

Drawing lakes over forests and mountains sheets with 2023 MonkeyFrog Overland style

Hi All,
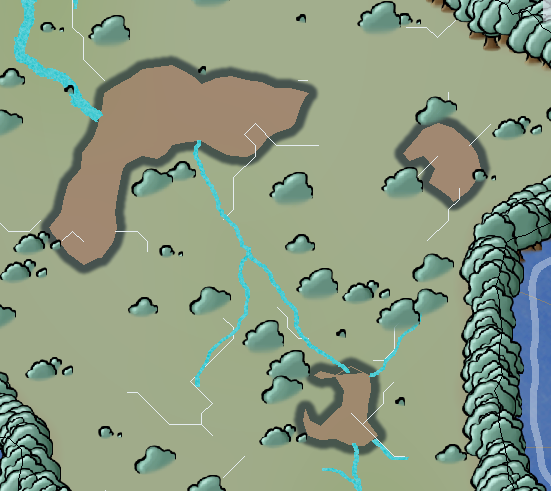
I have the MonkeyFrog Overland style, and I'm looking to draw lakes. I want to place them over forests and mountains, but they keep ending up underneath. To account for this, I created a new sheet, lakes, and attempted to draw them on there, but below
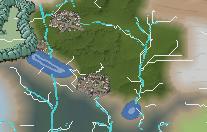
This is in contrast to other lakes on the same map, which look like the following
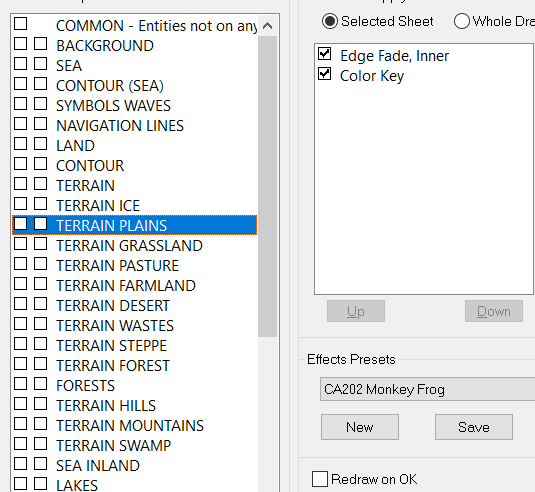
In order to get the result shown in the first picture, I copied the effects from the sea sheet, and copied the color key from land into all sheets below the lakes sheet, Sheet arrangement shown below
Does anyone have any idea what I need to do to get these lakes displaying properly?
Comments
Click on the sheet. then use move down.
I have. As you can see the draw order is now correct, but what's being drawn isn't the same as the default lakes, despite replicating the effects
Maybe hide SHEETS one by one, or use EXTRACT PROPERTIES tool to see if they were maybe drawn onto another sheet by accident.
Lakes works through a color key on the land sheet. If you want to create a lake on its own sheet, then you need to create a lake tool that uses the water fill and then have that new lake tool draw on a sheet.
Additionally, you need to decide if you want it just over terrain or if you want it over symbols. If it is just the terrain, then the river/lake can be above the symbols, but if you want it to cover up trees and mountains, then it needs to be below.
So I've created a lakes tool with these settings, and copied the sheet effects from the land sheets, and the effect is identical to the screenshots in my first post, I'm afraid.
The other key element is the Color Key effect MUST be at the top of the effects list for that Sheet, or it doesn't work.
That is not going to work for something like a color key which is designed to cut through the land sheet to expose the bottom layer. An empty layer with a color key is not going to be able to cut anything.
As I previously wrote, you need to create a fill for the lake. Right click on the river tool. You will see a River, Blue. That is something that has a fill. You need to take that fill (or another) and create a Lake, Blue tool. That can be placed on top of the items.
As written in the original post, I have the color key on every sheet below lakes as well. I'm cutting through to land, not to one deeper than land like I need to be. I've created a fill for the lakes, same effect; what you see in the original post IS that custom drawing tool.
The lakes are drawn on the correct sheets. I've copied the effects over, I'm getting different results when drawn on the land sheet than the lakes sheet.
It's interesting that you say this. I tried moving all my keys up in the list, and that didn't seem to change anything; but I'd be curious to know more about how the color key function works in this software, and how effects ordering changes things, do you have a source where I can learn more?
So if I’m following correctly, you’ve added the Color Key effect to every sheet between the water and your magenta polygon? The other thing you need to do is copy the magenta polygon to all of those sheets as well. The easiest way I’ve found to do that is to hide all of the sheets except the ones that should have the polygon and then use the menu option to Copy to All Visible Sheets.
Please can you attach a copy of the FCW file? We won't have your new drawing tool, but we will be able to see what effects are where and maybe why it's not working as you expect.
Thanks for looking into this, I appreciate it!
I've had my eye on many other things as well as this one, so I'm not as up to date with the thread as some of the others are. It's possible that someone else might solve it first now that we have the FCW to look at ;)
So, it looks like your lake is drawn on the LAKES sheet, but you want it to cut all the way down to the sea?
You have a couple of choices.
Option 1: Don't have your lake cut down to the sea. Instead, change it to a blue color, or the same fill as the sea, and let it sit on top of the other terrain.
Option 2: If you want it to cut through, you will need to:
If you want to copy it to all of the intervening terrain sheets, the easiest way is to hide all sheets, then unhide the LAKES sheet and everything between it and the SEA, and then use the Copy to All Visible Sheets option (found by right-clicking on the Copy icon) to simultaneously copy it on all of those terrain sheets.
Please let me know if this is unclear, and I can try to do more screencaptures.
One other thing to note: the cutout will cut through terrain, but it won't cut through symbols like the tree symbols that surround your forest.
Option 1 results in the following
Option 2 (with edge banding disabled)
gives me this
Noticably, the brown color in this one is being drawn from the lakes sheet, as I hid every other sheet in the drawing to discover
Found the issue, there was an additional glow adding to that color. All is now working, thanks everybody
As a sidenote, should anyone be attempting something similar, the "Cut through all the layers" approach was the only one that worked with the effects thoroughly.