

WIP: New Dungeon Commission
 jmabbott
🖼️ 39 images Mapmaker
jmabbott
🖼️ 39 images Mapmaker
Hi Folks,
It's been awhile. Here is a WIP of the 1st level of a 4 level dungeon.
Due to the quality of the scan I can't get the grids to line up properly after scaling the import, but it's good enough. Due to the irregular shapes, I decided to use a drawing tool to do the floors first, then I can go and trace the walls, copy the floor to the Wall Mask sheet and change the fill etc...Then add the symbols. This seems to be a reasonably efficient workflow. I'm about 2/3rds done with the floor. Over on the left will primarily use a fractal tool...


Comments
A good start. Too many square/rectangular rooms in dungeons out there.
Hi Ya Folks,
Working on multiple projects at the moment; this mapping commission, a TTRPG game using Chaosium's, Basic Roleplaying Universal Game Engine - a long title but this is the current ORC version (for those of you aware of such things) - got the layout more or less sorted in Affinity Publisher now and it's looking pretty good, as well as playing twice a week. Of course, I also have to try and fit in some work and family time... just not enough hours...
Anyhow here is an update. The major part of the walls are done, only the left hand side to do but that's mostly fractal, the walls for secret passages/rooms and of course the wall masks (with secret rooms going on the GM layer of course) including the ones I missed bottom right.
Hi Y'all,
Here is another update. Due to my CC3+ installation being on my work PC, I'm connecting via my home Mac running MS Remote Desktop and tonight, the lag for some reason is just not conducive to being productive...
Anyhow, fixed a couple of things which requires other bits to be re-done but overall I'm happy with the progress so far.
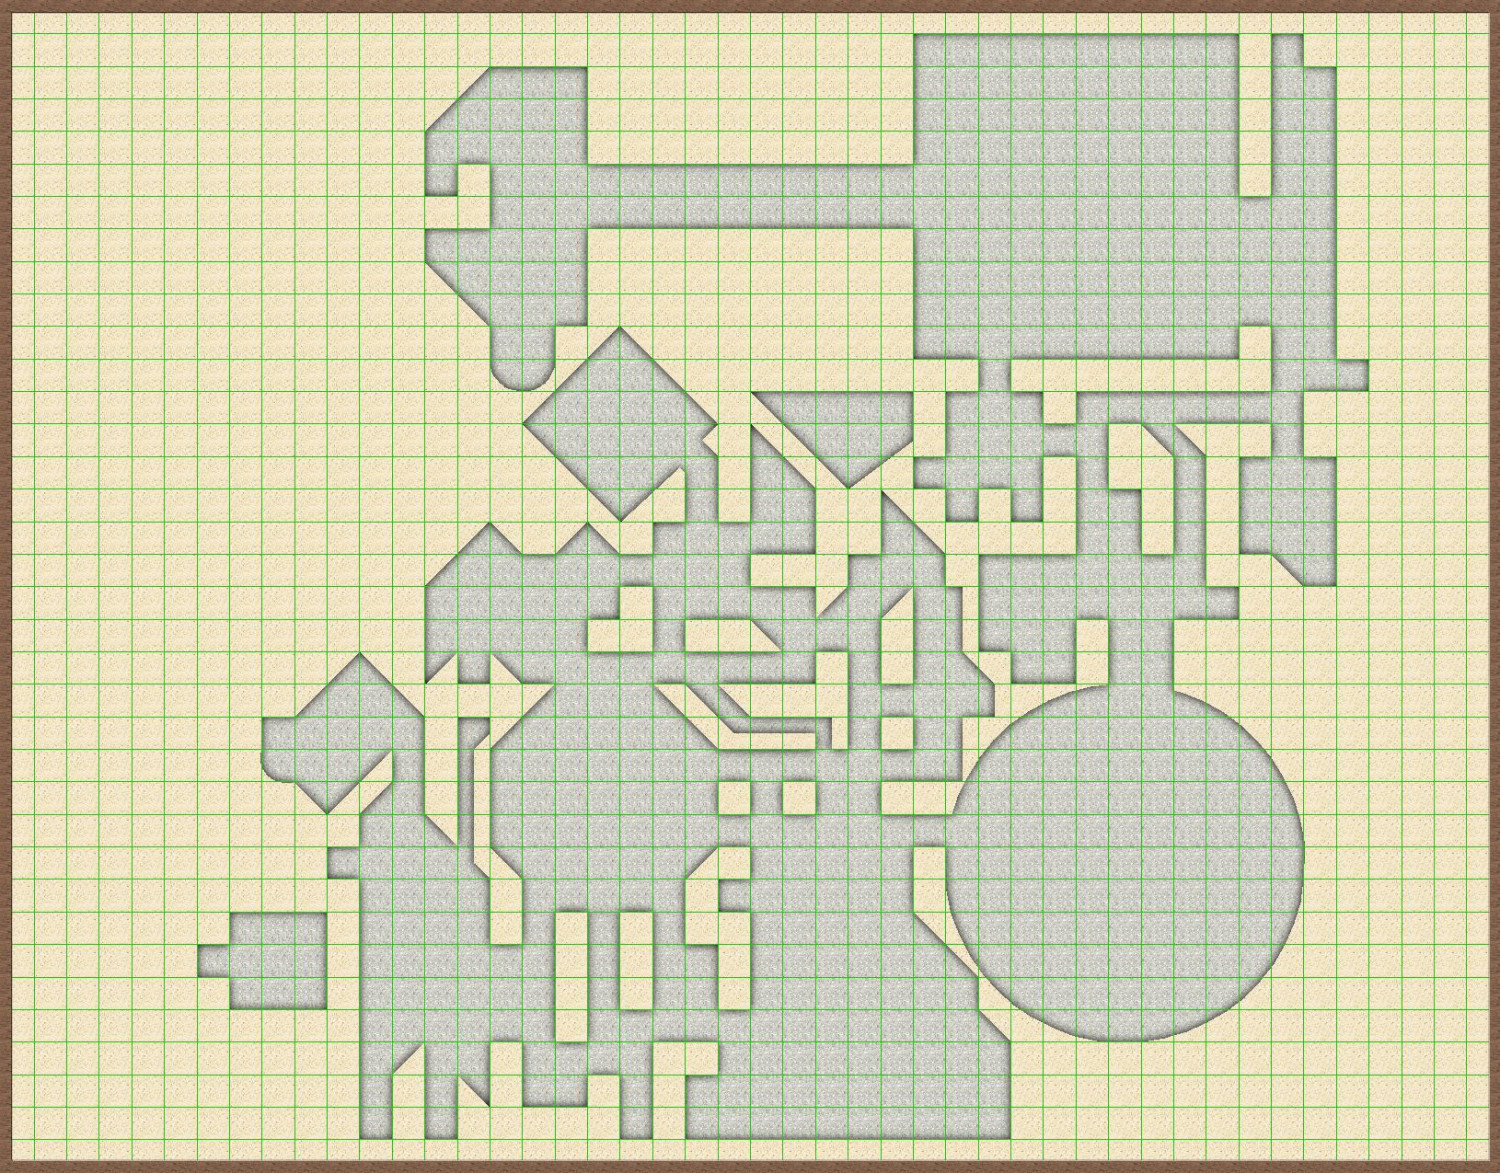
Hi Ya Folks,
Here is the current GM map showing the full dungeon. I believe I've created it in accordance with the provided shetch, i.e. got all the rooms & secret doors correct. This creates a problem however. On the player map, the bottom right side is completely blank and the central 3 sections are isolated, there is no way for the players to navigate between them without finding a secret door or two...so why should they be visible...
I've sent a copy of both to the client for advice...
The next level, while still a bit labyrinthine is soo much easier, basically all rooms are square or rectangular with the odd curved or triangular alcove - easy-peasy!
Hi Folks,
Here is a quick look at the last level...GM and player versions.
What has been others experience with accuracy scaling PDFs? All of these maps I get close but it's off enough so that a small area lines up with the grid almost perfectly, making tracing very easy and then it gradually turns to cow dung, and I have to do the best I can. This map was a nightmare...
Note: This is just the structure, I have to confirm floors and other objects...
Looking good so far, I like it when dungeons have oddly shaped rooms and zig-zaggy corridors and it's not just rectangular rooms and corridors with 90 degree angles. Much more interesting to look at and explore.
Copying maps from PDFs or image files is indeed a bit of a hassle. What I do is open the image with image editing software (I use GIMP but you can do this in Photoshop as well) and align it as best I can to a grid. This is the most finicky part and requires some scaling and rotating. Once I have it aligned I enable 'snap to grid' and crop the image to remove margins. Starting a new CC3 file I set the dimensions and grid to match the edited image and insert it on a separate layer and sheet. It doesn't always match perfectly but in that case I simply eyeball it, as long as it roughly matches it's good enough
Thanks Steven. Re this set of maps, you wouldn't want to fail too many Perception/Detect Traps rolls, they're insanely deadly...
I just scale in CC3+, for the next commission I'll try what you suggest in Affinity Photo and see if it makes a difference - I'm going to say where things go awry is in the scanning process - if they're not scanned perfectly straight and flat there will be issues - oh well the, hassles of being a cartographer for hire...😉
Hi Folks,
Day-to-day life has halted progress on this commission but detail work has finally begun!
Here is my latets WIP.
Note: The design is not mine, I'm just converting a hand-drawn map into CC3+ and trying to interpret the numerous notes as best I can. Just saying...
I misread that the first time and thought you said 'humerous notes'...
But anyway! It looks like it's coming on well, regardless :)
Thanks @Loopysue!
Trying to work out how to create jade marble floors, various coloured sands etc has been interesting. I'm using the colorize effect, I have a feeling the RGB matrix would probably work better and retain more of the textures (stone and sand) - but my brain refuses to comprehend that tool! To me it's a bit like non-Euclidean geometry...
Hi Jim,
Your map is looking awesome.
Sometimes I use the RGB matrix Jim, but more often I create a mask, and I do it like this:
Create a new sheet above the area to colour - usually above the floor sheet. Call it whatever you like.
Add sheet effect - Transparency - to the new sheet.
Draw a new floor/cave area on the new sheet that covers the area you want to colour, then use the change properties tool to change that new floor/cave to the colour you want.
Edit the Transparency effect to the Opacity you want.
Here's one I'm working on atm. It's the Shrine of the Kuo-toa, from the classic 1st ed module. This is without effects on.
This is with effects on.
This is the area with the sheets showing. I've just covered the normal flagstone flooring with a green mask. I called it Serpentine floor.
now with the effect on
This is at 50% Opacity
I'm sorry if I'm teaching you to suck eggs Jim, but if you haven't thought of doing this, I hope it helps.
Dak.
Hi Dak,
That was my original idea also and, to be honest, is much simpler and requires fewer sheets… I may redo this, using this method as 99.9% of the different coloured floors do not overlap…
After a far too long hiatus; Christmas holidays and technical issues with the remote connection to my work PC (as well as substanial laziness on my part), have all contributed to the delays. I gave myself a firm slap on the back of the head and told myself to bloody well get on with it!
Anywho, here is a long overdue update...
The color really helps this map.
beautiful
@JulianDracos It certainly does! Without, it would be very monotonous.
@Ricko Hasche Coming from you, that is high praise indeed! Thank you.
Another little update for this one, nearing completion - just a couple of little errors to fix where I missed some 'ragged' walls and I'm calling this one finished - 3 more to go. Thankfully, they're not quite as intricate as this one.
For the room numbering I used the cartouches from CA25 Fantasy Cities, I think these are easier to read than just numbers with a glow on this map.
1 square = 5 feet?
Hi Ricko, 10ft.
A great construction without a doubt... there must be gold inside. 🤣
Good luck getting it though! Between the traps and guardians, you can expect a high casualty rate!
What do the “M” and “F” symbols represent…or is that a secret?
Well, as this is the GM version, there are no secrets as such; Mist & Fog, the P is Poison.
Hi All,
I had a question from a forum user regarding this map. So rather than just answer one person I thought I'd post the answer to help others out, particulary as we have a lot of new members. Hopefully this will be useful.
The question was in 2 parts; part 1 was how do I create the cave lines/walls and part 2 was how do I mask the outside areas of the map.
For the cave lines/walls, if the style doesn't already have a fractal wall drawing tool I create one. Right click on the Wall drawing tool icon, then in the pop-up scroll down to the Wall type you want the fractal one to be based on, click New and type a name. I usually just add Fractal to the end, click OK. Go to the Drawing Method, select Fractal, then go to the Options tab and play with the settings until the preview looks like what you want, save it - most important! Start drawing your cave walls. To connect them to a regular wall use the various modifiers; End Point, On, etc, (bottom of the CAD toolbar on the right). Alternatively, you can access these from the Tools tab on the menu bar from the Snap sub-menu.
The masking is simple but can be time consuming, depending on the complexity of your map. First, on your Walls Mask sheet, add a Colour Key Effect keeping it to the standard colour #6. Then, using the same method as above, create a Wall Mask drawing tool with a solid fill style and colour # 6, call it Colour Key Mask. Use the default Wall Mask drawing tool to completely cover your map (you can always change the fill styles later if it doesn't match your walls, that's the beauty and one of the more powerful features of CC3+ IMO). Move your Wall Mask sheet above your Walls sheet (in sheet order) so the walls are now on top of your Mask. Select the Colour Key Mask tool you created, type a T for trace, select a piece of wall and trace your player visble floor areas, right click when you're finished. Switch the layer to GM only and repeat the process with the remaining areas.
Job done!
EDIT: I forgot to mention when you’ve finished colour keying your Wall Mask, move it back under your Walls sheet in the Sheet order list so now your Mask is back on top of the walls.
Hi All,
On the second map of this commission there is a rainbow coloured, ice-cold, crystal in one of the rooms. I'm trying to draw this but I've reached a bit of an impasse and I'm not quite sure how to proceed.
Firstly I drew construction lines (now black) on the JPEG sheet and layer, the on the Symbols Flat sheet, Symbol layer I drew a line in colour 7. I then used the Copy/Circular Array to create 112 lines, which I then re-coloured. I then re-drew the construction lines in black making the outer a path - thinking I could trace this with a colour key to get the general shape but then I realised this won't work as I want to lower the transperancy of the colours and blur the edges just a bit and then highlight the segments to give a sense of depth etc.
This is what I've got so far (took me a while to get to this point):
Triming the lines to the outer edge is not working as I would expect.
Any suggestions? I've attached the .FCW file.
I'm confused as to why a color key won't work. First do color key to knock out the parts you don't want, then blur, then transparency. You do have to pick a color for the color key that's not in your color wheel.
Or maybe I'm not understanding what you're trying to achieve here?
I added a magenta mask polygon on your SYMBOLS FLAT layer to pick up the existing Color Key effect and got this result (left image is with the mask polygon with effects off and right image is with effects on).
Thanks Joe,
I did that as my first option (and colour 6 works as it’s not part of the palette of the ‘rainbow’. I guess what I should have asked is how do I ‘blend’, i.e. soften, the edges of each colour line when they’re all on the same sheet? Will blur do that?
I added a blur in the middle of the SYMBOLS FLAT stack and got this result:
It blends your colors and also your edges. If you want sharp outlines, you'd need to put those on a different sheet. It's not possible to blur the interior colors and then do a color key to get sharp edges because the color key color will bleed into the surrounding areas. You will probably also notice a dark halo around the edges of the result because of alpha compositing errors in the software.
If your plan is to make this a symbol, you will likely run across the problem of symbols not responding well to effects unless DELAYDRAWSYM is active, which will mess with dungeon lighting and some other things.