Edge Fade "hole" issue

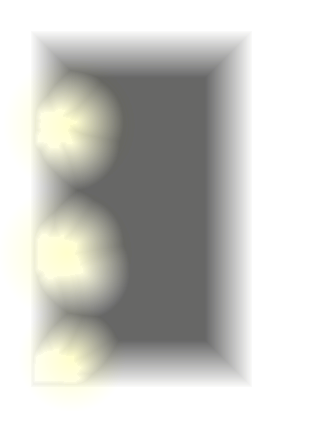
So i wanted to wait until the Update/Toolbar issues had quieted down so as to not overwhelm the PF team with a "cosmetic" issue. I know this has been addressed in the past, but I was wondering if fix has been discovered by anyone. So, when using the Edge Fade, a "hole" artifact appears within the polygon. This happens most often when there are multiple sheets on map with multiple effects in place, as you can see below. AND, if you notice I have been getting this "line" in the Edge Fade as well. I've never noticed it before, but when using it as a shadow in a room it becomes quite obvious in my png image. Any ideas???? The images below....the Edge Fade with all sheets hidden, then all sheets showing give me artifact. The two tables are an example of how the edge fade works with very few sheets and effects on it without a problem, with the exception of the "line".
«1

Comments

  • LoopysueLoopysue ProFantasy 🖼️ 39 images Cartographer
    edited July 2016
    I couldn't work out what was wrong when I tried the same thing and got the same results, but it might be useful if I let people know that I'm not convinced that this is specifically the edge fade at fault. I think its more of a moire pattern of some kind - an interference pattern between different kinds of transparency, of which edge fade is just one type.

    ...but that is just my opinion :)
  • edited July 2016
    Can you hide your sheets one by one to determine which sheet is causing this?
    Is it just that sheet or that sheet combined with one(s) above/below it?
    What objects are on that sheet?
    What effects are on that sheet?

    From your above images it looks like you only have the mask, the light symbols, and the floor causing this. What effects are on those sheets?
    Have you done as I've suggested in the other thread and changed the mask from black to the darkest grey or to a Solid 90 bitmap? Did that have any effect?
  • jslaytonjslayton Moderator, ProFantasy Mapmaker
    The Effects system determines what is on a sheet by remembering the currently-accumulated image buffer (what the display looks like before drawing the sheet), drawing the contents of the sheet, and then comparing the before and after images. Any pixels that are identical between the before and after are assumed to be transparent. The problem usually arises when a texture and/or previous combination of effects happens to generate a pixel that's exactly the same color as the last pixel drawn in that spot. You then get a single-pixel hole (or possibly blocks or lines of holes) in the image. The inappropriate transparency then gets amplified by effects that measure distance from edges, like the edge fade filter, making those bulbous holes.

    You may be saying "but I draw things exactly the same color all of the time and everything works just fine." The effects system tries to fiddle with the image imperceptibly at every sheet rendering to keep these sorts of things from happening and it works fairly well for a lot of cases. However, for stacked effects, you get just enough change in places to counteract the imperceptible fiddling that the effects system tried to do and you get what looks suspiciously like transparency acne.

    One solution for opaque elements is to put an interposing sheet between the two problem ones and draw an entity of a known-different color on that sheet. Then it won't be possible to accidentally get spots of the same color. However (there's always a however with these things), this technique doesn't work well with entities that have their own built-in transparency like PNG symbols because the intermediate drawing items will show through into the visible stack.

    Modifying the code to try to fix these problems requires a significant rewrite in the implementation of the effects subsystem. The easy way would substantially slow down effects rendering across the board and only work most of the time; the best way is a huge undertaking that would dip its appendages into code all over the system and likely to generate a whole suite of new bugs.
  • LoopysueLoopysue ProFantasy 🖼️ 39 images Cartographer
    So we're kind of stuck with it for now - is that right?

    btw, I just LOVE your new name for it "transparency acne" LOL
  • jslaytonjslayton Moderator, ProFantasy Mapmaker
    "Acne" is a technical term in computer graphics for undesirable and visually-disturbing point-sized artifacts of the rendering process. And we are probably stuck with it for now unless putting things on an interposing sheet will work for you.
  • Posted By: LoopysueSo we're kind of stuck with it for now - is that right?
    It looks that way. So the obvious solution is to find a workaround and that will likely be on a map by map basis.

    Which leads back to the series of questions I asked a few posts back. ;)
  • edited July 2016
    Posted By: ShessarCan you hide your sheets one by one to determine which sheet is causing this?
    Is it just that sheet or that sheet combined with one(s) above/below it?
    What objects are on that sheet?
    What effects are on that sheet?

    From your above images it looks like you only have the mask, the light symbols, and the floor causing this. What effects are on those sheets?
    Have you done as I've suggested in the other thread and changed the mask from black to the darkest grey or to a Solid 90 bitmap? Did that have any effect?
    Yes, i've tried hiding sheets to figure out the cause, but unfortunately there was not one particular sheet.
    It is when the Edge Fade sheet is combined with others, alone it appears fine as seen in the above pic with the candle glow in the background
    Nothing is on the sheet other than the Edge fade poly for the shadowy effect
    The only effects on the sheet are Edge Fade.

    And yes, i changed back to the solid fill. I remember that is used the black color sheet to try to eliminate the "acne", as i thought it was THAT fill style causing it. Obviously it didn't matter what fill style.


    I have in the past used a "liner" sheet between sheets when using a Bevel because of the artifact that appears with two similar colored sheets, but in this case, the sheet in question is to represent a darkened shadowy room, so a liner wouldn't work as i need the sheet to be transparent, as well (using the inner opacity function in edge fade for that effect - an yes i tried it with a 100% all the way down to near 0% with the same results)

    Shame, i really liked this technique but my maps tend to have a LOT of sheet with a LOT of effects and that's what seems to really be the cause of the acne in my case.
  • jslaytonjslayton Moderator, ProFantasy Mapmaker
    The traditional way to do the soft-edged shadowy stuff is to use a black element with a transparency effect and then an alpha blur on that. Where edge fade gives you hard edges based on the distance from the edge of the items and it will keep the interior detail, the blur technique will smooth over the edges and details as though viewed through an out-of-focus camera. It will also smooth out the acne instead of adding to the focus. I should probably implement some simplistic morphological filters for CC3 that will close or open tiny details like those. Something like https://www.cartographersguild.com/attachment.php?attachmentid=70263 only to work on the intermediate sheet results to allow for possible cleaning. As the medical establishment likes to say, offering treatment for the symptoms is far more profitable than curing the disease (or something like that).
  • LoopysueLoopysue ProFantasy 🖼️ 39 images Cartographer
    I'm going to try and interpret that a bit for myself out loud, because I'm not really understanding you.

    So, if I were to try and replicate the lit room above I would make the whole room as light as where the candles are, and then draw a shape that was the shadow of the room, and the fill for that darkness would be black solid? Then would I add a transparency effect and an edge blur to turn the shadow shape I've just drawn into amore realistic shadow, and then add a blur on top of the transparency and edge fade once I was satisfied I'd got the transparency and edge fade right?
  • edited July 2016
    The above technique i used is an interpretation of a technique of Shessar's as seen in this thread, Sue. I honestly couldn' t explain it very well, but if you want to know what i did, with the exception of the fill which is currently black color rather than Solid 70 fill (which i also tried) check out this thread - at the bottom

    ShessarsThread
  • edited July 2016
    Posted By: jslaytonThe traditional way to do the soft-edged shadowy stuff is to use a black element with a transparency effect and then an alpha blur on that. Where edge fade gives you hard edges based on the distance from the edge of the items and it will keep the interior detail, the blur technique will smooth over the edges and details as though viewed through an out-of-focus camera. It will also smooth out the acne instead of adding to the focus. I should probably implement some simplistic morphological filters for CC3 that will close or open tiny details like those. Something like https://www.cartographersguild.com/attachment.php?attachmentid=70263 only to work on the intermediate sheet results to allow for possible cleaning. As the medical establishment likes to say, offering treatment for the symptoms is far more profitable than curing the disease (or something like that).
    Would the above technique allow me to create the candlelight glow cut-outs in my multipoly like in Shessar's thread? And i've never quite figured out the Alpha Blur....something to play around with. Oh, and i think it's the pharmaceutical establishment that likes to say that. Most of us in the medical establishment really do prefer to make people well :)
  • Posted By: Lorelei
    Yes, i've tried hiding sheets to figure out the cause, but unfortunately there was not one particular sheet.
    It is when the Edge Fade sheet is combined with others, alone it appears fine as seen in the above pic with the candle glow in the background
    Nothing is on the sheet other than the Edge fade poly for the shadowy effect
    The only effects on the sheet are Edge Fade.

    And yes, i changed back to the solid fill. I remember that is used the black color sheet to try to eliminate the "acne", as i thought it was THAT fill style causing it. Obviously it didn't matter what fill style.


    I have in the past used a "liner" sheet between sheets when using a Bevel because of the artifact that appears with two similar colored sheets, but in this case, the sheet in question is to represent a darkened shadowy room, so a liner wouldn't work as i need the sheet to be transparent, as well (using the inner opacity function in edge fade for that effect - an yes i tried it with a 100% all the way down to near 0% with the same results)

    Shame, i really liked this technique but my maps tend to have a LOT of sheet with a LOT of effects and that's what seems to really be the cause of the acne in my case.
    Too bad. I was really hoping that we could figure out a workaround for this. I like the official DD3 lights setup, but this method gave a bit more control on where light and shadow fell for dim lights that wouldn't cast strong shadows or for outdoor sun/cloud shadow effects. I probably haven't had a problem because I tend to only use a handful of effects on a map but what good is a technique if it doesn't work for everyone.

    And just for the record, though I know I've expressed it before, I don't care for blur effects, though the alpha blur isn't bad in some uses. I pay a lot of money for my glasses to bring the world into focus. Why in the world would I want to do something that puts part of it back out of focus? LOL
  • jslaytonjslayton Moderator, ProFantasy Mapmaker
    edited July 2016
    Try this:

    Make a sheet
    Draw black areas on that sheet for dark shadows.
    Draw intermediate grays for intermediate shadows
    Draw white areas for not-shadows (punchout on shadows).
    Add a blur effect of the desired size. Alpha blur can be used, but it really isn't required.
    Add a blend mode effect of multiply with 50% (or whatever percent you want your darkest shadows to be).
    Profit!
  • LoopysueLoopysue ProFantasy 🖼️ 39 images Cartographer
    What's the blend mode, Joe?
  • jslaytonjslayton Moderator, ProFantasy Mapmaker
    edited July 2016
    Posted By: LoopysueWhat's the blend mode, Joe?
    The middle part shows the sheets setup on the left and the effects setup on the right. I didn't do intermediate shadows in this example, just black and white.
    I updated the text after the intial posting to help clear things up.
    This sort of thing is the purpose for which the blend mode filter was created.

    As a point of interest, this example is what the directional lighting filter does internally. It makes a white image emanating from the lights with blockers leaving dark spaces. Then there's a blur and a blend of that black and white image onto the regular image.

    I may have misinterpreted your question. What does the blend mode effect do? It takes the result of the current sheet drawing and effects and applies it to the rest of the drawing with the specified transparency. In this case, it is a multiply operation of the form result=transparency(sheet*previous_result) for each pixel. This effect is similar to the Photoshop layer operations.
  • LoopysueLoopysue ProFantasy 🖼️ 39 images Cartographer
    Oh yes, sorry! I'm a bit blind this evening. Been at the desk for about 18 hours already :)

    Multiply it is then. Thanks :P
  • Uhm.... translation for those of us that don't speak tech?
  • You know that little quiver that you get in the creative part of your brain when it has just been shown something that opens countless doors of possibility?

    Joe, this is brilliant!
  • I would, if I understood anything g he just said! Lol
  • jslaytonjslayton Moderator, ProFantasy Mapmaker
    The idea here is that you want shadows with holes. In this case "shadow" means a dark area and "hole" means a light area. I draw a black and white set of splotches to represent the dark and light areas, respective. Because I wanted shadows with soft edges, I added a blur, which will give an image that goes from white at the bright spots, black at the shadows, and smoothly fade between them due to the blur.

    The overall effects system works by starting with a blank drawing surface and then draws each sheet in turn, blending each new sheet onto the result of all the previous sheets according to the transparency value of each pixel in the new sheet. Like a sheet of clear plastic with markings on it stacked on top of the previous sheets. Mathematically, adding the new sheet on top of the old ones performs the following mathematic operation for every pixel in the image:

    newResultRgb = (newSheetRgb * newSheetOpacity) + (oldResultRgb * (1 - newSheetOpacity))

    where newSheetOpacity is the opacity at each pixel and that value varies from 0 (fully transparent) to 1 (fully opaque). In computer graphics, opacity is called "alpha" for historical reasons. The operation shown above is known as "alpha blending" because it blends two images according to the value of the opacity, or alpha.

    The implicit operation for every sheet effect is to alpha blend the new sheet results on the existing image of all previous sheets. The blend mode effect, though, changes how the new sheet results are blended with the previous results. In addition to the basic alpha blending described above ("Normal" on the blend mode effects), the blend mode effect offers a long list of possible blending modes. One of those modes is multiply. Multiply is nice because it will multiply each pixel on the new sheet with the corresponding pixel on the result. If the new sheet is just shades of gray, the multiply blend mode effect causes pixels in the image to darken by the color of the new sheet's pixel:

    newResultRgb = (newSheetRgb * newSheetOpacity) + (newSheetRgb * oldResultRgb * (1 - newSheetOpacity))

    The blend mode filter also has a supplemental transparency that avoids the need for a separate Transparency effect.

    This sort of thing is how you had to do stuff way back in the depths of time when pretty much all you had was channel copy, blur, blend, and a couple of other primitives at your disposal.
  • Okay, that actually.makes sense. Hey, I wonder....would this also work if you wanted to create ocean depths? Like an underwater city?
  • LoopysueLoopysue ProFantasy 🖼️ 39 images Cartographer
    edited July 2016
    You see? I just can't match that kind of application brilliance Storm! LOL :) All I can do is modify your genius with a few suggested details.

    It would work brilliantly for that kind of thing, and I suppose you could use a dark blue or green instead of a black layer, so that deeper things would look like they were really in water, and not in some hole in the ground... and then you could add a topmost layer with a very faint and extremely transparent suggestion of wave shapes... and then... the edge of a boat at the bottom of the picture like you were looking down into the water from sitting in a boat... OR you could make the frame solid water surface with a wooden inner rim - like using one of those window things or a glass bottomed boat to view the hidden city beneath the waves...

    Now I'm just getting carried away! But that's what you do to me - one kick and I'm all the way off on a tangent! LOL.

    Would I be right about thinking we might just have an underwater city coming from you soon?
  • LoopysueLoopysue ProFantasy 🖼️ 39 images Cartographer
    I wouldn't know if this is explained in the Tome, but maybe to prevent any future confusion for those who come after us (and who like me don't have the Tome), it might be a good idea to update the basic user manual to describe the use of the Blend Mode effect more thoroughly, so we don't have to go through all of this all over again at some point in the future?

    Just an idea :)
  • Thanks Joe, this seems to be a good fix~ i"ll test it out on another map...i think my floors are too dark in the Mellalune Inn map and makes it harder to appreciate the "shadows"
  • LoopysueLoopysue ProFantasy 🖼️ 39 images Cartographer
    edited July 2016
    Yes. Thanks Joe. I meant to say that too, but I got flipped over by Storm's imagination (again) :)
  • lol... I've been wanting to do something underwater for a while... I REALLY want to do an underwater coral reef... but of course, I would need an underwater symbol set... complete with multi colored coral, underwater plants of all sorts.. and sea shells and stuff. I will have to see what I can find... and then get back to you :)
  • LoopysueLoopysue ProFantasy 🖼️ 39 images Cartographer
    There's a fill in the CSUAC or Dundjinni collection that calls itself seashore vegetation (or something similar), but its actually sea anemones seen underwater. You can imagine my disappointment when I chose it to fill an area of salt marsh on the Merelan City map!
  • I will have to take a look at that... later. Right now, I have a new project I'm getting ready to start, in and around the rest, that needs more immediate attention! lol
  • jslaytonjslayton Moderator, ProFantasy Mapmaker
    edited July 2016
    An example with several shades of gray. The difference between the two images is just the blend mode. And yes, the JPEG compression is doing awful things to the images.
Sign In or Register to comment.