


Loopysue
Loopysue
About
- Username
- Loopysue
- Joined
- Visits
- 9,968
- Last Active
- Roles
- Member, ProFantasy
- Points
- 9,853
- Birthday
- June 29, 1966
- Location
- Dorset, England, UK
- Real Name
- Sue Daniel (aka 'Mouse')
- Rank
- Cartographer
- Badges
- 27
Latest Images


-
Cyberpunk: Proof of Concept
This is exactly the problem I had when deciding which way to go with Marine Dungeon.
In the end, because it is only one small issue in 12-13 of a Cartographer's Annual, I had to be firm in my thinking and select the most commonly requested themes. This may leave some mappers a little disappointed with the end result, but it is better to have a well defined theme and to do it well, than try to mix in all kinds of stuff and end up with a style that is too pick and mix to be useful to all that many mappers.

![[Deleted User]](https://secure.gravatar.com/avatar/c75d9a245b74d9c59be0999ea81ca541/?default=https%3A%2F%2Fvanillicon.com%2F92add7f8c954488718110edc4896ad39_200.png&rating=g&size=200)


-
Floating City
Ok. That is a pretty big city.
The floating bit will be easier to work on if you have a two tier system in your sheets. Basically, make all the same sheets again and name them the same apart from adding "TOP" or "2" to the end of the name to distinguish the new sheets. Don't duplicate things like frames, borders and ocean backgrounds. Then copy all the sheet effects over to the new sheets, and move all the stuff for the floating island onto the new set of sheets so that the floating island is entirely separated from the rest of the map. You might at that point have to give the floating island it's own 'land' background the exact same shape as the island itself. It will be this shape that will cast the shadow from the island onto the rest of the map below.
Once you have done that I recommend hiding the island sheets altogether and then working on the rest of the city until it is more or less finished, so that you don't subconsciously take roads around the island or place buildings to make space for it. When the island is shown again it should cut things in half - because it's not on the same level.

-
Treehouse ideas
You can align the fill.
It's a two stage process, but it doesn't take tat long, and only works on polygons, not lines.
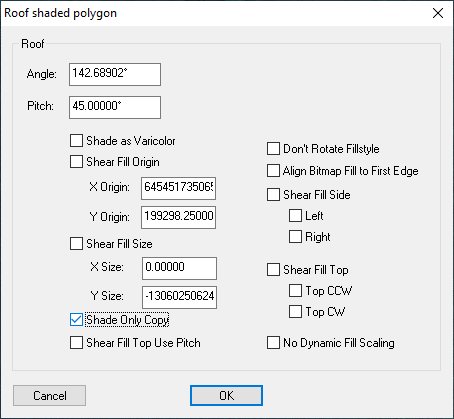
- Right click the Polygon tool on the right hand toolbar and pick "Shaded Polygon (Angle by Edge)", and use it to click the edge of the fill you want your boards to align with. This will rotate the fill accordingly, but it will also give it a pitch as if it is a roof.
- Type EDITSHADING and press enter, then pick the newly rotated part and check the checkbox called "Shade only copy". Then OK.

-
WIP - Cahokia symbol collection
You're welcome :)
One last thing! The drawing you do in Krita is only seamless if you use the wraparound screen view (W). Otherwise its just like drawing on an ordinary image.
-
[WIP] Cliff City B&W
It looks quite complicated.
If you aren't happy with it yet, consider working on one level at a time. Start with the base level and get that right first, and then move up a level and get that right.
Drop shadows are not ideal in this situation, since the shadow can end up detached from the cliff. It is better to use a fairly light shadow with a reasonable blur at each level of the cliff. Don't forget to cap each level with a white polygon to cover the inside, like putting the lid on that level, or the shadows will show inside the cliff as well as outside it.
