


Wyvern
Wyvern
About
- Username
- Wyvern
- Joined
- Visits
- 3,237
- Last Active
- Roles
- Member
- Points
- 5,515
- Rank
- Cartographer
- Badges
- 24
Latest Images


-
Community Atlas: Temple of Nidag, Stormwatch, Emerald Crown Forest, Alarius
First order of business on resuming the mapping was, of course, to shrink that northeastern pair of chambers:
Having also fitted it with the same grey flooring as the connecting areas though, I was having doubts about persisting with that, as it started to feel too much that it was segregating the whole northern segment from the rest, and wasn't really continuing the level-colour idea I'd begun with. So I changed it back to the green tiling, and once the rest of the northern area flooring was completed, that slight mismatch angle in the linking area didn't seem as noticeable (hopefully!):
I have made one concession to "reality" here, however, in giving what will be the lower kitchen, and upper kitchen's cellar, a cobbled floor, as hard-wearing and less fancy seemed much the order of the day for such a place.
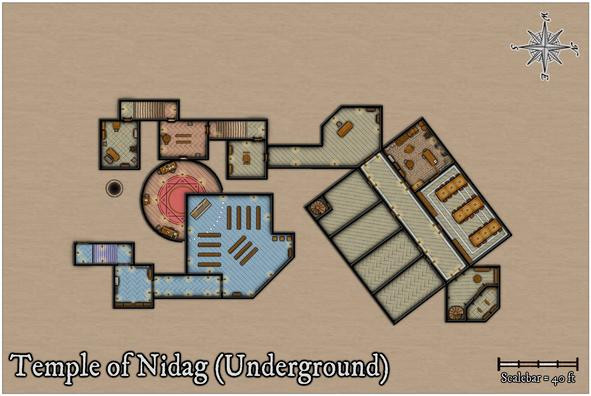
With the main structural elements complete at last, it was time to start adding the decorative ones, furnishings and the like:
One notable amendment here was adding glow symbols for all the wall torches, and candles in the great circular temple chamber. This makes them easier to identify, and provides some further indication of the difference between the two temples - fewer torches in the lower section. This happened almost by-chance, as I'd missed seeing the glows sooner, given they're at the end of the furniture collection, with the candles, rather than in the wall features catalogue, where the wall torches are. Needing to add candles to the lower temple meant I found them - eventually!
Pressing on into the northern segment, I wanted to add quite a few bits of scenery in the Kitchen/Kitchen Cellar particularly, which included a couple of stoves by the northwest wall, where an unseen flue would link to the surface chimney outlet, a couple more stove-lengths beyond the nearest wall (as a quick check with the otherwise hidden chimney bitmap sheet in the map indicated):
This also made me realise there needed to be a connection between this Kitchen and the adjoining large Dining Hall just to its northeast. I toyed with a serving-hatch notion before opting for a full double doorway - it's a big room, intended to have three tables in it from the Inkwell book-inspired notes, so easy access for staff and foodstuffs would be essential. This res likely won't show that doorway though.
Proceeding on, the Dining Hall was next, where I thought it would be interesting to add some extra floor decoration, and also in the long corridor. In the Inkwell descriptions, both are rather fancily-appointed, so I wanted to hint at that:
While all I did was add a few pale lines, using the blue water bitmap texture, as it looked quite like pale marble at a sufficiently high res (if not so clear in the narrowness of the final lines), that proved quite tricky, because of the off-axis angle of the whole northern segment. What I did was copy the floors, and realign those copies to the standard grid lines, so I could use the snap grid to draw the decorative lines to the right sizes. The final placement of the new lines had to be done by-eye though, any remaining misalignments of which were something the corridor torches and tables were intended to help disguise!
That turned out to be quite time-consuming, so the rest will have to wait for another day...


-
Experimenting with wooden stairs
Have you tried CA209 Stairs and Steps? That has some wooden steps and some more generic "brown" steps that will work as wood or stone. If you need some plank lines in places, just draw some on afterwards. Even some of the worn, brown stone steps will work as wood - again add a few plank lines if you wish to fool the eye a little more. Old wooden steps will wear away just as the stone ones do, after all, and might be patched with different colour wood scraps. You could also "carpet" them to hide that middle worn section.
Symbol Set 2, Bitmap A, has some complete wooden stairs, darker though not reddened wood, some of which come without arrows.
With DD3, you might try mixing things up with other wooden furniture - the bench, pew, the sideboard, chests, crates (which latter two both have paler wood colours), and the planks in the Debris catalogue (though those would probably only work with difficulty). You may need to hide the edges or sides with some of the furniture and containers, but they could give alternate options for landings, say, apart from steps.
It'd probably be worth hunting around in a few more catalogues as well, as you never know what else wooden might seem suitable!


-
Sword & Sorcery Cities
It's perhaps worth saying too that rooftops are rooftops, and haven't changed a tremendous amount over time, within a fairly limited range of forms (flat, sloping, domes/spires). In the basic City Designer 3 package you already have the option to draw your own rooftop (= house) shapes, using a variety of textures, so you can add exotic shaped pieces/materials to any ordinary roof to make them look weirder. If you'd prefer ready-made domes in a variety of colours and textures, try the bonus issue of the 2018 Cartographer's Annual, City Domes.
Don't forget too to explore the house symbols style options in CD3 anyway - Classic (loosely ancient Greek-Roman), Mideast, Thatch in the Bitmap A collection; Classic, Fantasy, Hovel and Thatch in the Bitmap B set; some of the Gothic items in both could provide some especially weird structures as well; many of the Vector symbols could be used in this regard too.

-
Add On File Size Question?
Only sometimes 😉?
When I tried checking the size of programs on my computer after reading this topic yesterday, I found that most of them have no file size given using the usual Win Settings options, so I'd assumed, also from the weirdly suspicious similarity in these CC3+ file sizes, that Windows can't actually tell the size of such things properly. Nice to have a proper explanation for that now though!

-
Community Atlas: Temple of Nidag, Stormwatch, Emerald Crown Forest, Alarius
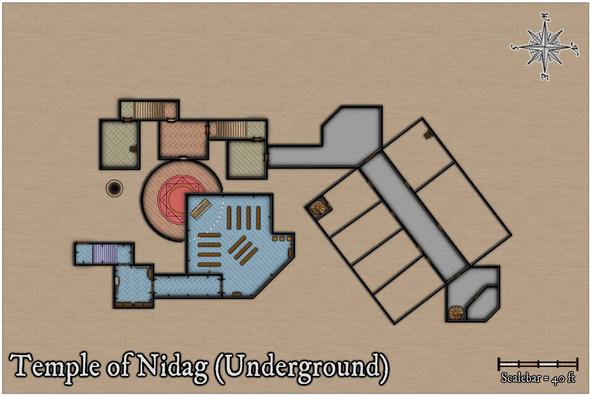
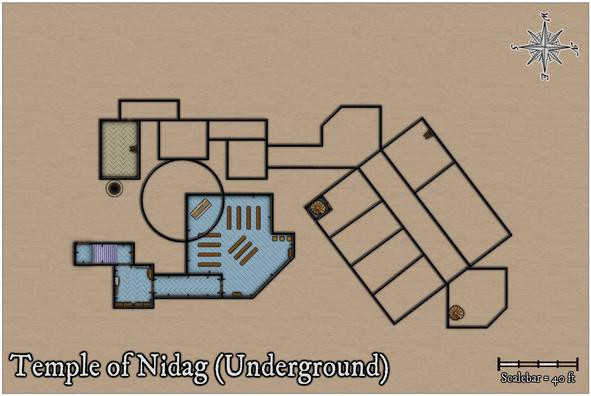
The starting-point for the subterranean map was to save a fresh copy of the surface map that still had the line drawing of the underground setting in it, and then delete everything that didn't relate to the access-points from the surface drawing. The overall map background was changed to a brown stone bitmap fill along the way, and, so I didn't forget what I was doing, or indeed forget to do it later, the map title was amended too:
Also left here is the well from Maleng Square, given the shaft below would naturally pass-by this below-ground level. The other well on the surface map, at Bennart Cross, is too far from this underground level to worry about adding it. The surface wall lines and floor textures were simply left as reminders of how the access-points were laid-out in the earlier maps, and were to be removed subsequently.
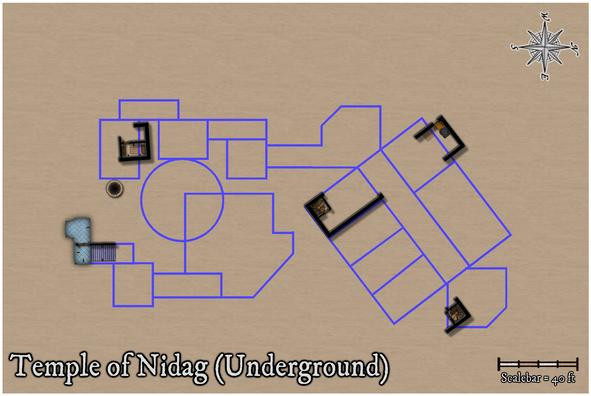
Next was filling-in the wall lines, with the first subterranean floor textures, around those access points, and disposing of the unneeded surface elements:
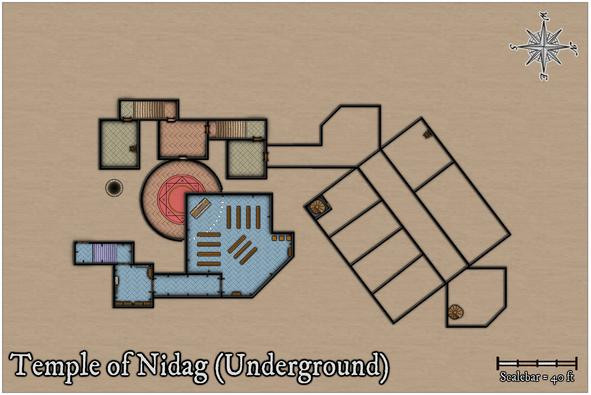
All the northern area's walls have been added, given there are three separate access-points into this part of the complex. The spiral stair in the rectangular room has been walled-off with its own door, and more doors have been added to the two southernmost access route areas, with some extra wall-torches for the temple stairwell.
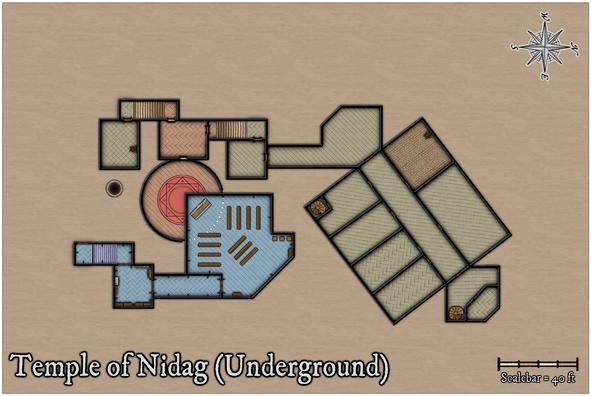
Effects on the wall lines were still the same as the surface ones at this point, hence the shadows. I hadn't been sure if these would still work satisfactorily, if with added wall masks, and this view convinced me they probably wouldn't, particularly with the outer glow on the floors as well, making the wall lines and shadows overall too dense. These were swiftly amended, and the rest of the upper part of the temple completed to give a better idea of how this would look:
I decided when preparing the surface map that blue was going to be the dominant colour for the pretend-good temple, and started to think at this point too that floor colourings might help enhance the different underground depths at which different parts of this level were intended to be. The blue area here also has no direct connection with any of the rest, except for the unseen drop-shaft below the altar. While said altar isn't as symmetrically-placed with respect to the deeper circular chamber any more, I'd rather taken to the idea that there would be imperfections in the overall designs involved, hinting that perhaps all was not well. Thus some of the upper wall-lines aren't quite true in the surface buildings - many were drawn purely by-eye deliberately for that. Aside from the fact this is a rather rough-and-ready part of the surface town, built outside the walls.
As ideas coalesced around this facet, my explanation for the complexity of the subterranean parts was that they'd been dug-out, or were created using existing surface hollows and hummocks, as the area was being developed by individuals and teams, the original temple group doing much of their own work, in digging out "cellars" for their surface properties, if oddly deep ones in places (obviously, trying to find an alternative well 😉).
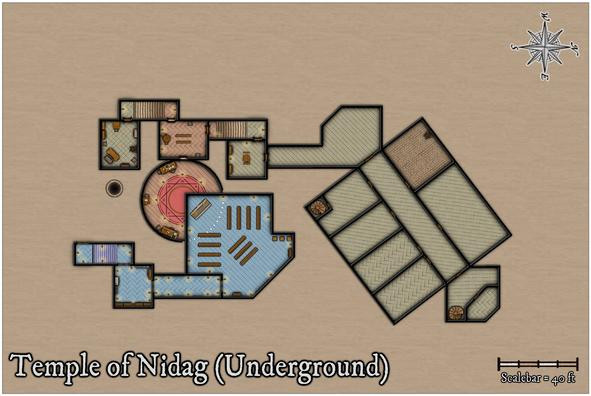
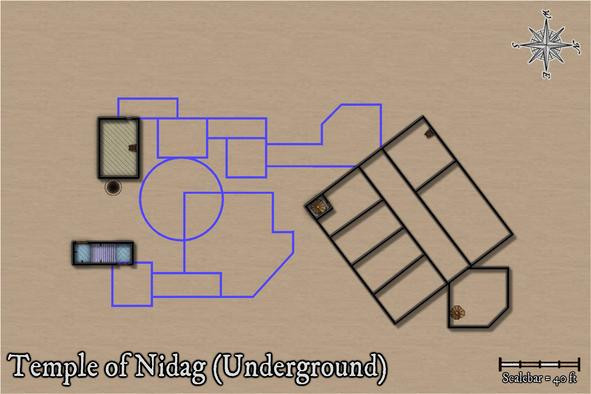
Moving ahead, the final wall-line conversions were carried out:
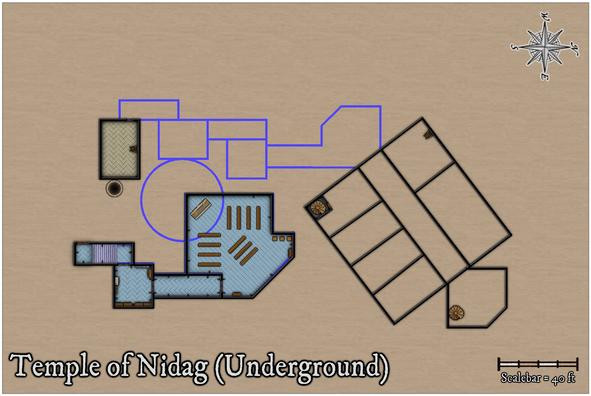
Followed by a more protracted spell of adding floor textures, staircases and doors to the western, in parts deepest, segment:
Apart from the new additions, after toying with the idea of a separate well-shaft access-point, ultimately, I decided to shrink the room nearest it instead, given the shaft had probably been sunk some while before the "cellar construction" had begun hereabouts. The segment of wall for the circular chamber below the upper temple has been changed to indicate that now, and the idea of using different floor textures to help show different vertical levels was continued in this area.
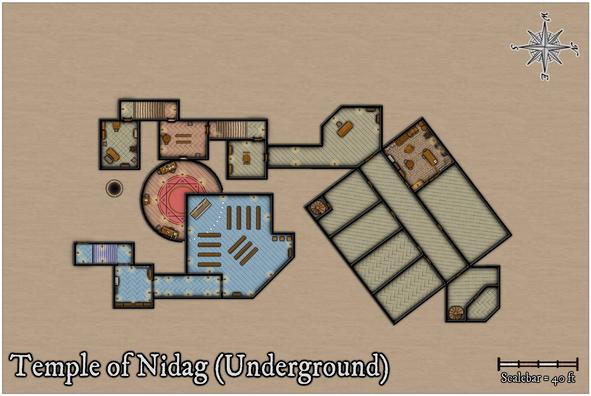
Progressing with this ran into problems for the final section, however, as adding one of the diagonal-tile bitmap fills to the connecting passage-room north of this freshly-completed part showed the northeastern wall-angle for the diagonal link into the large rectangular area was off. While something I already sort-of knew, it was one of those things easily forgotten until reality strikes! So currently, I've gone with something rather plainer in texture for the passageways only:
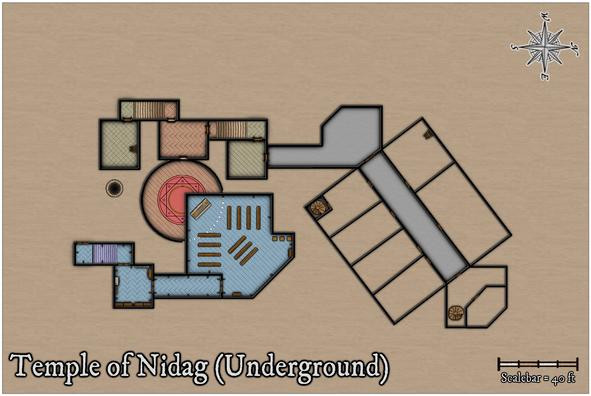
A few more adjustments have been made here too, because that northeastern end chamber not only had a forgotten extra wall line in it for a second chamber there, but its wall-lines didn't quite marry-up with the broad "corridor" trending away to the southwest either. Now though, I'm less happy with the placement of the spiral staircase in that northeastern room, which I think needs changing. The staircase has to be where it is to match the surface buildings, so the subterranean wall lines will have to be moved. Again!
One other element isn't demonstrated by these images. Somewhat like the upper floors on the surface level, the glows between, here, the walls and floors, have shown an irritating tendency to interact badly with one another in places, so an intervening sheet with copied, colour-changed, wall-lines with no effects on has been emplaced between the walls and floors ones to prevent that happening. That though can only be done once the doors have been cut through the walls, and while the res probably doesn't show it, doors have been added in the illustration above.
Still to do: complete the last area, fit-out the whole with more furniture, then worry about labelling, and whether the area surrounding the mapped region still needs to be quite so large. Thus, some way to go...


