


Wyvern
Wyvern
About
- Username
- Wyvern
- Joined
- Visits
- 3,238
- Last Active
- Roles
- Member
- Points
- 5,516
- Rank
- Cartographer
- Badges
- 24
Latest Images


-
Community Atlas: Errynor Map 40 - Clack Valley
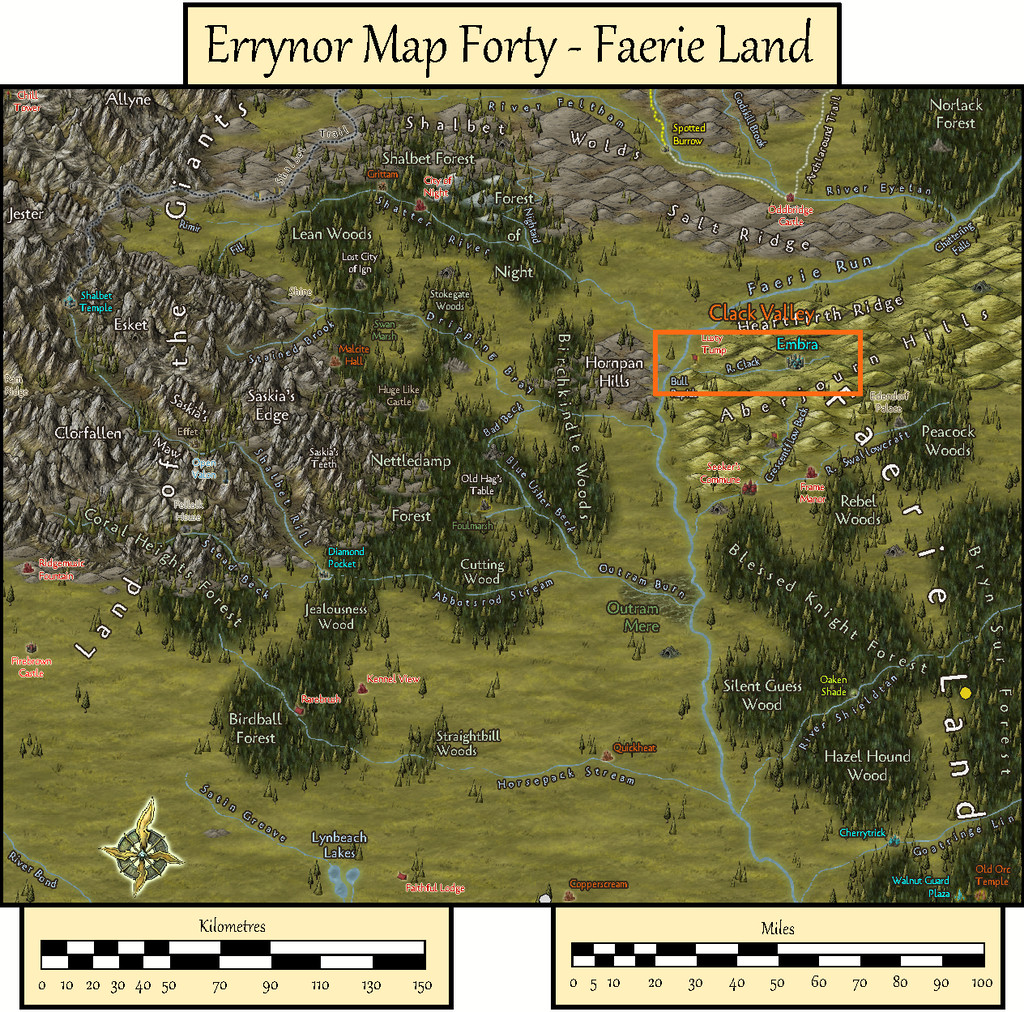
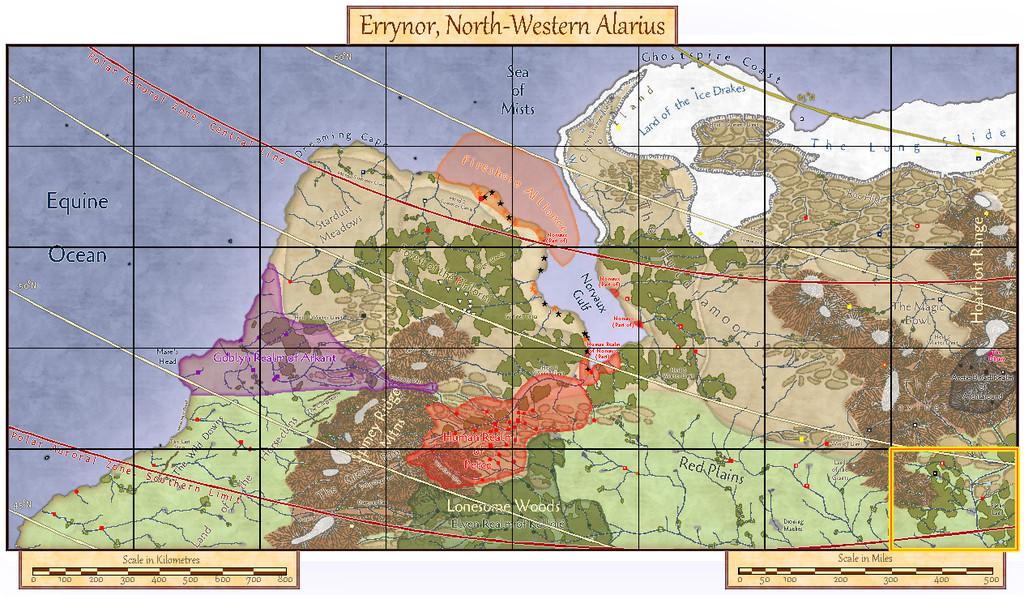
When I started preparing the Faerie Land map for the Atlas, I already knew I was going to add to it a couple of places which would require further mapping. As it turned out, both would be placed relatively near one another in northwestern Faerie Land, in the River Clack valley.
To better locate both though, it was clear a map covering a much smaller area than Map 40 would be helpful first, which is where the Clack Valley map originated. Examining what the valley looked like on the Faerie Land map, it seemed reasonable to cover the entire length of the River. From that, an area some 50 miles long by 15 miles wide (80 by 25 kilometres) would work nicely, as shown here by the orange rectangle:
Making a hand-drawn copy of this area onto squared paper, much as I often do (see the Map 40 construction topic elsewhere on the Forum for the concept), I then drew-up some new and amended random feature tables to add fresh detail, deciding and setting the results into one-mile squares across the whole valley. From those, smaller rivers could be added in places, also drawing on the general tenor of how and where the various hill ranges had been plotted on the larger map previously. Here too, I'd decided to add a variety of random plants as well as creatures, since real-world faerie lore frequently draws attention to such things as having significance. This all helped give further character to the region.
By this stage, there was an increasing need for a host of new names to highlight some of these fresh significant places. Aside from the randomly-generated names left over from the Faerie Land map, which hadn't been used there, I'd also come across a substantial series of random-name tables on The Collaborative Gamer blog a while before, so I used those to roll-up an extra set of names to choose from, to add to what I had already. Some of the name-options on that blog are heavily Tolkien-based, which I decided against employing here, but many of the other tables read almost like a series of thesaurus entries, giving ideas even when they weren't always used in the strictly random form in which they'd been rolled. Then it came down to fitting the names to suitable specific places. After which, the CC3+ mapping could begin!
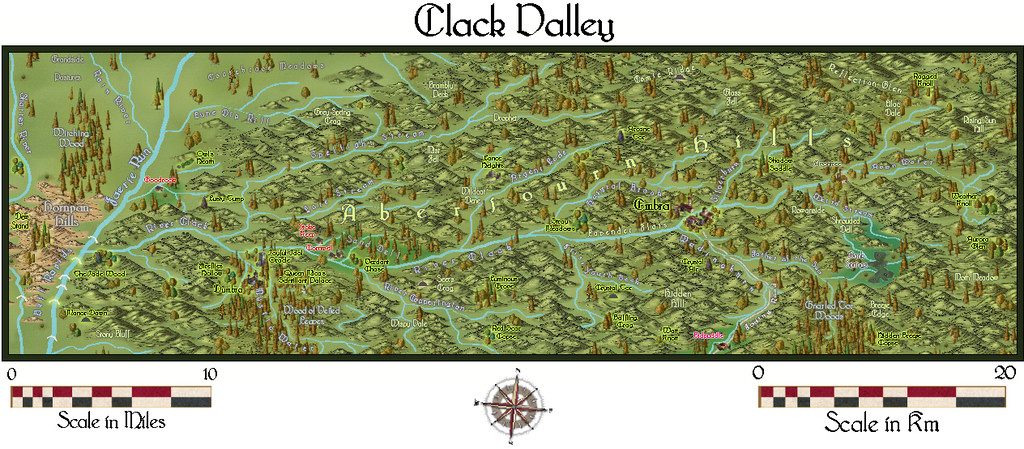
Looking through the various mapping styles of those I'd not used previously which work particularly well for handling smaller overland areas, led me to the Alyssa Faden Overland style from the 2014 November Cartographer's Annual. This is supplied with the Bridgnorth font, and that too seemed to fit with what I intended for this area.
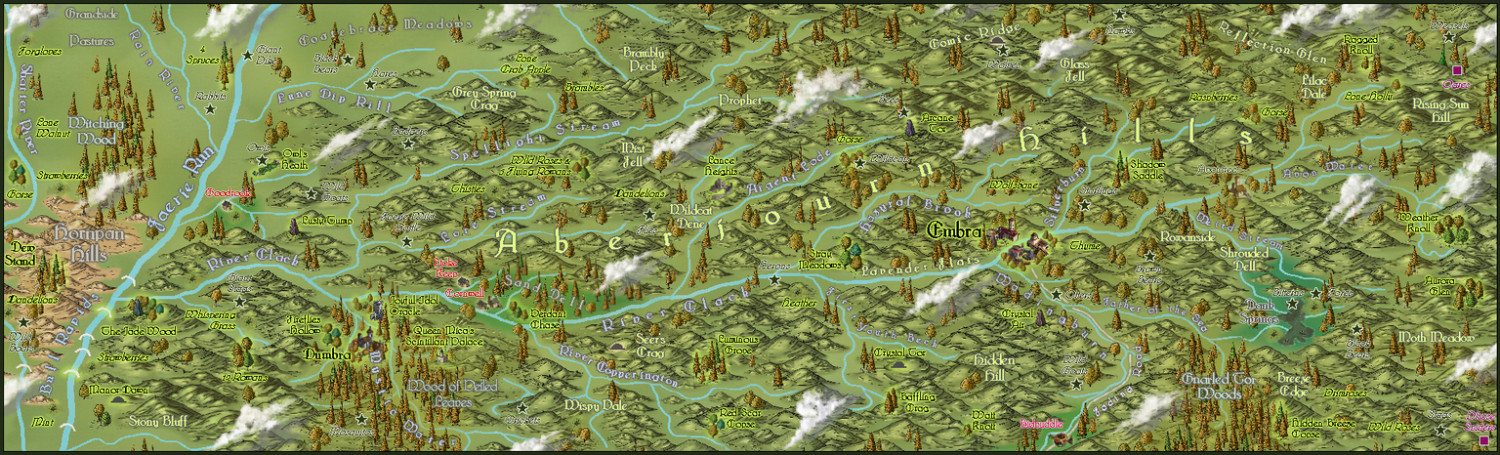
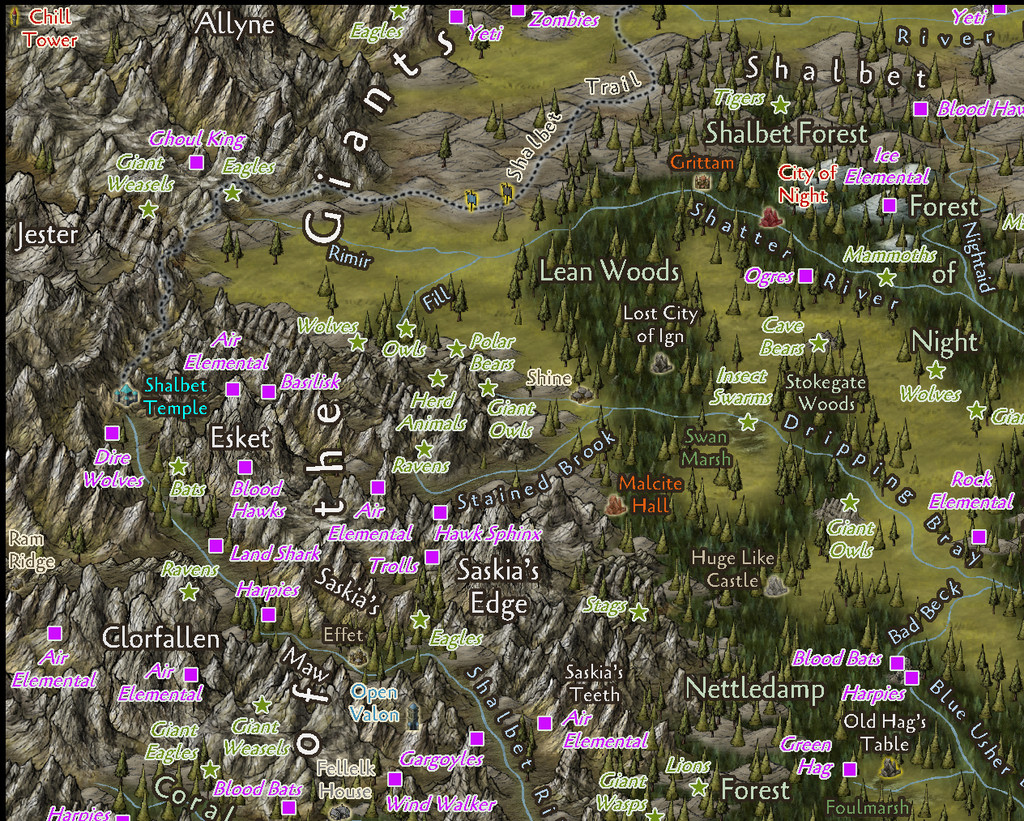
This then is the basic map:
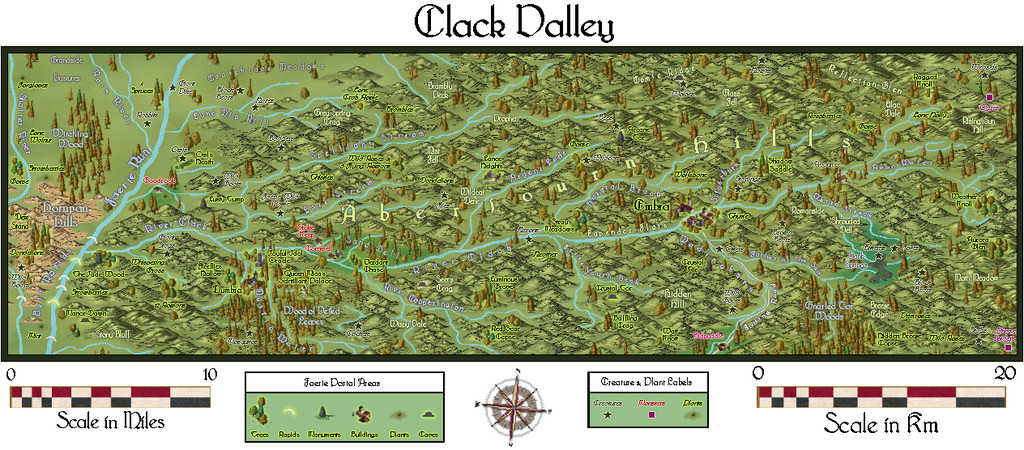
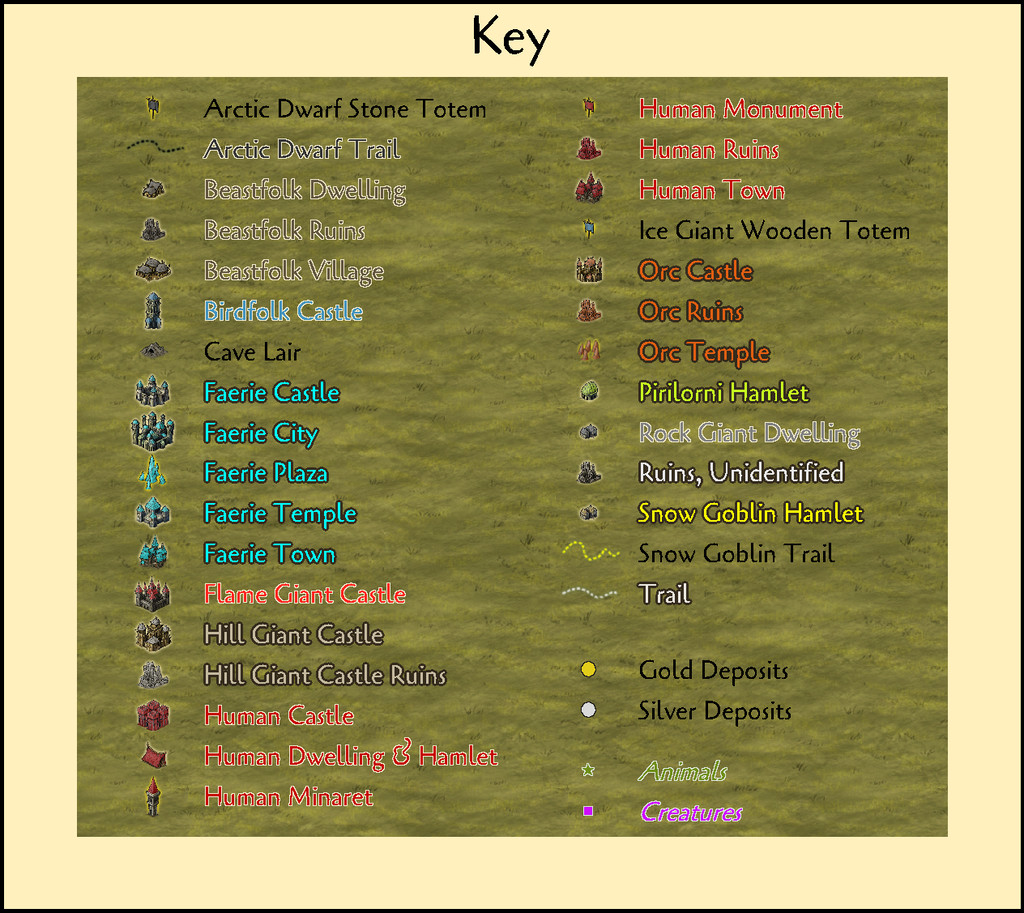
There are two small Keys to accompany it, which can be hidden separately if required, one of which brings in the extra labels and markers for the various creatures and plants added to the map:
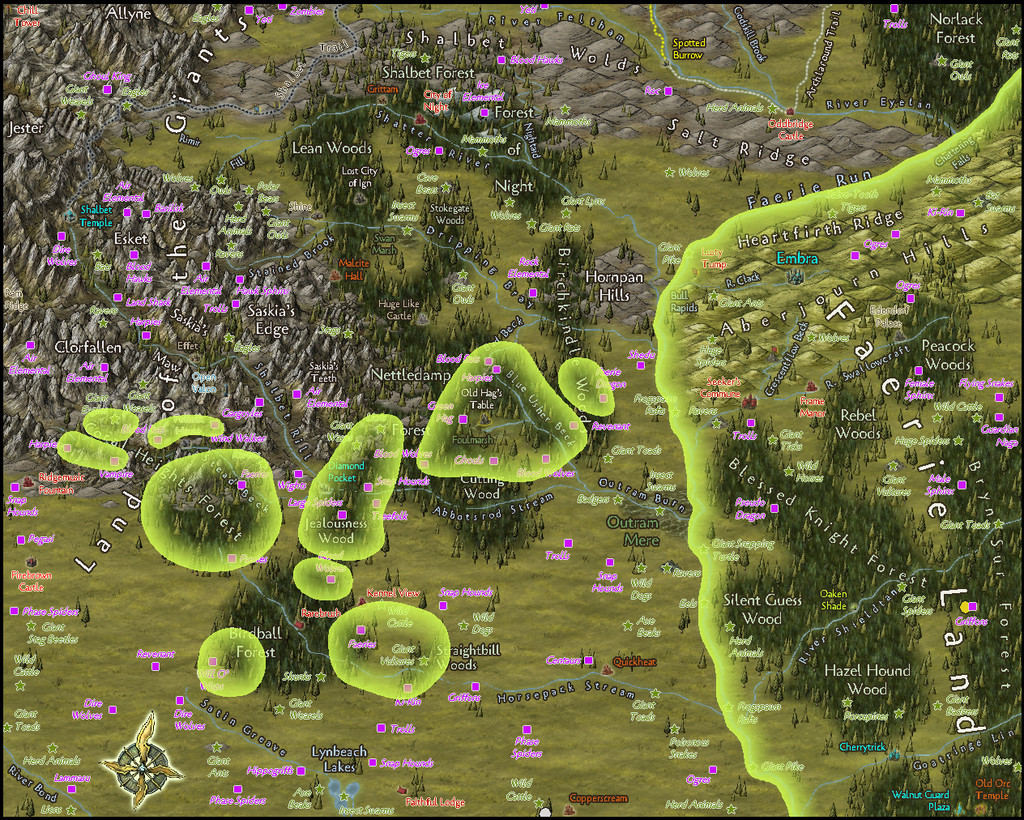
Although most of the area illustrated falls within the Faerie Land Core zone, as defined already on Map 40, a small part towards the map's left-hand edge is beyond it, as this overlay view shows, also intended to be toggleable in the final Atlas FCW version:
Part of my reason in picking this mapping style was because it comes with its own selection of cloud symbols, so I had to add some of those too:
As these are purely decorative, despite being placed so as not to conceal too much of any important labelled sites, they were set-up so they can be toggled on or off separately as well.
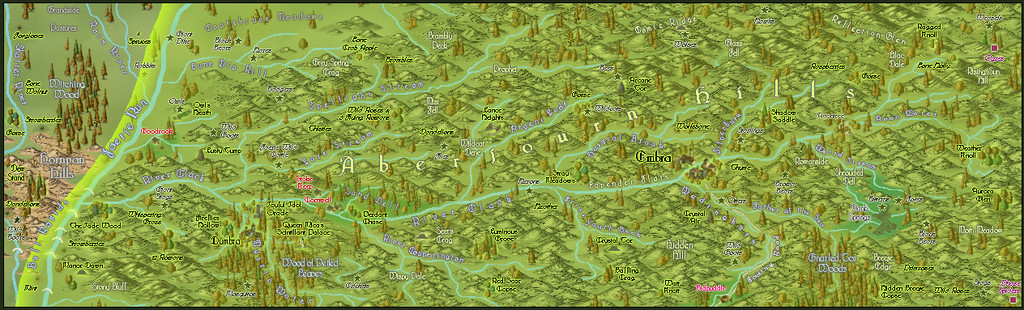
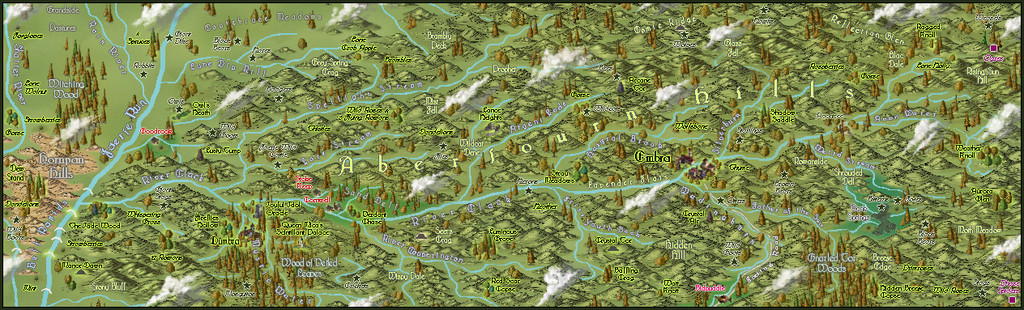
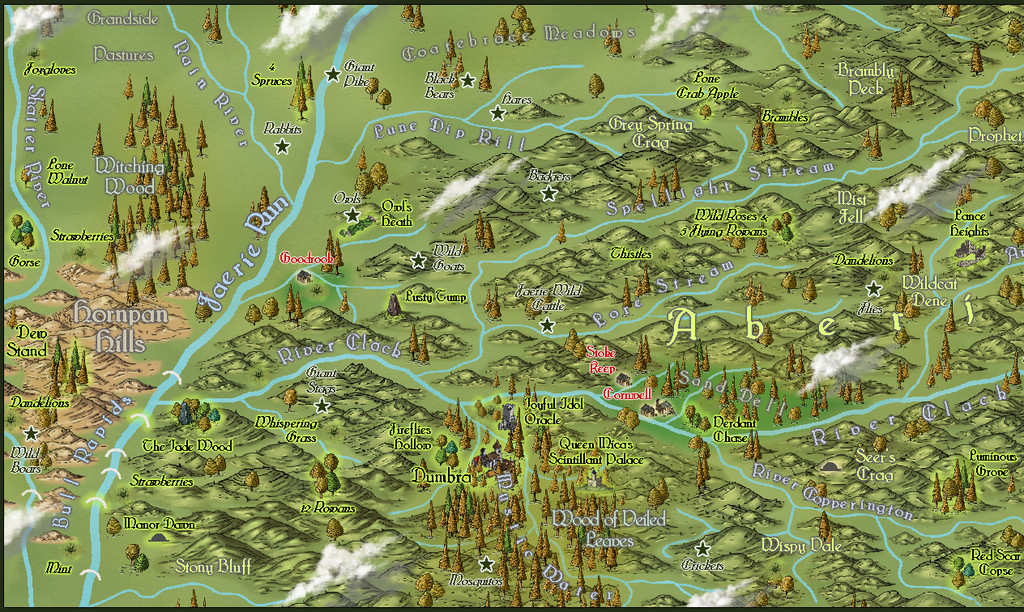
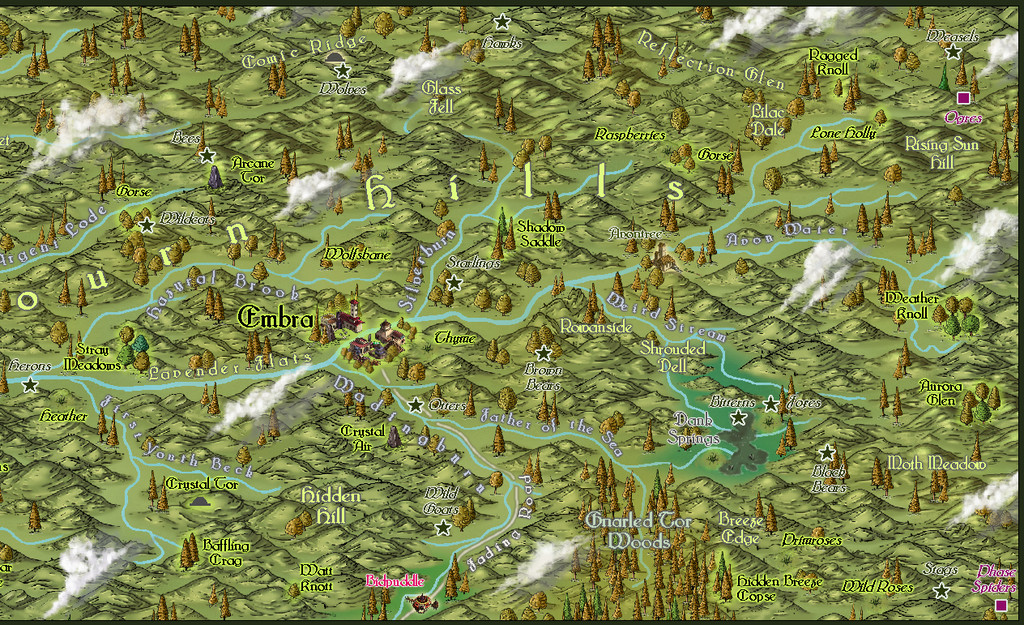
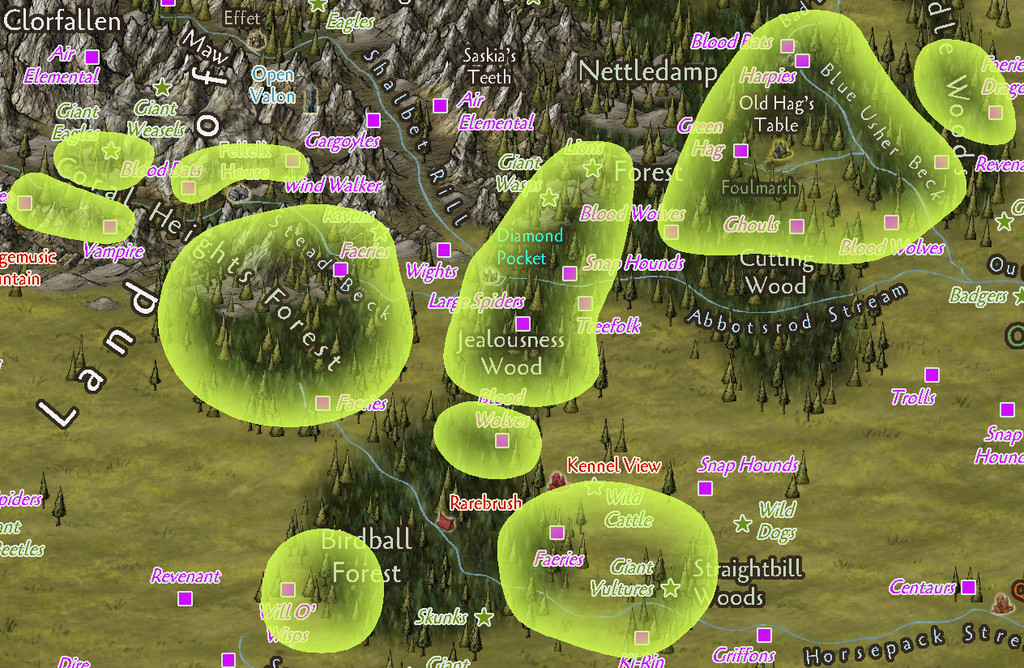
Naturally, the Forum's layout options make horizontally-linear maps particularly difficult to see much detail on, so the images below show the western and eastern halves of the map a little closer:
This last image is larger than the usual Forum preferred size, but it is at least complete!
The Atlas map will also be provided with the usual PDF and text file document of notes explaining more about the map's contents, and which two late medieval Herbals were drawn on especially to add a sprinkle of magic to some of those special plants!


![[Deleted User]](https://secure.gravatar.com/avatar/c75d9a245b74d9c59be0999ea81ca541/?default=https%3A%2F%2Fvanillicon.com%2F92add7f8c954488718110edc4896ad39_200.png&rating=g&size=200)


-
Community Atlas: Errynor Map 40 - Faerie Land
As mentioned recently in another Forum topic, the next of my 40 250 x 200 mile maps detailing the Errynor area of NW Alarius on Nibirum is now ready for submission to the Community Atlas. Despite becoming "distracted" into preparing more additional maps for the first Errynor map than I'd expected initially, Map 01 - The Cliff, I decided to continue with the next one in the order I'd originally intended, by switching right across the map to its opposite, lower right, corner:
Beyond that though, much of the pattern for the mapping - using the Herwin Wielink style, some Cartographer's Annual 62 Geometry varicolor symbols, the Cagliostro (from the 2017 CA), Candara and Gabriola fonts, the latter both from standard Win 10 installations - had been set already by Map 01. There were though some differences. This time, I'd be mapping the most landlocked area in Errynor, not one that was almost entirely under the sea. While that simplified the number of different map views I'd need to create, because - clue in the title "Faerie Land" - I wanted to illustrate the effects of the two overlapping realms, the Mortal one and that of Faerie, it didn't reduce them to zero.
The initial layout was fairly straightforward, and largely involved hand-copying the details from the Errynor map area above into the template for this new map, with additional items from the hand-drawn original as discussed in the "Construction" topic. There things rather stalled though, as I realised I needed to work out details on what the Faerie influence areas were going to look like and exactly where they were going to be. Plus I also suddenly had lots of features that clearly would benefit from being named.
The Faerie areas were relatively easily worked out by simply hand sketching some ideas on a tracing-paper overlay to the original squared-paper map, and I already had some feature names from my decades-long work with earlier versions of Errynor that could be reused.
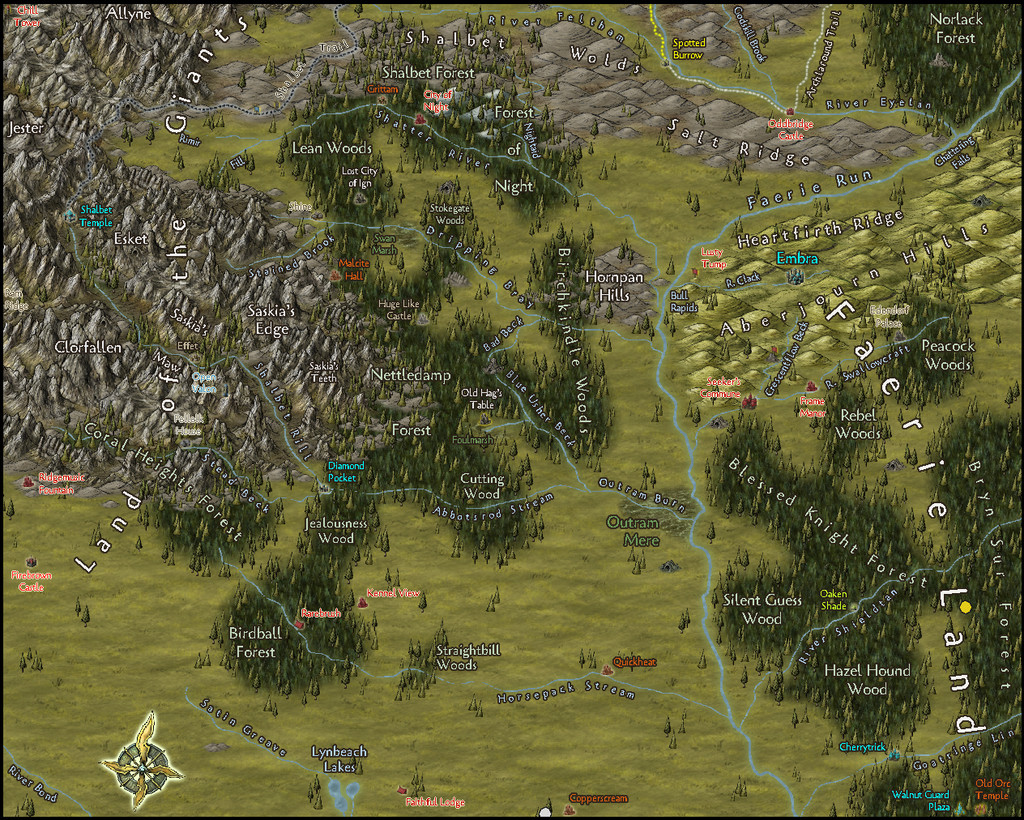
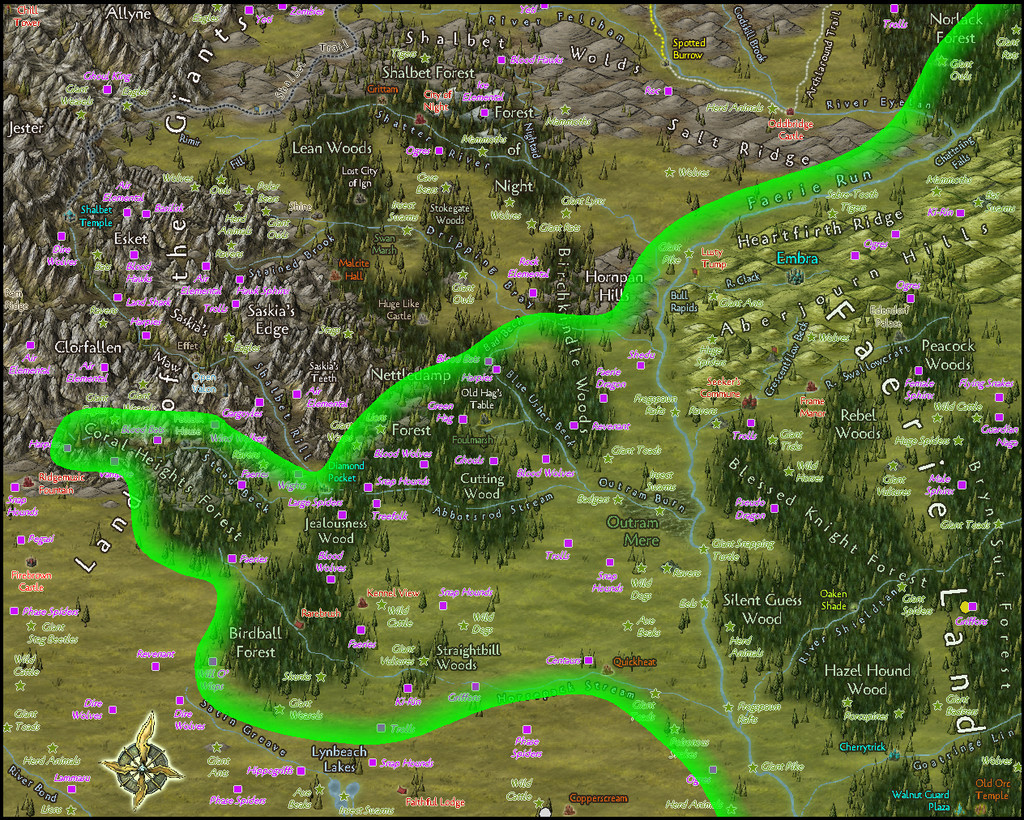
However, you know me and my fondness for random design mechanisms... One of the early Judges Guild printed works I got was their "Village Book 1" tome, from 1978, and in that is a system for generating random village names. Up to 368,000 of them! The names will work perfectly well for other sorts of places too, with the addition of terms such as "Wood", "Forest", "Marsh", "River", "Brook", etc. So I rolled up a long list of possible names. Each series of rolls generates a two-part name, prefix and suffix, effectively, though you can add more parts to vary things from time to time too. Not every combination works well, as you might imagine, but the names can be subtly altered, or only one part used, or merely used as inspiration. I was pleasantly surprised to find most were actually very suitable for what I wanted; some that seemed obvious, some a little odd, some that could be humorous, some a warning, many intriguingly evocative, much like looking at a map of real-world places in fact. So here we have Map 40, complete with place names:
And a close-up of just the NE corner to show a bit better detail at the usual Forum resolution:

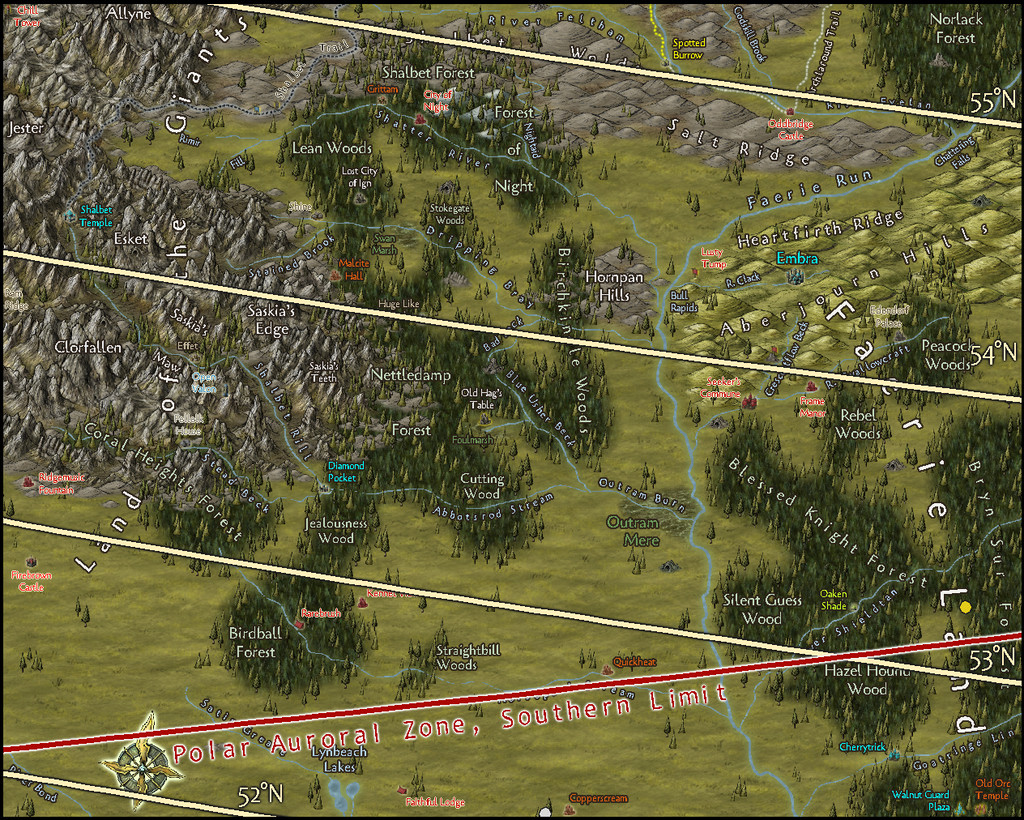
If all goes to plan, there should be a toggle in the Atlas FCW version to allow access to the latitude lines, and an arc indicating the southern limit of Nibirum's polar auroral zone, too:
That slightly offset-from-the-corner compass rose is to allow for the numerous creature markers and labels in that corner, as elsewhere across the map, to be shown (again, another Atlas version toggle is intended to allow these to be displayed or hidden):
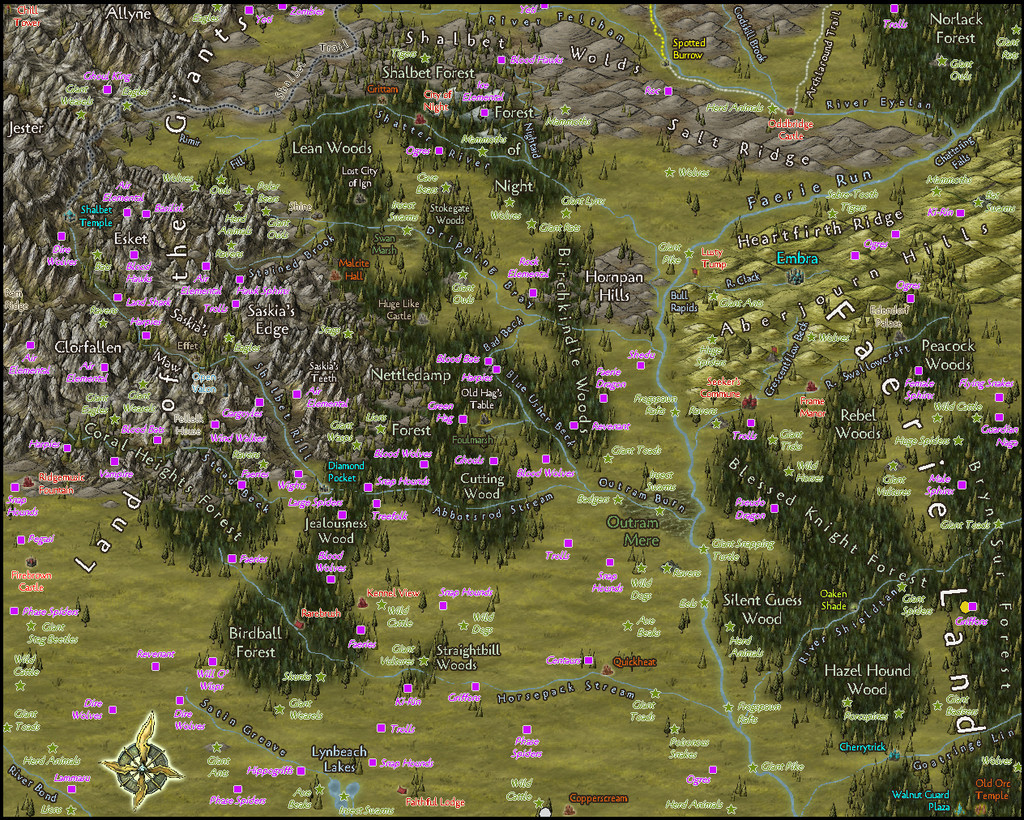
Which looks rather messy at this resolution, so another close-up may help, this time over in the NW map corner:
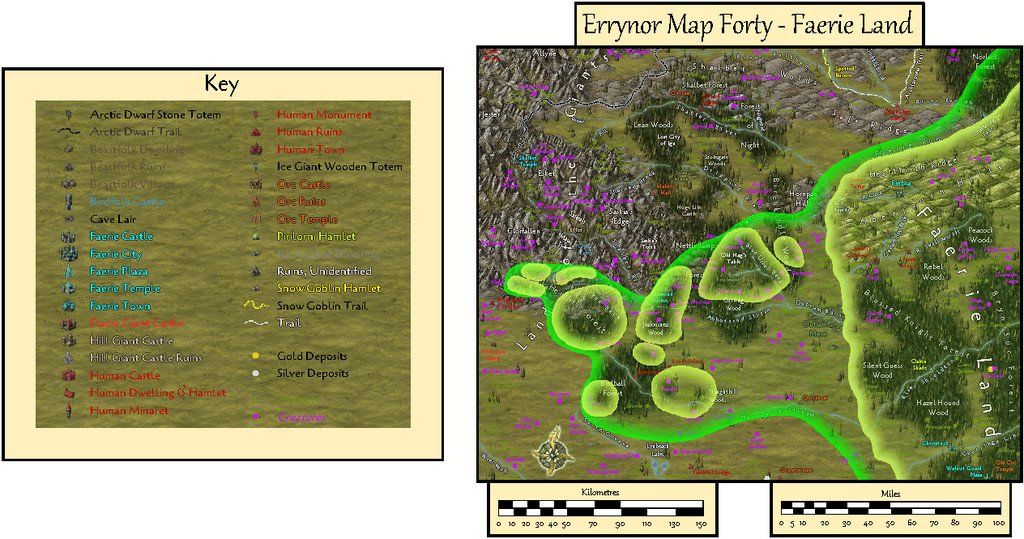
Plus of course, there needs to be a map key as well:
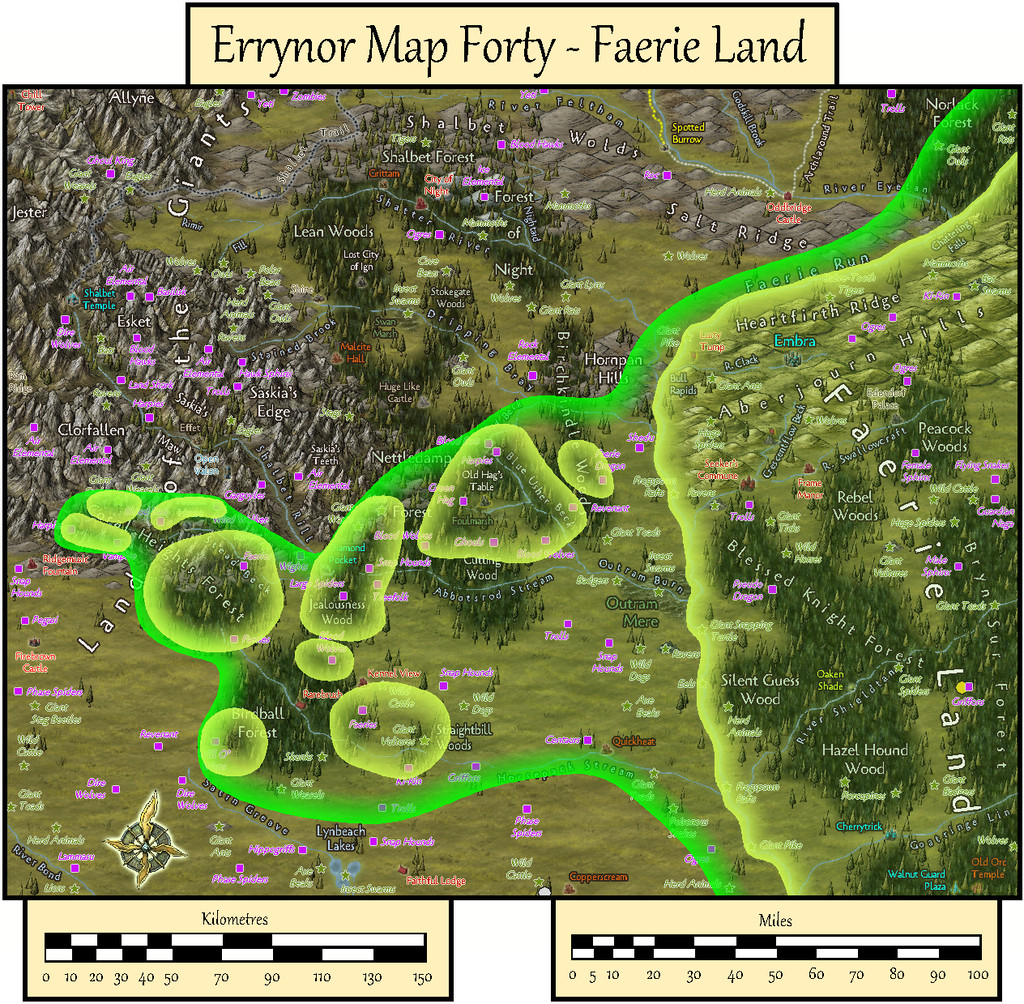
The areas where the Faerie realm overlaps most strongly with that of the Mortal plane can be shown via a further pair of toggles to indicate the core areas, and the maximum extent of the overlap on a few special nights each year. The following images are of those whole-map core areas and a close-up of the separated patches west of the great Faerie Run river, followed by the line of the maximum Faerie overlap extent:
These can be shown combined with any of the other toggleable map overlays, and for anyone concerned at the lack of a scale, that's because to try to improve the resolution, I've shown just the map rectangle here till now. This is how the map really looks:
The complete layout is then this:
The Atlas will also have a 23-page PDF, and a text version, with its accompanying detailed notes, explaining a little more about the settlements and the significance of some of the creatures and resources.
I haven't quite finished with Map 40 yet either, as the River Clack valley with the great Faerie city of Embra (see the first of the detail maps above, the NE corner one, for these locations) is to receive some further mapping in the Atlas shortly too.


-
Searching for symbols for WW2 and modern military vehicles, artillery etc.
If what you're wanting to do is use online images to make your own vehicle trace-drawings for conversion to symbols, it's worth checking the military museum sites (especially if you're hunting for more obscure vehicles) and also scale model websites - including model kit manufacturers. A number of manufacturers now have PDFs of their kit instructions online that you can freely download, and they sometimes have illustrations showing top-down views for the paint and decal schemes for instance, which might be another starting point.
In terms of constructing the symbols, I'd suggest having a set-up where the lines, base colour, camouflage patterning and any markings are each done as a separate Sheet in CC3+ (or more likely "layers" in non-CC3 graphics programs), to make it easier to swap those for different theatres and times. Also, @Lillhans' comment about separate tank turrets is an excellent one. I'd suggest too using Sheet overlays for the top of various AFVs that have different variants using the same lower chassis and skirts, again to make those easier to swap-out without having to keep redrawing each time.

-
Searching for Farmland
Simplest option would be to use the colour drawing tool, and then add an RGB Matrix Process Effect to the whole map, set to "Gray". This will make everything look B&W - so you could design the entire map using the colour set-up, and have it all appear as greyscale in the finished item.
In case you're unsure about adding the Effect, when you open up the Drawing Sheets and Effects dialogue box (click on the rectangle marked "S:" with the name of the current Sheet in at the top of your CC3+ drawing window), click on any Sheet, then click the "Whole Drawing" radio button above the Sheets list.
Then click "Add", select "RGB Matrix Process" from the list this will call-up, and then click to highlight the RGB Matrix Process Effect that's now been added to the Whole Drawing list.
Then click "Edit". Once you're in the RGB Matrix Process dialogue box, click "Predefined", then "Gray" from that list, and finally "OK", and then (assuming you have something already drawn on your map to check), click "Apply" to see what it does.
Good luck!
-
Connecting Symbols
I actually did just this three days ago Sue, hence why I'm currently so informed on the subject!
You're welcome @Jeff B !

