


Wyvern
Wyvern
About
- Username
- Wyvern
- Joined
- Visits
- 3,237
- Last Active
- Roles
- Member
- Points
- 5,515
- Rank
- Cartographer
- Badges
- 24
Latest Images


-
WIP Arboridia (Mercia) for Community Atlas
No, I'd agree with that too @Maidhc O Casain, although to my eye it's the very strong drop-shadow on the title that's causing problems, as I don't struggle with specific colours.

-
WIP Arboridia (Mercia) for Community Atlas
You may be able to get the roads more obvious simply by widening the lines, and maybe increasing the glow effect on their edges. The pale colouring actually seems fine.
I very rarely use any of the forest fill tools, since trying to get the tree-density right if your map's not a typical size for the style takes too much time and effort for me. Plus I usually want to add features in the woods, so end up moving or deleting trees to accommodate them. Thus it's quicker and easier for me to just place trees individually!

-
Ricko's Questions
Sorry to be late replying. The simple answer is "no", because the render export will always use the larger value for the larger map edge in a rectangular JPG export, and hold the other to the correct proportion accordingly.
This may mean having to switch the orientation before printing, depending on exactly how the image is to be printed, but when creating just the image file, that's irrelevant.
I always put the same value in both, because it save me worrying about which edge might be marginally longer in some almost square maps, or (and this is more likely!) me entering the wrong value for the obviously longer side because I forgot which box was which in the export pane!


-
Ricko's Questions
Ricko asked: I'd like to know how I can export the file in the highest quality possible, since exporting with JPEG Quality gives me a small, pixelated file on the street lines when I zoom in below 100%.
This will be for an A0 print.
I tried a couple of tests using the "Save As... - Rectangular Section JPG" option in CC3+.
Ordinarily, I use a small amount of antialiasing on JPG exports, generally 30% to 35%, and forgot to turn that off, which meant the export failed! So I tried again with Antialiasing turned off.
I suspect the single key thing is to ensure the final export size is set to for A0 paper, so I turned that up to 119 cm. This is my settings pane:
And then I ran the export. The final file size is about 66 MB, but this is a sample zoomed-in to be 100% and then resaved as an image the Forum will accept (so it's smaller than the true 100%). However, when I was zoomed-in at that level, there was no pixellation whatsoever on the roads. This is that smaller image, but using the above settings:
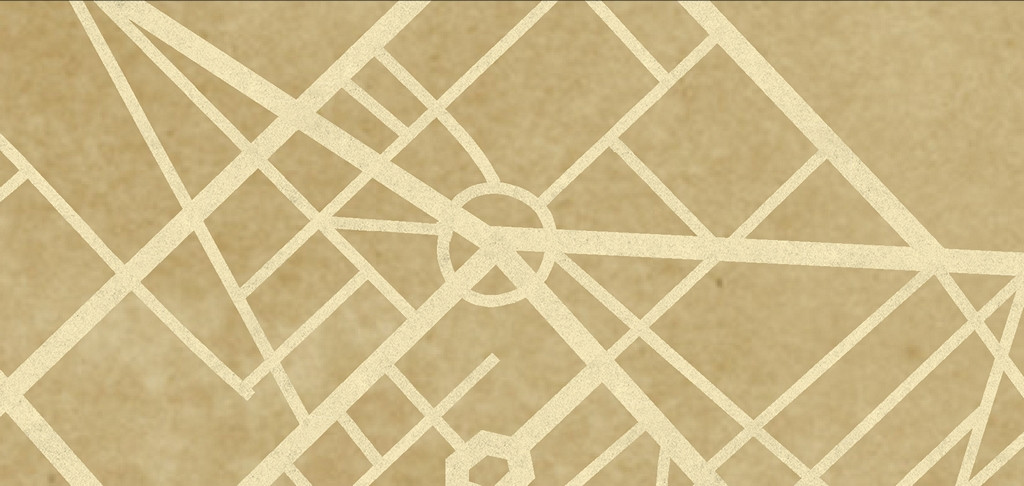
I think all you really need do is ensure the final image size matches the paper size you want the export for print to be - A0 in this case. Good luck!
-
CC4 Overland Development Thread
Loopysue remarked: I'm only interested in geology, though, and not a geologist, or a geomorphologist, or whatever you have to be to understand that particular type of physics.
Ah, don't worry over it! The physics of crater formation is endlessly being revised and experimented with, like most sciences, whenever something new and unexpected turns up. It's a particularly tricky field, because most of the impact craters easiest to examine in some detail are on the Moon, which isn't a helpful analogue for such craters on Earth, or other places where there's an atmosphere to alter how they look on various timescales, from original impact onwards, or how they can form when an impactor strikes a medium that isn't lunar regolith and rock. First approximation stuff is fine to give a crater that looks like a crater non-specialists can recognise and make use of!
Plus, what you have now will work nicely for both impact and (inactive) volcanic craters - though the latter will work best connected to a suitable mountain-top or area of suitably craggy rock, of course.

