


Monsen
Monsen
About
- Username
- Monsen
- Joined
- Visits
- 661
- Last Active
- Roles
- Administrator
- Points
- 8,864
- Birthday
- May 14, 1976
- Location
- Bergen, Norway
- Website
- https://atlas.monsen.cc
- Real Name
- Remy Monsen
- Rank
- Cartographer
- Badges
- 27
Latest Images
-
New User help
I don't think there any videos out there for creating starmaps with Cosmographer.
There's not any tool that will populate the map randomly with systems, you'll have to do that manually.
My most important tip for new users is to make sure to understand the program properly before jumping into a large-ish custom project. As you said, it can be a bit overwhelming at first, so if you haven't done so already, I highly recommend working through the basic tutorials in the user manual, even if they aren't about space and sci-fi.

-
Community Atlas Project - Download information - Contributions Welcome
Yes, you are free to link to the atlas, and to individual maps from a commercial product. Please do link to the atlas page for the map though, not directly to the image file itself or fcw file.
If you wish to include any of the maps in the product itself, you need to negotiate that with the artist themselves.


-
NAN,NAN Problem
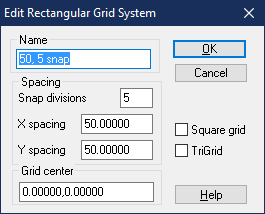
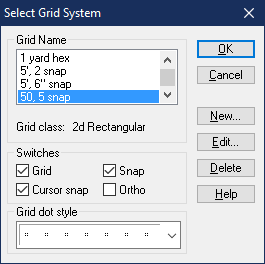
Here is a fixed version of the file. I've set it up with a 50' grid with 5 snaps.
Here's the exact steps to set up a reasonable grid:
- Right click the Snap button in the lower left.
- Hit the New button in the dialog to define a new grid
- Select 2d Rectangular as the grid type and hit continue
- You can name the new setting whatever you want, but it is best that it follows the actual settings, so I named mine "50, 5 snap". I then set the snap divisions to 5, and the X and Y spacing both to 50. What this ends up doing is making a snap grid that has a visible dot every 50 map units (feet), but it snaps every 10 feet. If you feel the the snaps are too fine grained, try setting the snap divisions to 2 instead, and if you have too few snap points, try with 10 for snap divisions.
- Click ok, and then back in the select grid system dialog, scroll down and click on your newly created grid to select it, and then hit ok. This will make your new grid the active one. Save the map.

![[Deleted User]](https://secure.gravatar.com/avatar/c75d9a245b74d9c59be0999ea81ca541/?default=https%3A%2F%2Fvanillicon.com%2F92add7f8c954488718110edc4896ad39_200.png&rating=g&size=200)
-
[WIP] Community Atlas - Ezrute - Dunor Valley - Strip map of Journey from Rocky Valley to Isendathin
Not too fond of how the text glow visually looks more of a blob behind the text rather than an outline of the text. I suggest reducing the blur radius, or switching to the Outer Glow effect instead.
-
[WIP] Community Atlas - Ezrute - Dunor Valley - Strip map of Journey from Rocky Valley to Isendathin
Actually, you have used the wrong symbols to just put them closer together, you need to use the "middle" symbol, you have three "starts" on the left side, and three "ends" on the right side.
Since the ribbons have the same shape, they should be replaceable without too much work though.
