


Royal Scribe
Royal Scribe
About
- Username
- Royal Scribe
- Joined
- Visits
- 9,532
- Last Active
- Roles
- Member
- Points
- 3,353
- Birthday
- February 5, 1968
- Location
- San Francisco, California
- Website
- https://legacy.drivethrurpg.com/browse/pub/31814/Royal-Scribe-Imaginarium
- Real Name
- Kevin
- Rank
- Mapmaker
- Badges
- 16
Latest Images
Reactions
-
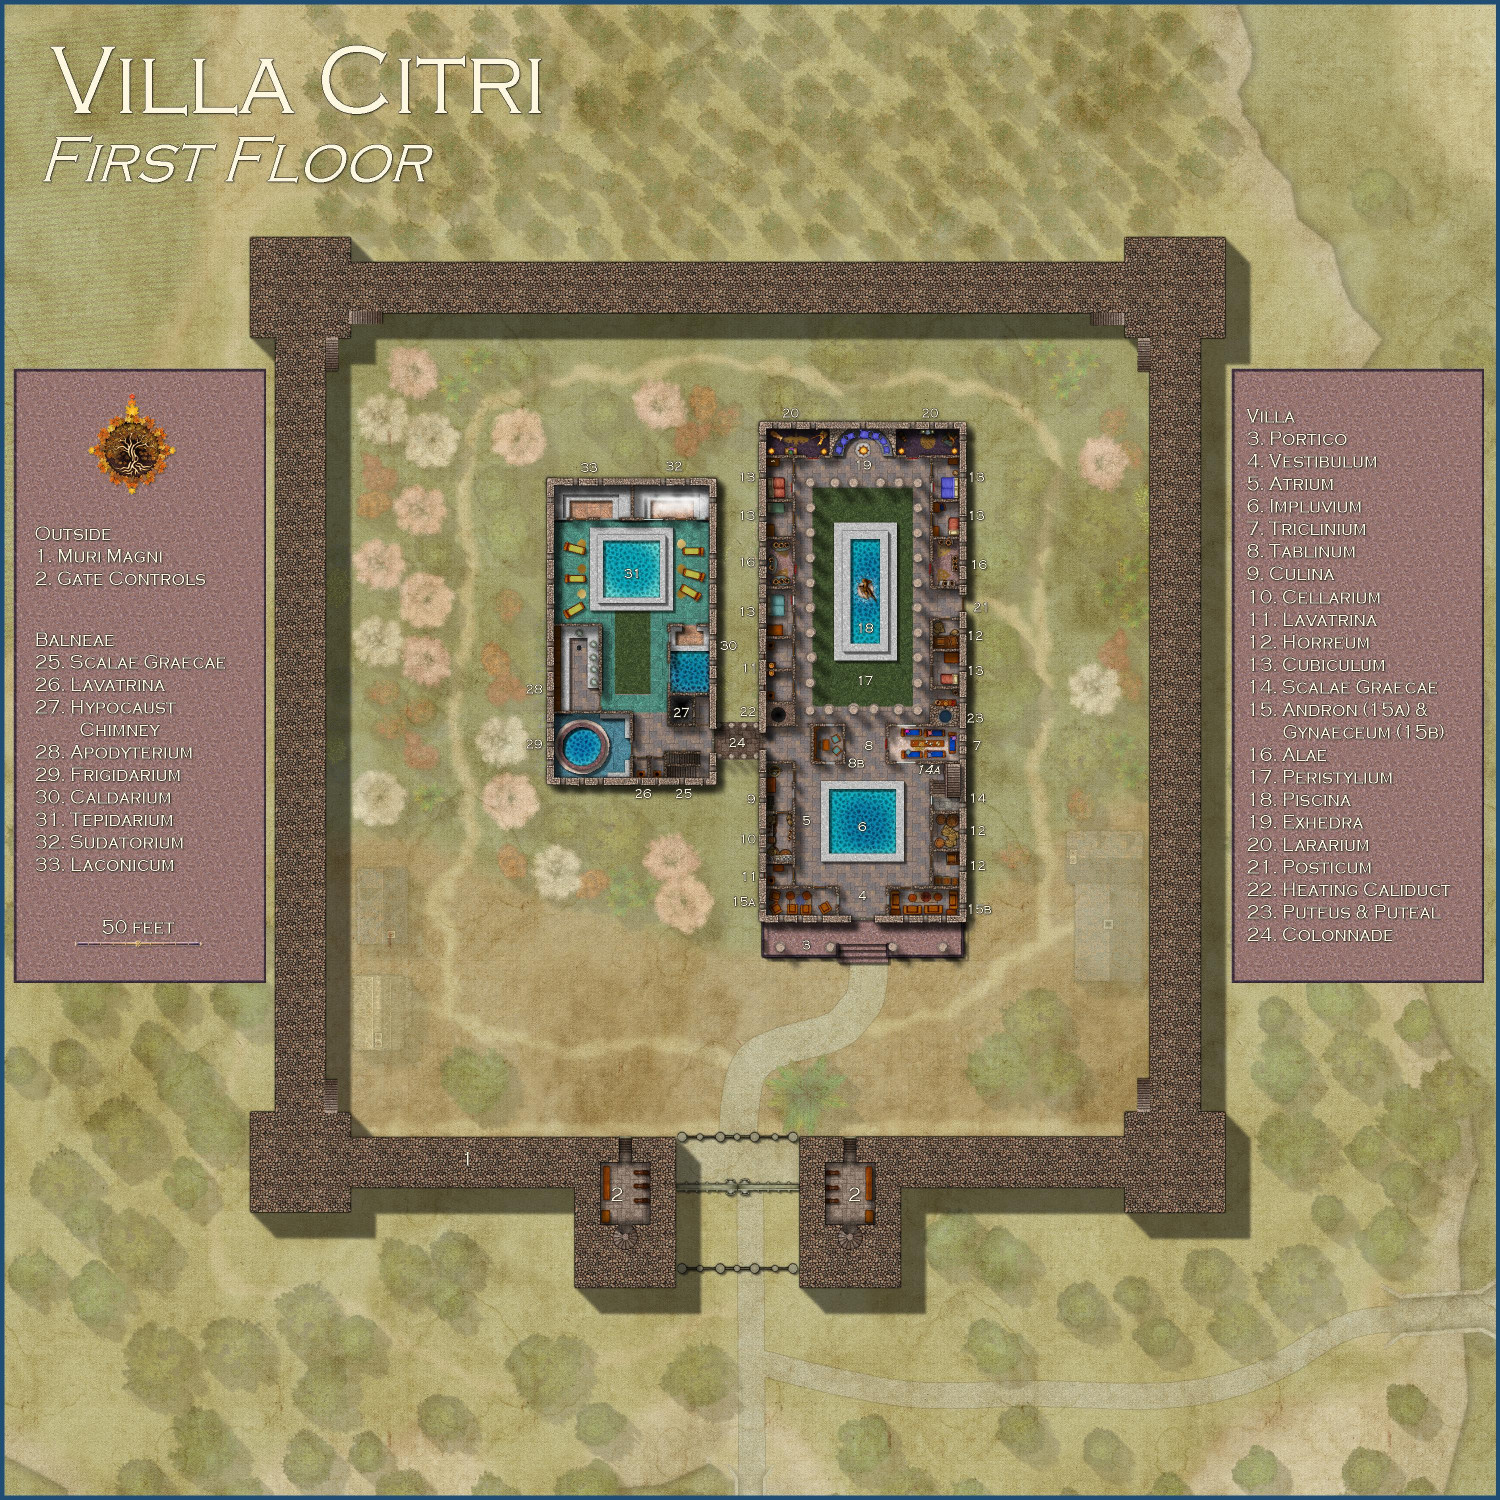
[WIP] Villa Citri (Roman-style villa)
Okay, I have furnished the first floor. Couple of other changes, too:
- I reduced the size of the label numbers and mostly moved them outside the room (and the villa) that's being labeled. I hope it's clear enough what the number is labeling.
- I added a semi-transparent parchment sheet to semi-0bscure the exterior areas, similar to what I did when I mapped the interior of the wizard's tower. (It's a different parchment than that map, though -- the original was from the Beaumaris Castle annual and I didn't want to have the parchment be the only thing from that annual.)
- I split the Legend in half, and because they weren't showing up very well on the parchment, I placed them on a marble background. I tried different effects to really make them look etched in stone (like removing the drop shadow and changing the glow from inner to outer), but it made it harder to read, imo.


-
[WIP] Villa Citri (Roman-style villa)
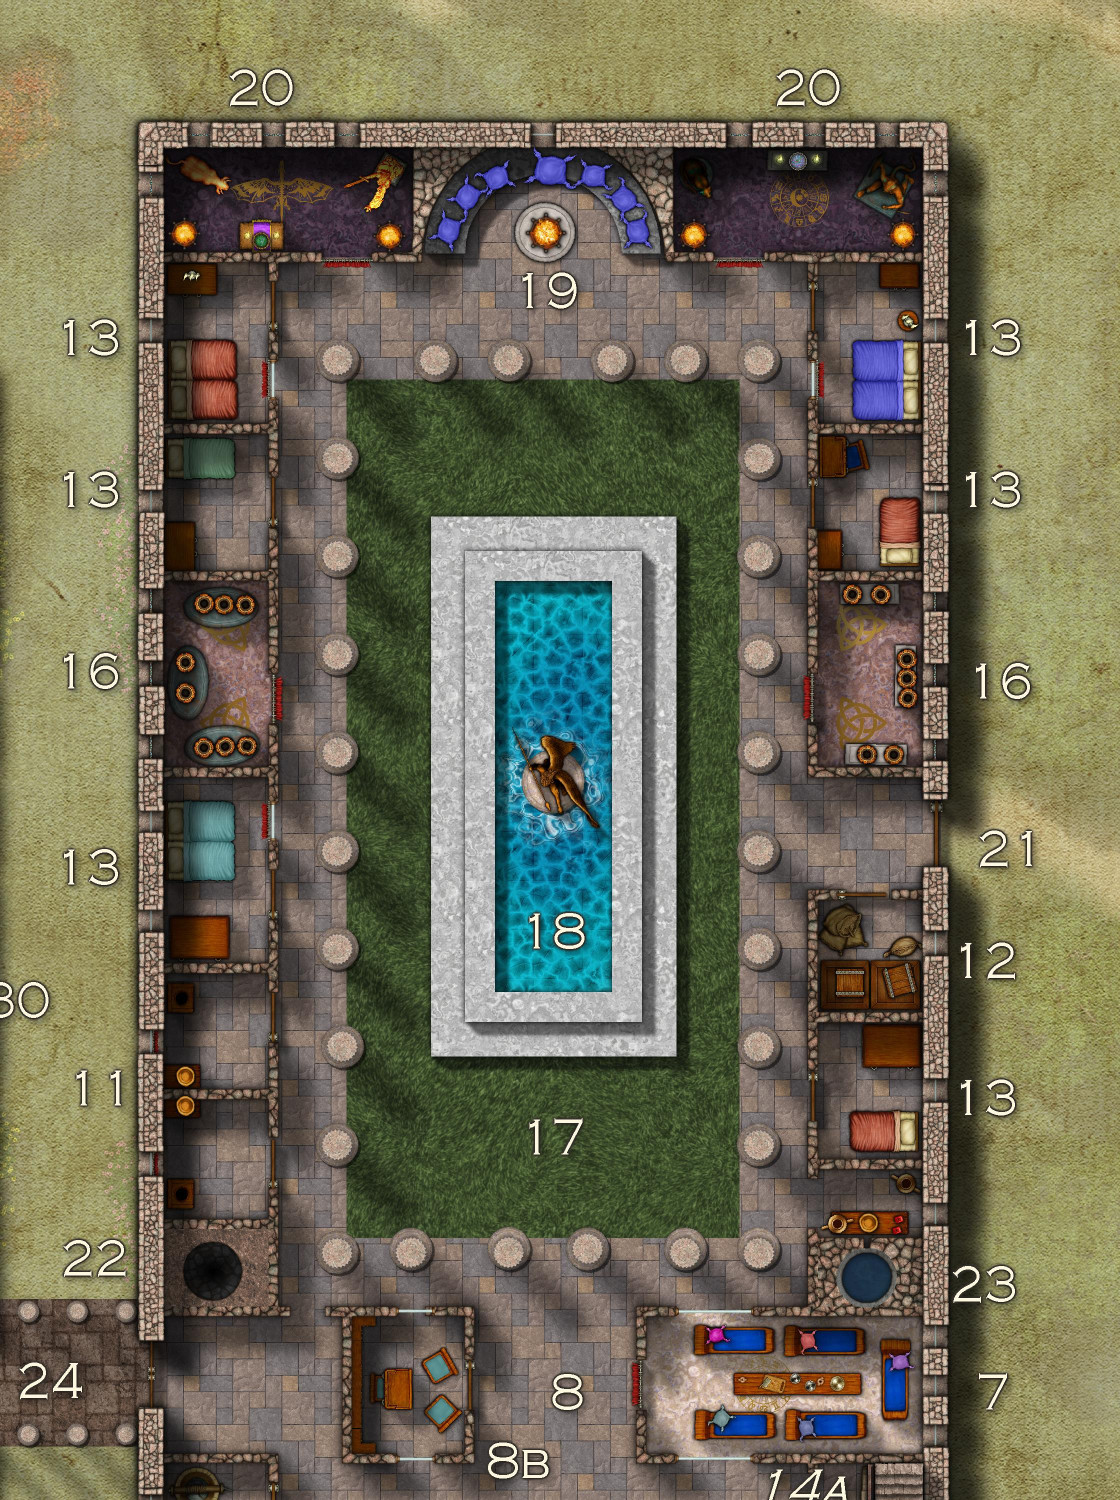
Okay, I made some tweaks. The Alae (#16) have been moved up to be more central in the Peristylium courtyard. Now they are going to be strictly for honoring the household's ancestors, because next to the Exhedra (#19) I have added two shrines to honor the gods, the Lararia (#20, or singularly, Lararium). It's amazing what you can learn from Google if you just ask the right questions. I thought I can gotten down the rooms for Roman villas, but when I asked Google whether Roman villas had chapels, it told me about these shrines to gods. Plus, that gave me another excuse to use the brass inlays that I love so much. (Added some inlaid shells next to the pool in the bathhouse, too.)
Also added a shaft (#22) for hot air from the basement hypocaust to reach the top floor. Across the hall, there's a shaft (puteus) for water to be piped up into a little room with a tap for the water (puteal) -- that came from Googling "what did ancient Romans call a 'well'?"
Still have to add windows and doors, and furniture. Wish we had some Roman couch symbols!

-
[WIP] Villa Citri (Roman-style villa)
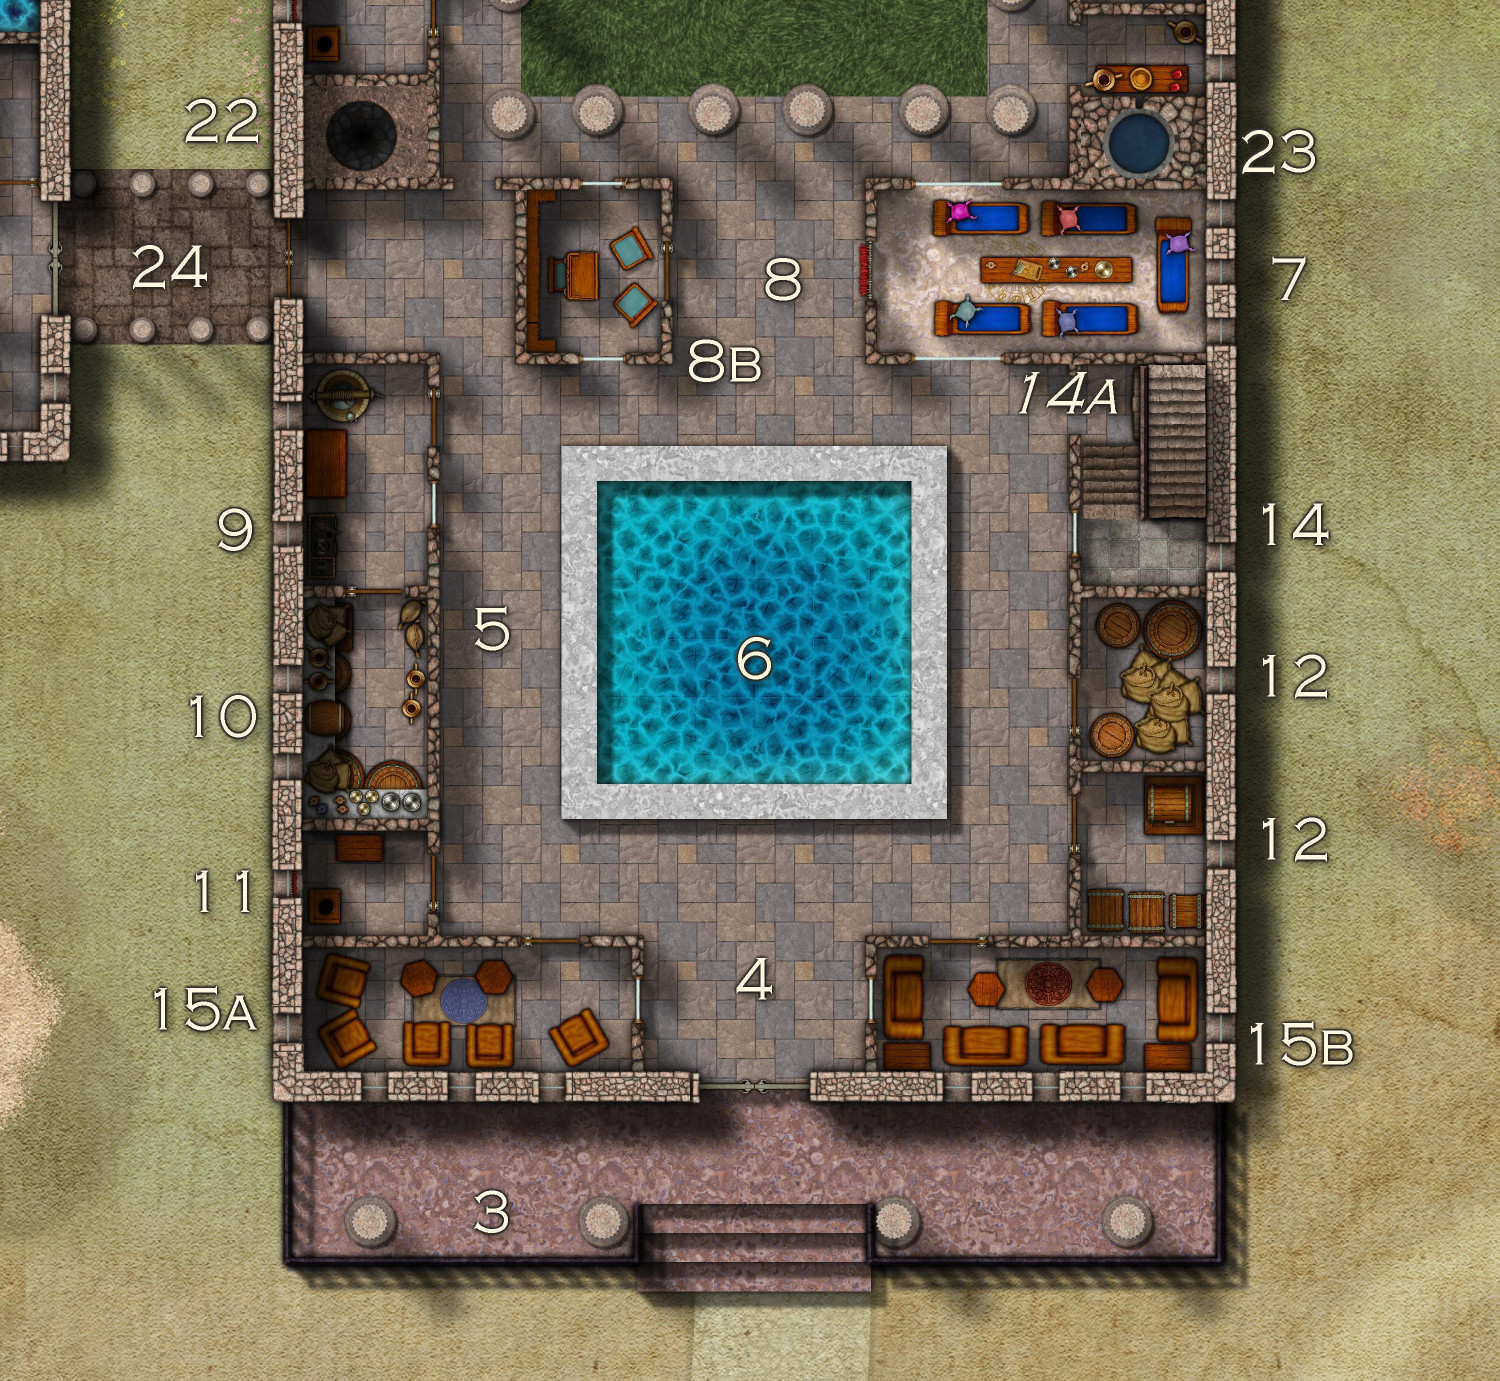
Here's a first pass at the first floor of the main villa. There's more work to be done (like windows, and maybe furniture), but in the meantime, I wanted to solicit feedback on what types of rooms I'm missing. As this is a fantasy world, I'm absolutely fine blurring the lines on what would be strictly Roman, and mixing in things that would be more medieval or fantasy.
Also, bear in mind that this is just the ground floor. The basement will include a larder, wine cellar, and access to the sewers. The upper floors will have bedroom suites overlooking the courtyard. I plan to have a library on the upper floor of the baths next door.
Here's the description for the numbered labels:
- Fortification Walls (not shown here)
- Gatehouse (not shown here)
- Portico - Covered porch
- Vestibulum - entry to Atrium
- Atrium - The central hall, where guests were greeted and the family's household gods were honored. It has an open roof (compluvium) and a rainwater pool (impluvium)
- Impluvium - Shallow pool that collects rainwater which is then carried by pipes to the kitchen
- Triclinium - The dining room where guests reclined on couches to eat
- Tablinum - The office or study of the head of the household, often located between the atrium and peristyle. The floorplans I've seen always show it without doors, so the head of the household can keep an eye on things, but I have chosen to add an enclosed office next to it.
- Culina - The kitchen
- Cellarium - The pantry.
- Lavatrina - Lavatories
- Horreum - Storage rooms
- Cubiculum - Bedrooms. I have a lot on this floor, but since the upper floors are intended to be mostly bedrooms, I am very much open to converting some to other uses if you can think of things I should add.
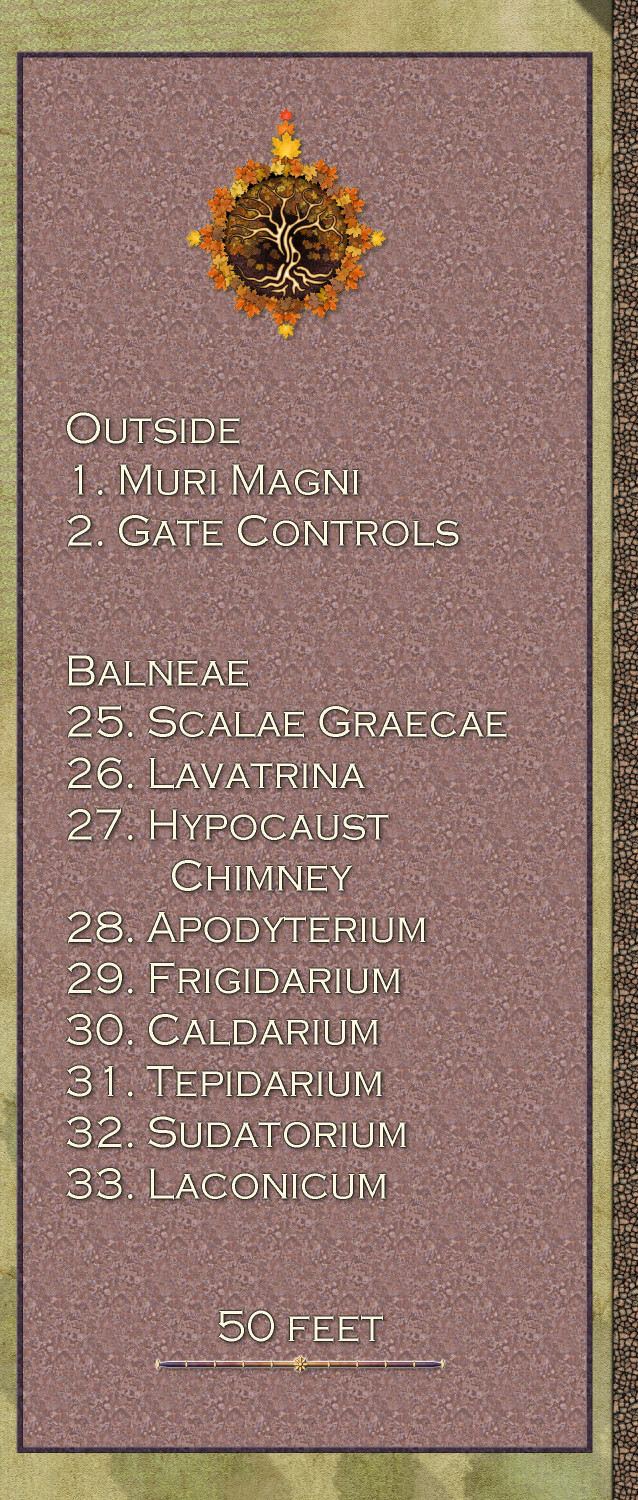
- Scalae Graecae - Staircases going to second floor. (The term "scalae" referred to a staircase that was open on one side; "scalae graecae" referred staircases with walls on both sides.) You may not be able to see it, but an archway under the stairs going up is meant to lead to stairs going down to the basement.
- Andron - In ancient Greece, this room was a room for men only, with couches arranged in a U-shape. By Roman times, it could also mean a room that was a passway between sections of the villa. (Open to changing this name if my sources are bogus.) In this villa, it provides access between the atrium, the peristylium, and the colonnade so that folks don't have to pass through the tablinum when it's in use.
- Alae - My sources about what this is are all over the place. As far as I can tell, they were once used as chambers with windows to allow daylight to the rest of the villa, but this became less important once the compluvium was added to allow light from the sky. They later became used as storage rooms, or as rooms to honor the ancestors. I've decided to go with the "honor the gods and ancestors" meaning.
- Peristylium - An open-air courtyard, often a garden, located at the back of the house.
- Piscina - Originally a fishing pond, the term later evolved to also refer to man-made pools and fountains.
- Exhedra - Semicircular or semi-open space or room, often found in ancient Greek and Roman architecture, used for conversation and seating. I am going to put in a semicircular bench here, and maybe a cozy brazier. Nice place to sit and chat overlooking the courtyard on those warm summer evenings.
- Colonnade - Unwalled, covered walkway lined with columns that leads to the bathhouse.
- Posticum - I forgot to label this one, but it's the read/side exit.
What am I missing? What would you want to see in the main floor of a wealthy noble's country estate?


-
What got you into cartography?
I first started with Dungeons & Dragons in December of 1979. !!! Back then, our maps were hand-drawn on graph paper, or store-bought modules that were only slightly more sophisticated than graph paper. Played off and on with different groups for decades.
In 2017, having not played for nearly a decade, I started to create my campaign world. I searched for mapping software and the Internet's consensus was that Campaign Cartographer was both the most powerful and the hardest to learn. Sounds like a challenge! I used my tax refund to buy everything except the annuals (which I didn't understand)...and failed.
I've always been a visual learner. I retain more from reading a book than from listening to the audio version of it. I thought I could teach myself from the PDF manuals. I got some basic concepts, but I didn't really get them. I fiddled around with the software but everything looked awful. (They might have looked slightly less awful if I knew how to turn on sheet effects.)
Then COVID hit in 2020, and with a lot of not-leaving-the-house-time, I revisited my world-building, but not map building. It wasn't until mid-2023 (six years after buying the software!) that I finally decided to start watching some of the tutorials. The obvious thing to everyone except me: videos aren't just audio, they are also visual. Things started to click. And then I became addicted to the videos. To see a blank canvass come to life and turn into a work of art! And then to start mapping: even more addicting! I've mentioned this before, but it is really stimulates left brain/right brain simultaneously. There's the creative part about creating a work of art. But there's also the analytical/problem-solving part about how to do that with textures and symbols and optical illusion sheet effects. I posted my first map here (not the first map I created, but the first I posted) in January 2024, and it's been full speed ever since.


-
[WIP] Villa Citri (Roman-style villa)
I am diving into the interiors now, starting with the first floor (or ground floor).
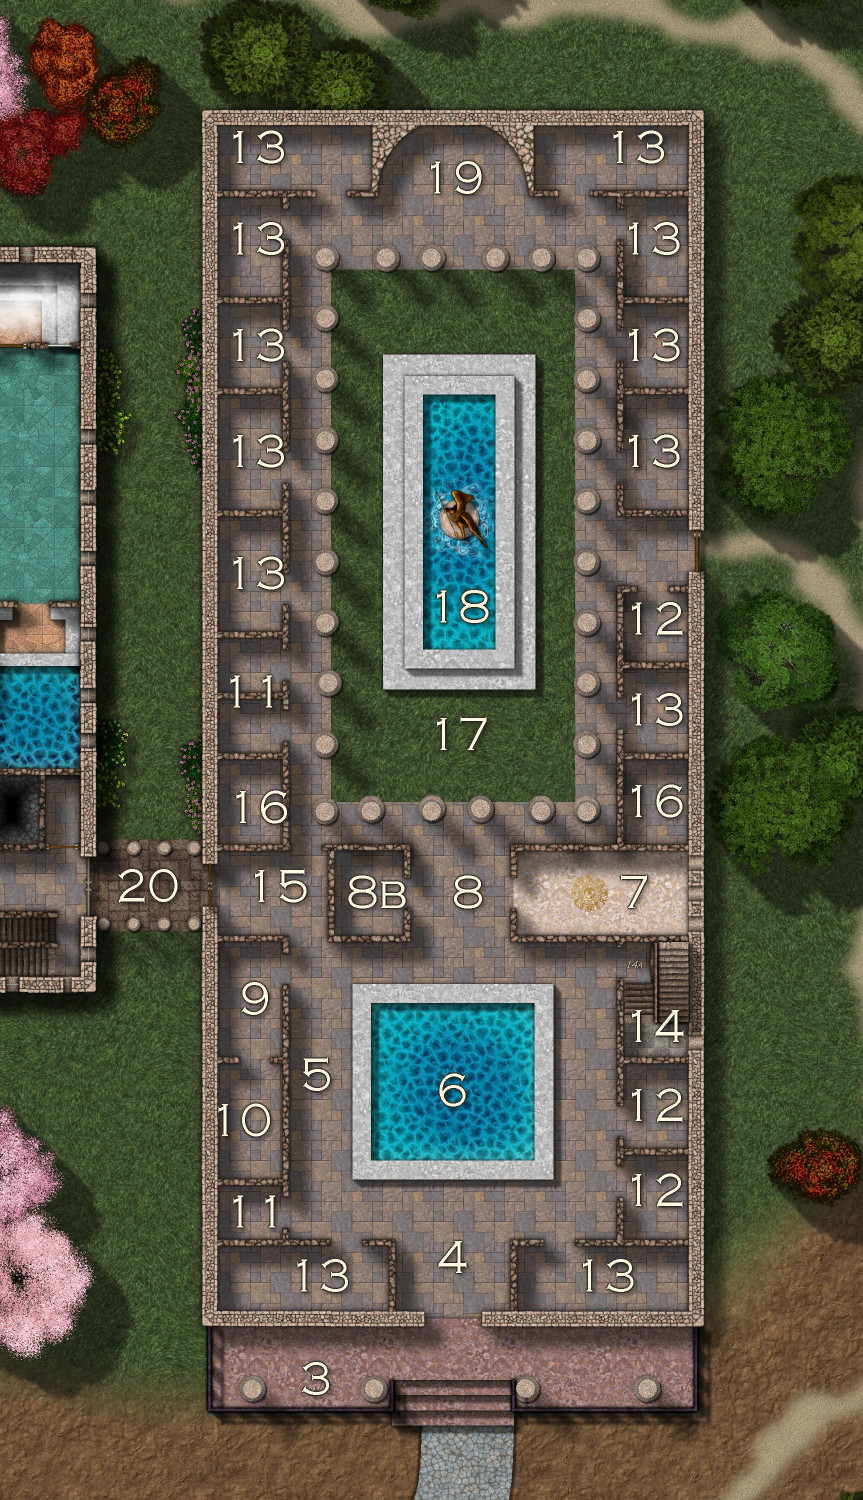
At this level, the perimeter wall is mostly solid stonework. The defensive passageway with arrow slits will be one story higher. But the gatehouses do have chambers on this level with mechanisms for raising the two portcullises (I was tempted to write portculli) and open the iron gate. Internal spiral staircases allow guards to reach a chamber with access the parapet over the gate, where they can address visitors when the gates are closed.
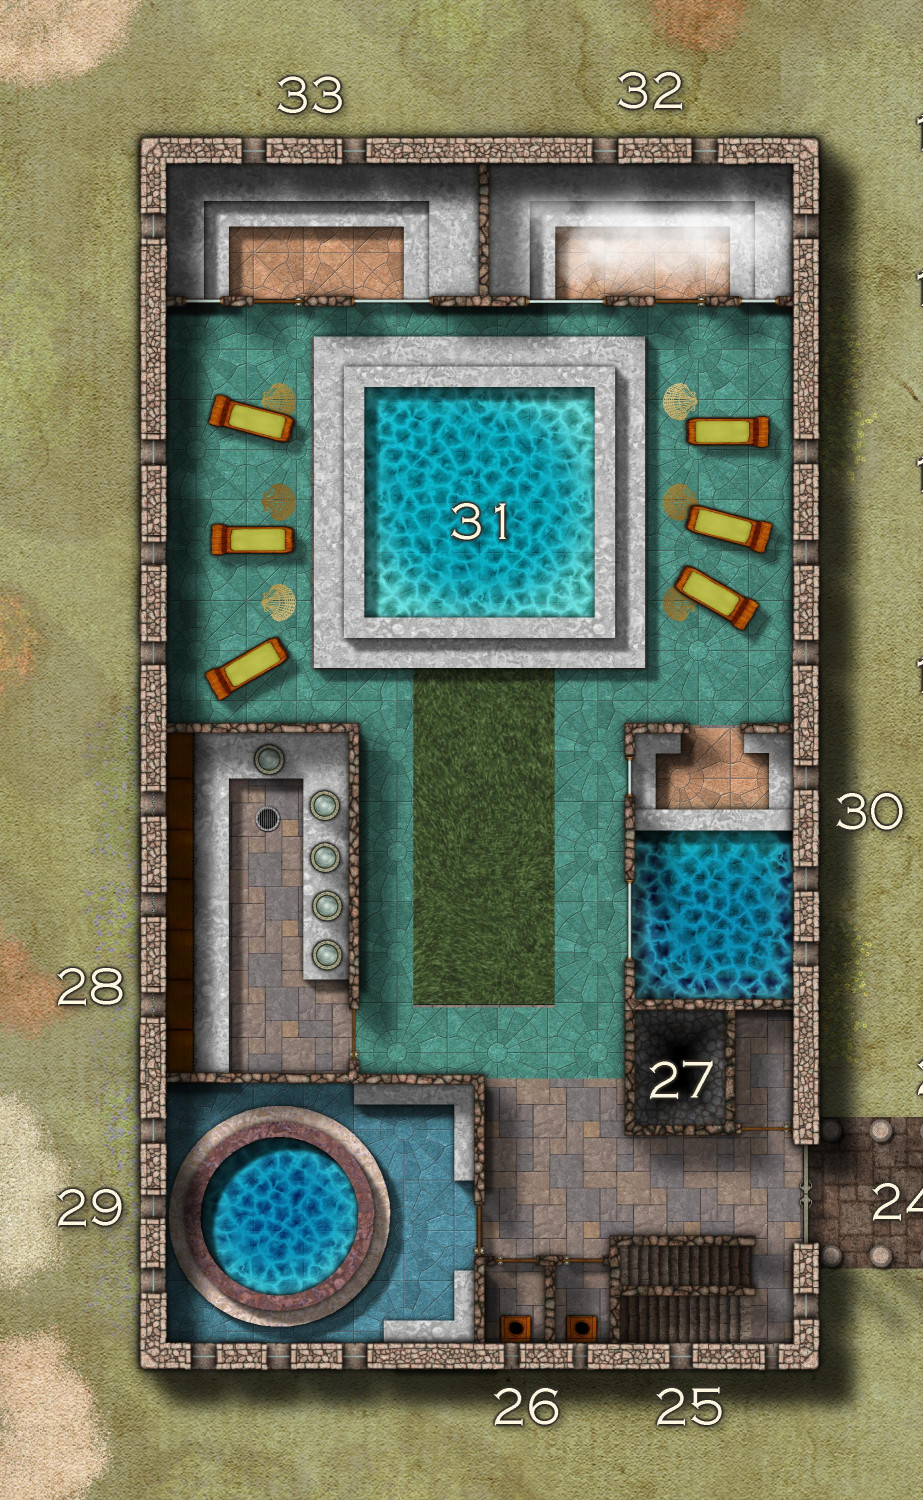
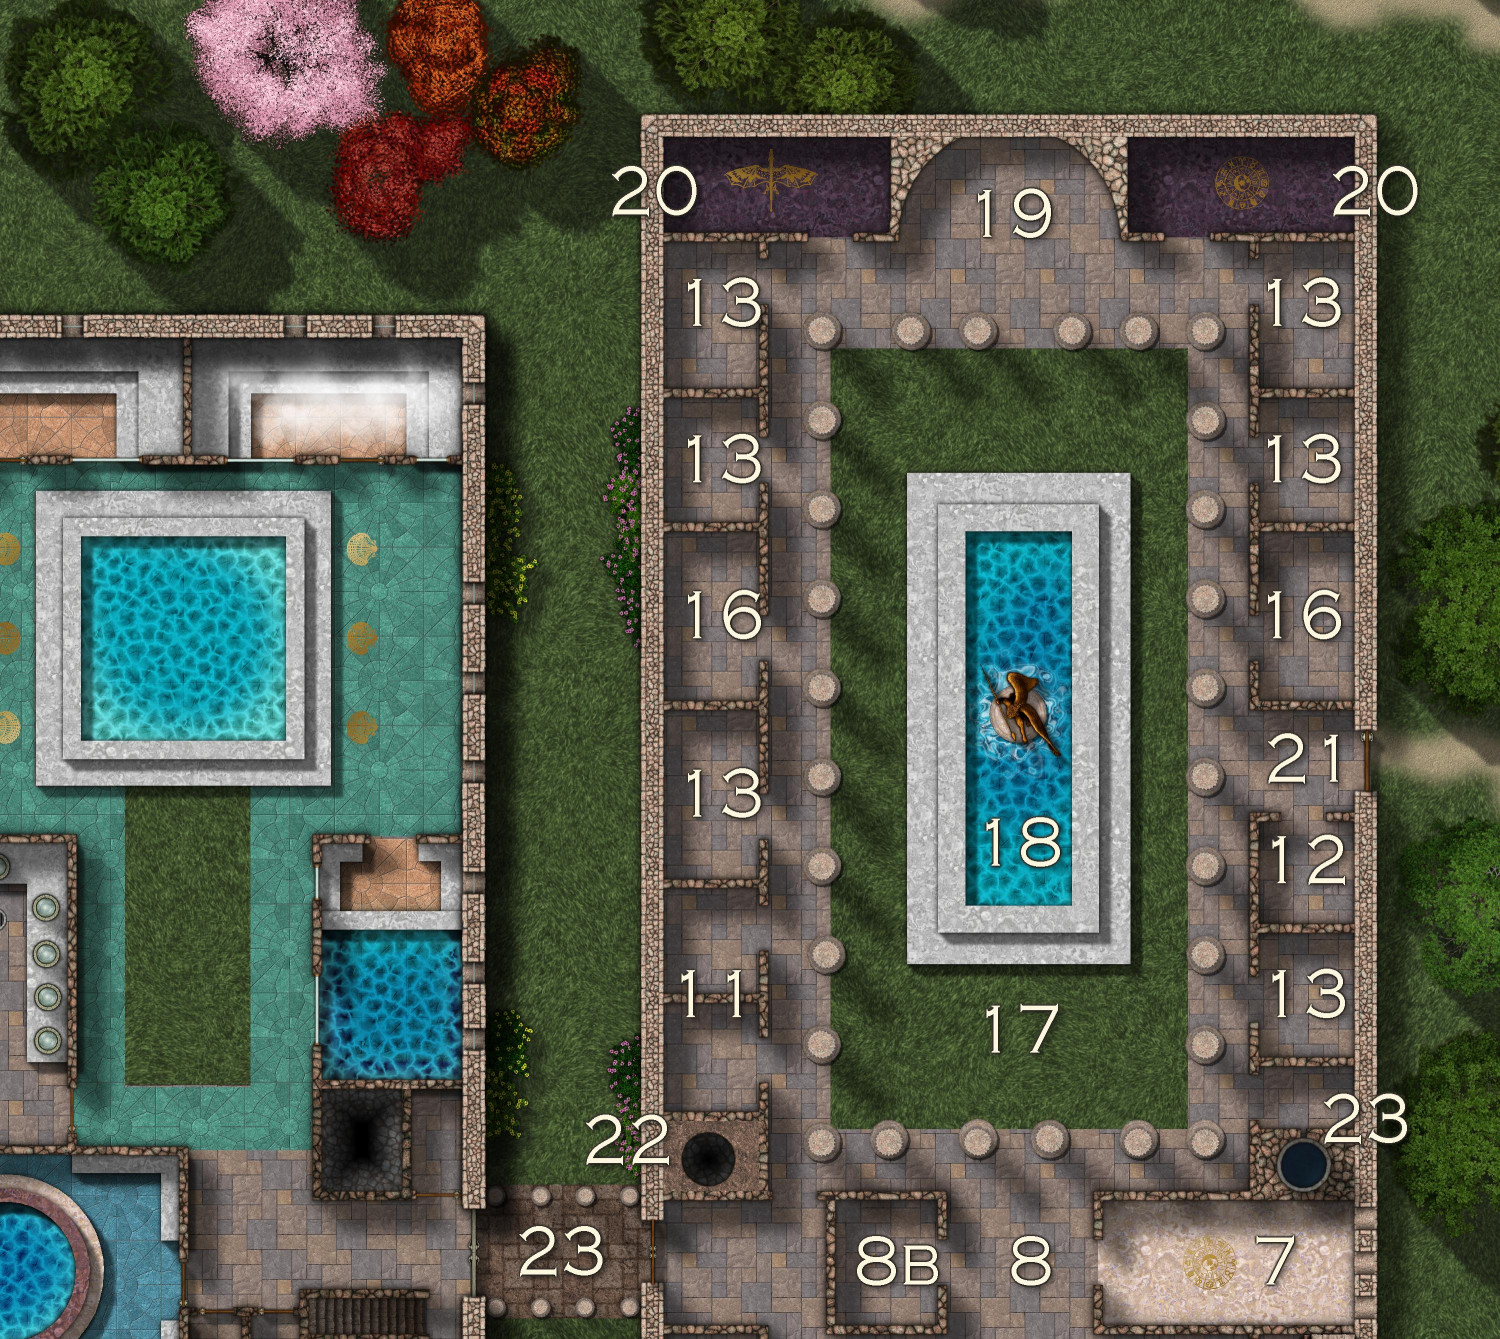
Mostly I've been working so far on the first floor of the balneae, the bathhouse. This is what it looks like covered:

And here's the (not yet labeled) interior of the first floor:
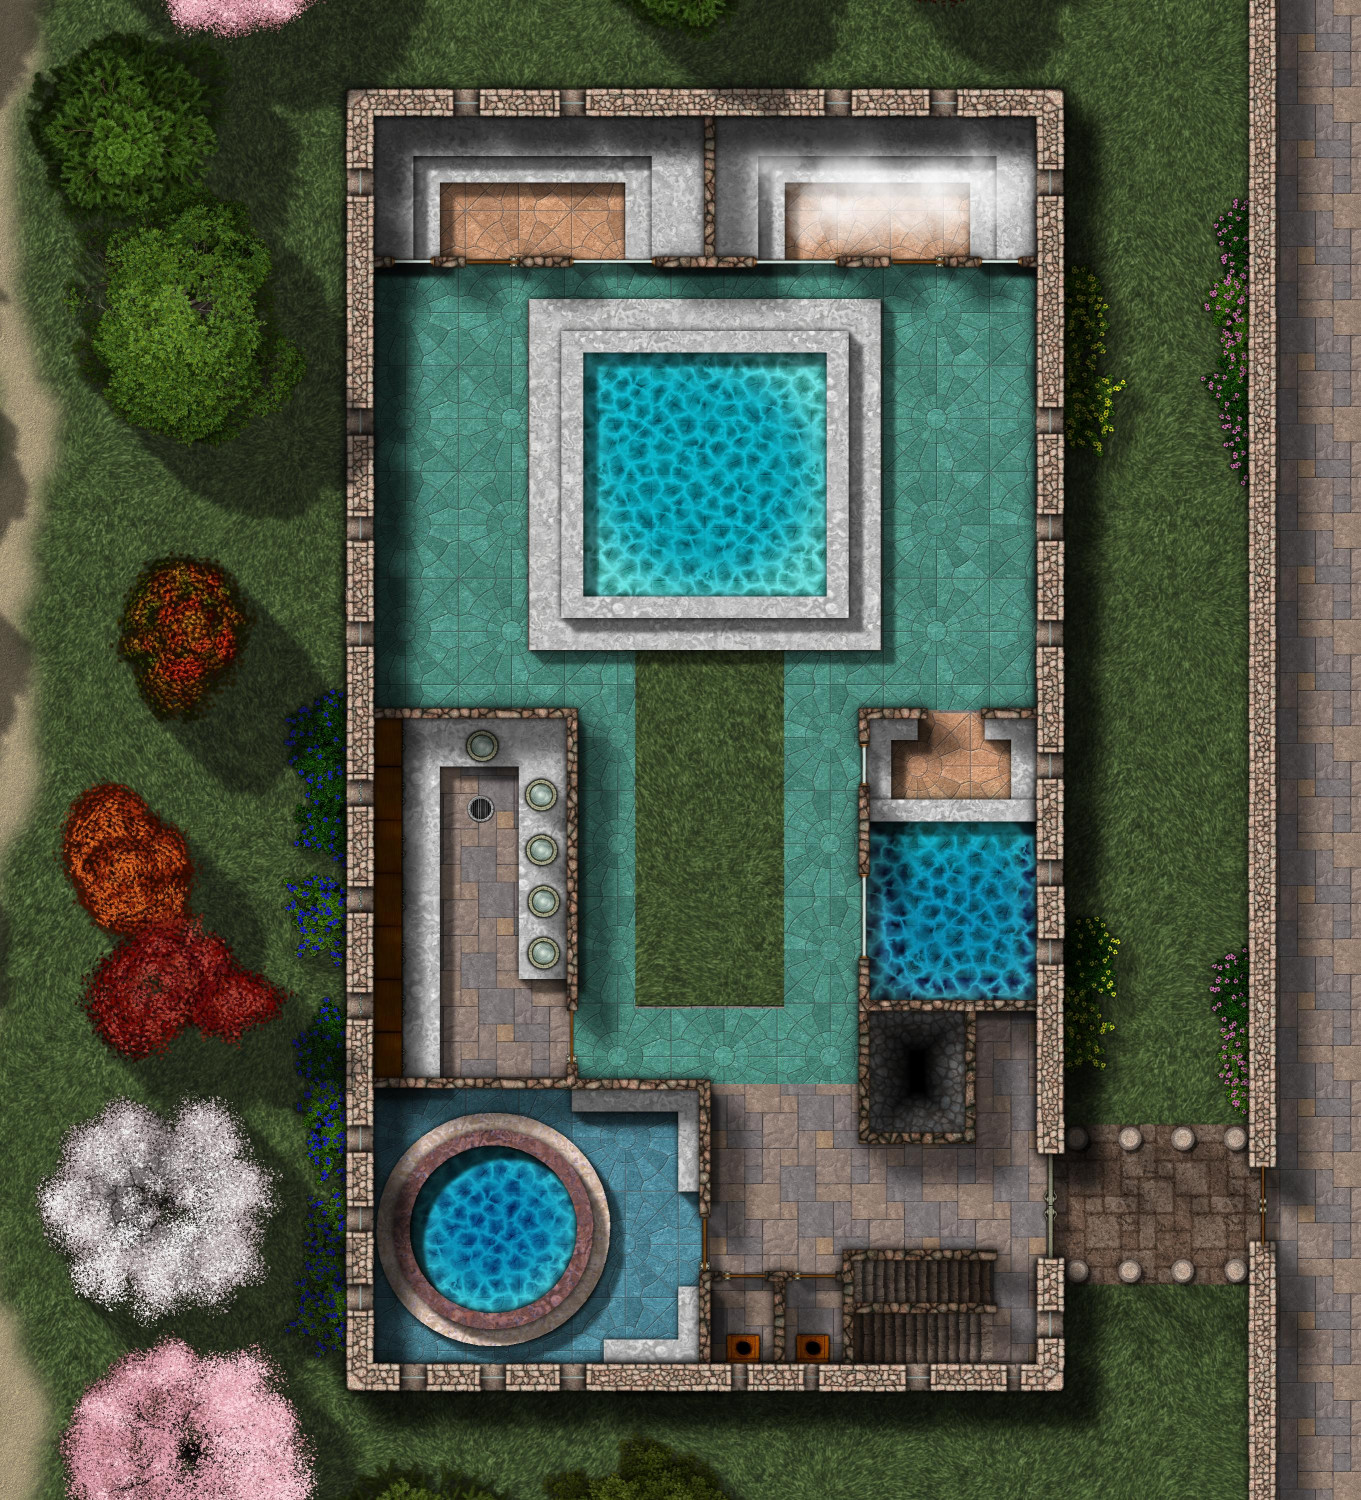
The balneae, or bathhouse, is connected to the main villa by a colonnade, an unwalled covered walkway lined with pillars.
As you enter, there are stairs going up and down to your left, and the chimney for the hypocaust in the basement on your right. Then you see two lavatories, and then the frigidarium, the very cold pool. Next to the frigidarium is the apodyterium, the changing room where bathers could clean up before entering the communal pools. Across the courtyard is the caldarium, the hot room, where both the water and the tile floor are heated by the hypocaust furnaces in the basement. The main pool in the center, partially open to the sky, is the tepidarium, the warm room, where water is heated to a comfortable temperature but not as hot as a bath like the caldarium. On the northern wall are two saunas, the laconicum (dry sauna) on the northwest side, and the sudatorium (steam sauna) on the northeast.
Downstairs will have the hypocaust as well as the pipes for bringing water to the various pools. Upstairs will have more communal exercise areas, a library, and a balcony overlooking the tepidarium.

