


Wyvern
Wyvern
About
- Username
- Wyvern
- Joined
- Visits
- 3,237
- Last Active
- Roles
- Member
- Points
- 5,515
- Rank
- Cartographer
- Badges
- 24
Latest Images


-
Community Atlas: Dendorlig Hall - A Sort-Of D23 Dungeon for Nibirum
Well, my original intention was to provide a progress update here during January. And then before the end of January. And here we are in February, so you can see how well that went...
However, progress HAS been made despite that, even if a lot of it's less easy to show here as yet. That's mainly because I've been preparing handwritten notes on the various itemised areas within this dungeon, which in turn has led to a few alterations in the look of the map. As I've reached area 100 of the 360 this way, things in that respect aren't going too badly. Typing-up my handwritten scrawlings is not moving at the same speed though, and that's still a LONG way behind.
As I mentioned briefly before, from the initial map, it was clear that the parts nearest the entrance cave (areas 1-49) formed a separate region within the overall dungeon, as all being linked to one another, with just a single access-route to the remainder. Looking at the Atlas notes regarding Malajuri, in conjunction with the relatively small sizes of the rooms, led me to the idea that this had originally been a Gnome subterranean complex. For obscure/now long-forgotten reasons, the Gnomes had had to leave it for long enough that its whereabouts had been lost, until the Gnomes under King Dendorlig XXX had managed to find it again, and start to reoccupy, renovate and explore it in more recent years.
As also noted, the description of what's where within the complex has been drawing heavily on the random details generated by the Wizardawn system, albeit amended or adapted in places, particularly in this first Gnome-reoccupied zone, where random monsters are not going to be lurking! Instead, things like that have been reimagined as alternative features, such as wall-paintings or sculptures, and rather more has been added to have the whole make sense, since there's now a village (in cavern 22) and a military compound covering access to the rest of the dungeon (where dangers DO still lurk), around and off the muster courtyard 39. Along the way, a powerful maybe-deity nature spirit of the mountain has been inserted, Dendorla, at the great Water Temple (17), since water is a) naturally vital for living things, and b) the Gnomes long had elements such as piped water supplies and flushing toilets. I've mentioned before how making sense of random descriptions and area layouts helps me better visualise what may have been happening/is still occurring in such places. There's even a serious danger I may yet have to devise a small area map for the Gnome and Halfling farmlands in the hidden Dendorlig Vale area just beyond the underground complex here (food, after all!). Yes, Halflings too, taking on-board the Tolkienian idea of Halflings being natural farmers and gardeners. Plus as there are almost no Halflings in the area of Alarius I've been mapping, I thought this would give a chance to explore something a little different this way.
Since other parts of the map are still subject to change, I've not tried to present the whole again currently, so this is a view of just the reoccupied "Village" area and a small part of the adjacent areas, from the top right corner of the original map:
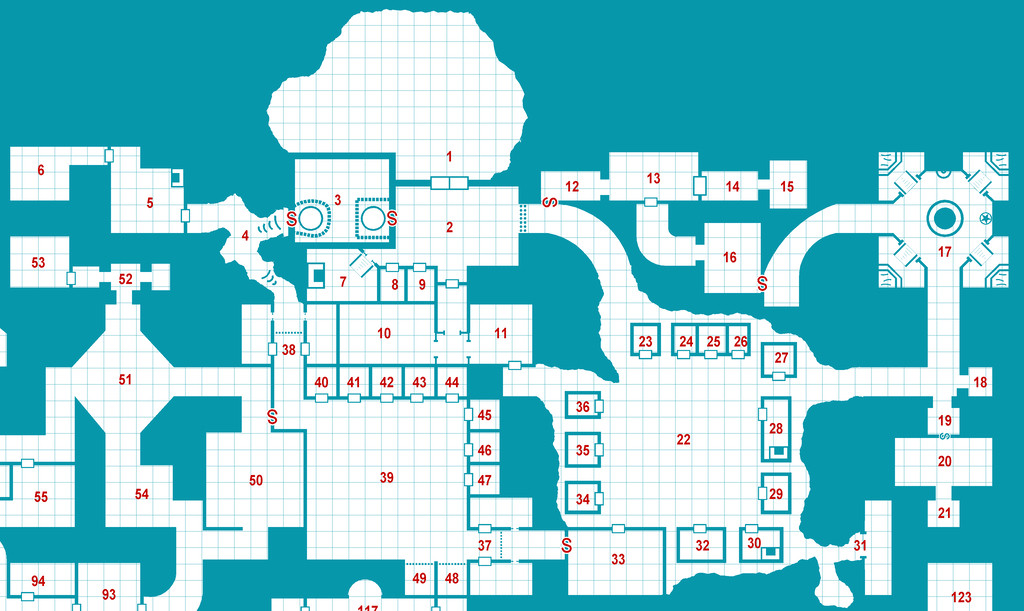
As is rather obvious, the top edge of the map has grown, to better illustrate the full extent of cavern 1 (and yes, the number for that needs moving on this shot still!), and there have been other changes too. The "red-S" doors are no longer secret doors, but sliding ones, operated by magical card-keys only, to better restrict access to various places, such as the Royal Apartments (12-16), the Keep (3), and the route to the remainder of Dendorlig Hall (between 39 and 50).
While not illustrated again here, as I'm still compiling notes and map amendments for the latter stages, I've set areas 50-66, 93-110 and 143-146 on the original plan as those areas the reoccupying Gnomes have currently explored, at least cursorily. The other areas - so most of the map - have yet to be looked over by them, and this is where things can get especially interesting. Even if that "cursorily" proviso means even the explored regions might not be quite so "safe" as expected. That stout, well-secured, red-S door between areas 50 and 39 isn't merely for show!
All being well, further updates to follow (not saying they'll be any more frequent/regular though...).


![[Deleted User]](https://secure.gravatar.com/avatar/c75d9a245b74d9c59be0999ea81ca541/?default=https%3A%2F%2Fvanillicon.com%2F92add7f8c954488718110edc4896ad39_200.png&rating=g&size=200)


-
Community Atlas: Errynor Map 33 - Siolforland
While the choice and location for most of the map's non-landscape features were decided randomly, as done, and discussed, for previous of these Errynor maps, this time not all the settlements were, as just over half the smaller ones were added subsequently, chiefly along the main river lines in the lower half of the area:
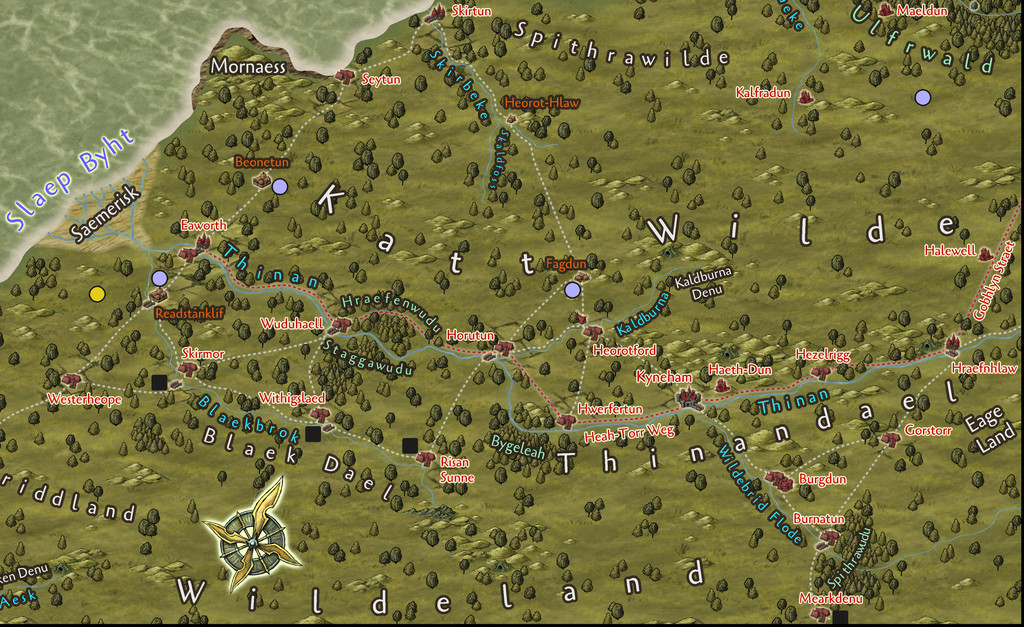
Those that were located randomly had helped determine the general layout for the river lines, in combination with the more obvious geographic requirements. After the resources were added, again randomly, the curious concentration of several coal markers near these established waterways helped provide the spark for what became the civilisation hereabouts, as portrayed in the map's PDF file. Adding the "missing" coal mining villages deliberately to complete the pattern, led naturally to providing mining settlements near the mercury deposits that didn't already have one, plus of course there would be further smaller places, down to individual farmsteads, were this map not at the "large-regional" scale it is.
Route junctions, bridging points, minor landscape features and nearby creatures then helped generate ideas for the varying local character of particular settlements, with names then either chosen to suit those, or sometimes where the names helped give an extra concept of what might be happening at certain places, beyond anything obvious from their physical siting.
Having done that on land, a couple of smaller settlements were added undersea as well to round things off more, along with one last non-random settlement on Hwael Igland ("Whale Island"), since this little island took on an increasingly important role during the development of ideas regarding the ocean trade-route to Arkant from here. However, Hwael Igland is the subject of another Atlas map, so that's a story for another time!


-
Community Atlas: Embra - Wooded Places
Approaching the end of this "guided" (?) tour of Embra, the penultimate group of sites to visit comprises the Wooded Places of Interest, approached via the relevant central pie-wedge from the "Official Guide" map, as usual:
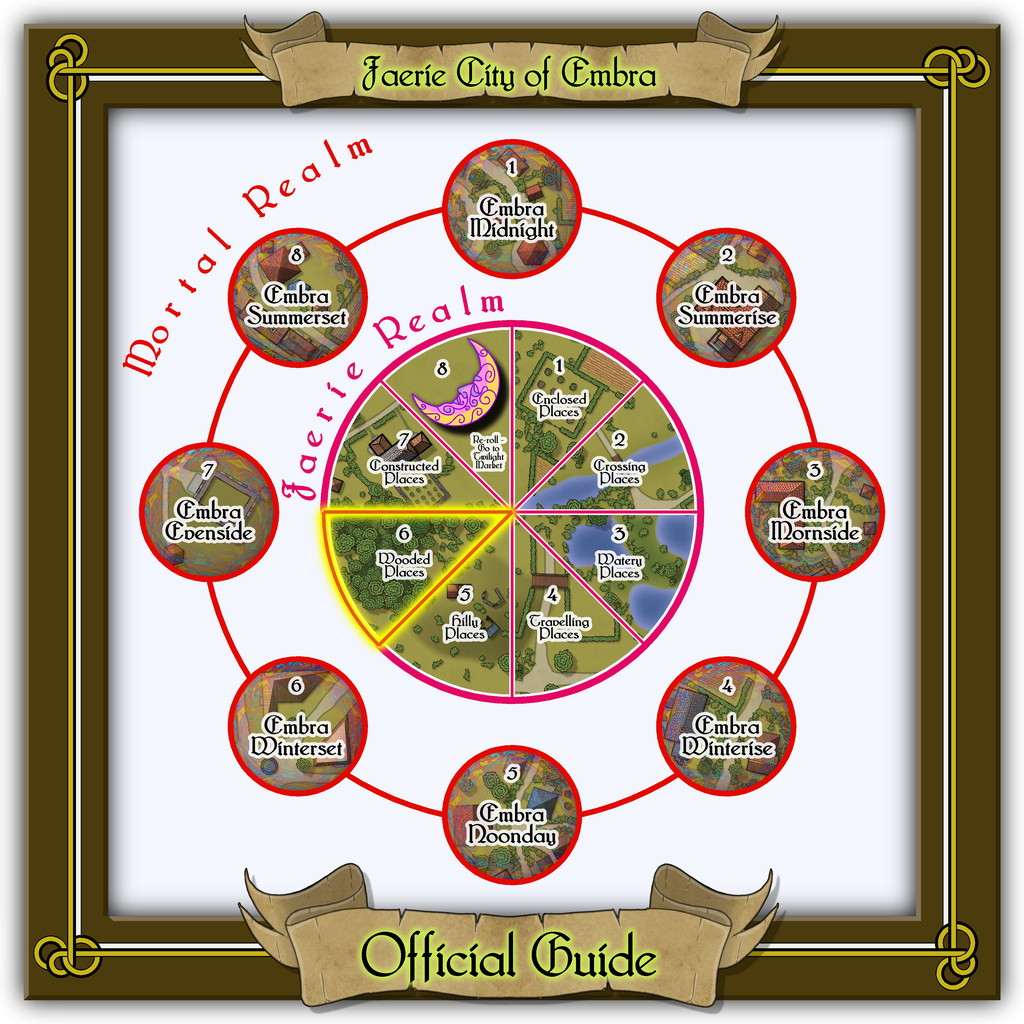
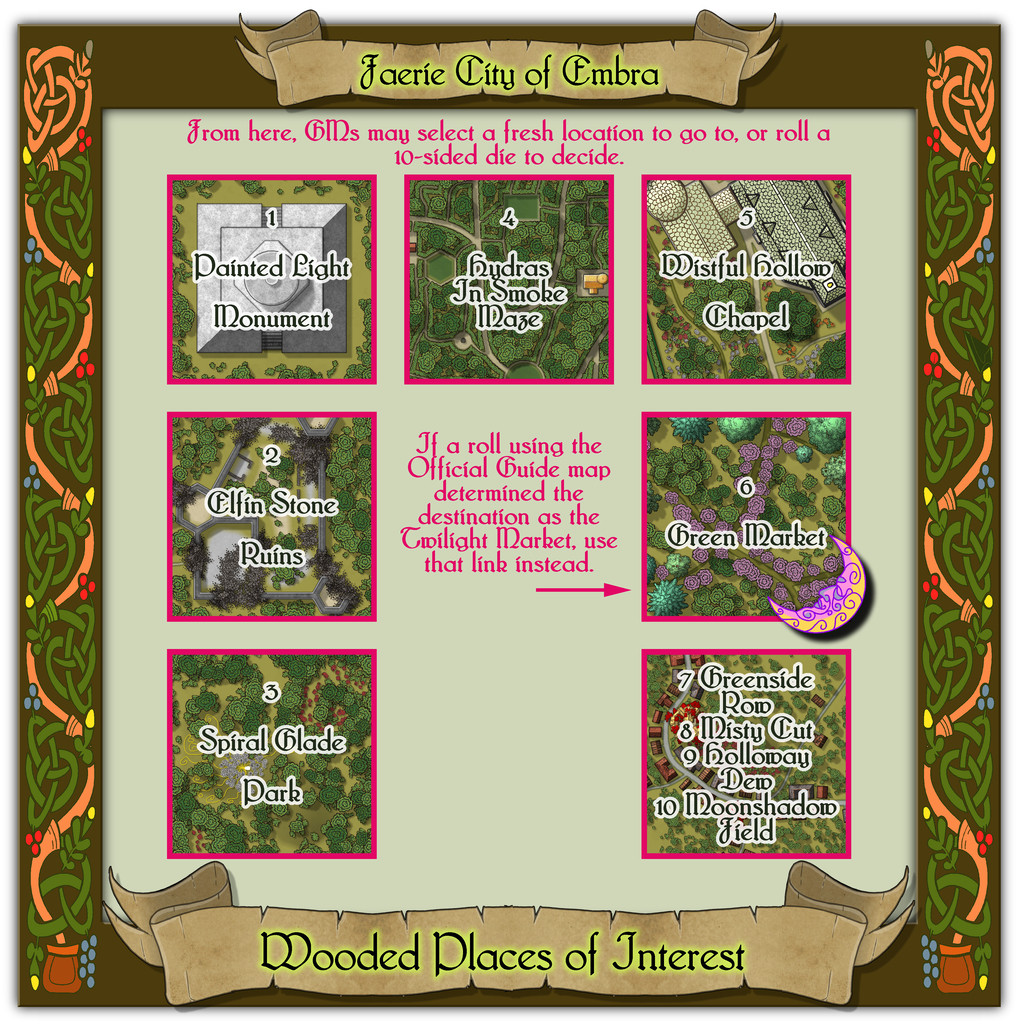
This set, like the Hilly Places, has half-a-dozen individual mapped locations to connect, plus a seventh map for its four "Streets".
From the start with the Enclosed Places at Embra, it always seemed likely I'd be revisiting the foliate borders used there for these Wooded Places map frames too, as nothing else I'd come across seemed to fit the bill quite so well, this time with a reworking of the colours. As we shall discover however, I couldn't resist another couple of the knotwork creature designs from that page of those also in the Dover Clip-Art "Celtic Borders on Layout Grids" book...


-
Community Atlas: Embra - Crossing Places
Lastly, the fourth map covers the seven Crossing Places Streets in one:
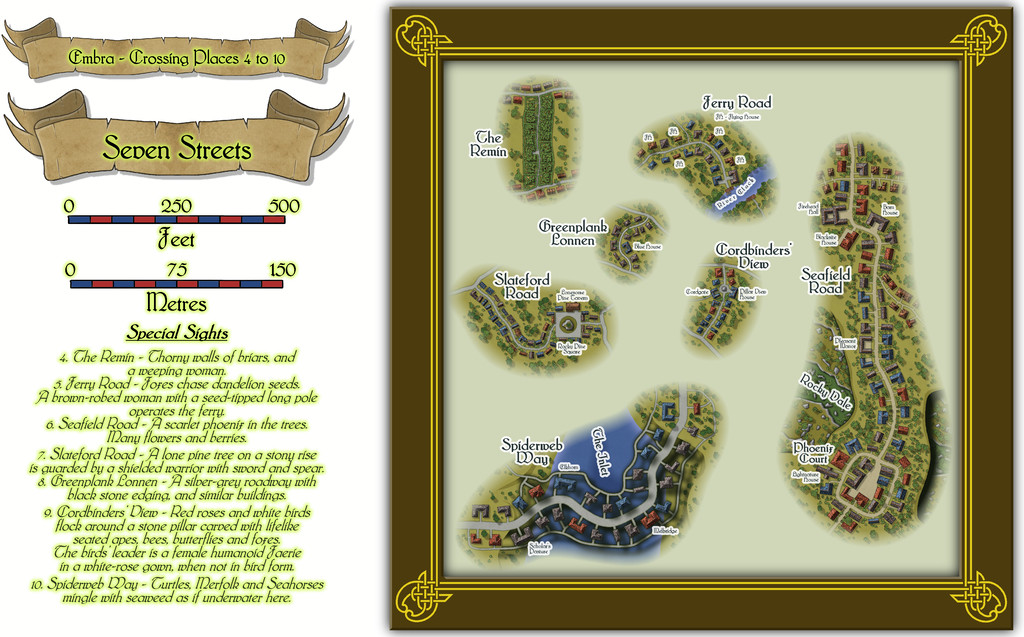
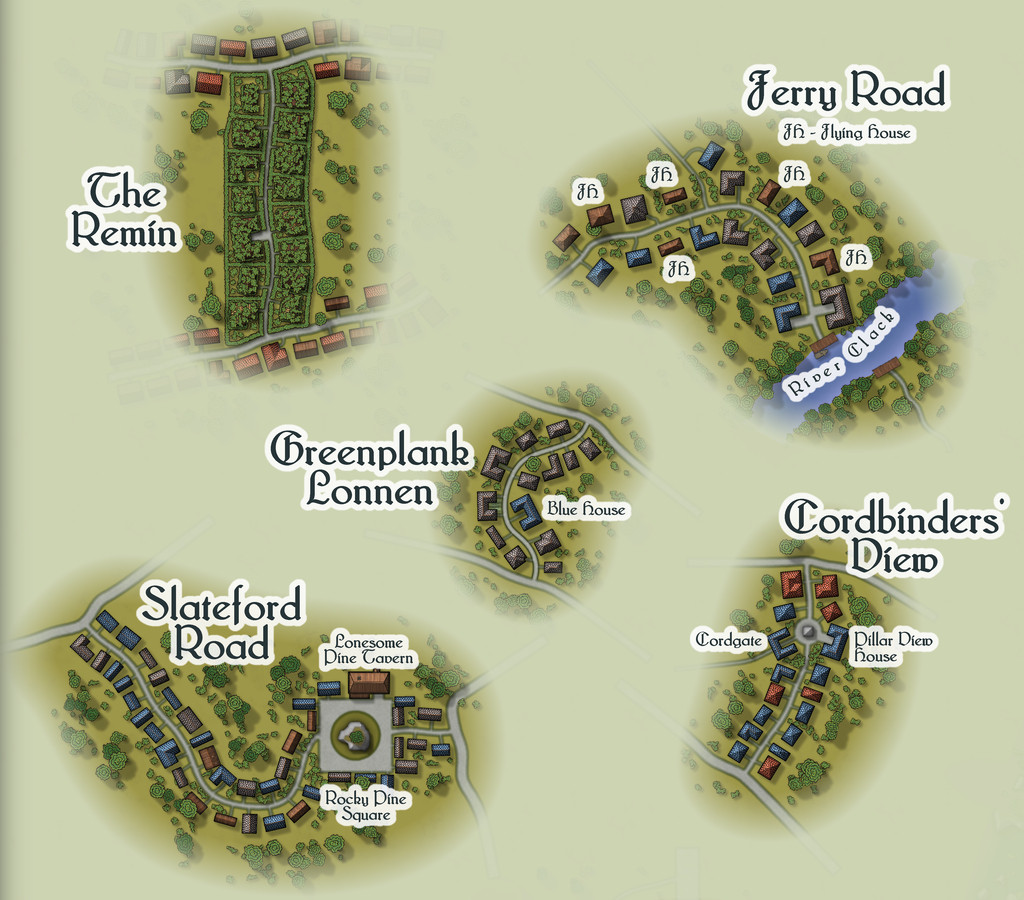
Which of course is tricky to see much detail on at this size, so some closer views might help:
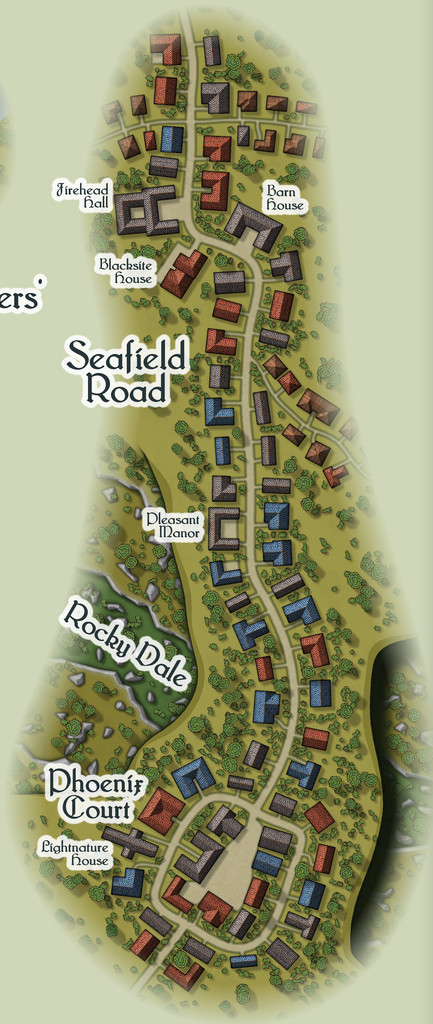
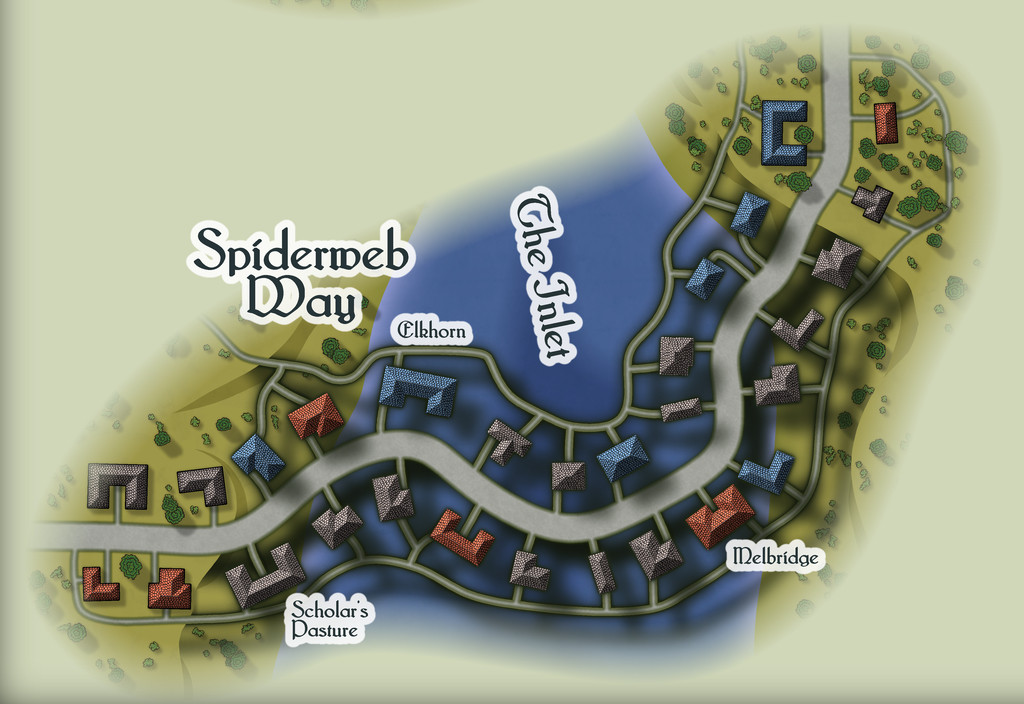
Two of these are obviously bridge-style crossings, albeit in rather unusual ways. Spiderweb Way suspends part of its street, its paths and buildings high above an Inlet of the sea, for all Embra is in the most landlocked part of all my Errynor maps. This is, however, Faerie, so think more surrealist thoughts, and it all starts to make perfect sense. If it doesn't, you just need to think more surreally... Seafield Road too suspends part of itself high above a deep, rocky ravine, although one that nobody ever seems to have managed to get down into. Like the sea Inlet, is it real? Or illusory? Naturally, choosing which Place of this pair was to have the sea inlet was quite deliberate; can't make things too obvious in Faerie always, after all!
One more street, Ferry Road, has a ferry across the River Clack at its end, but the other four are all narrow ways linking broader routes that are completely ignored and unnamed here. For clearly, only the Crossing Places matter in this case! Naturally, each of these smaller streets has features all their own too - the odd, wailing music along The Remin is only one curiosity (yes, that's NOT mentioned in the featured texts, only in the text and PDF files), as the houses there appear to be made of thorny bushes, for instance.
Now we only have five more "Places" groups to discuss...

-
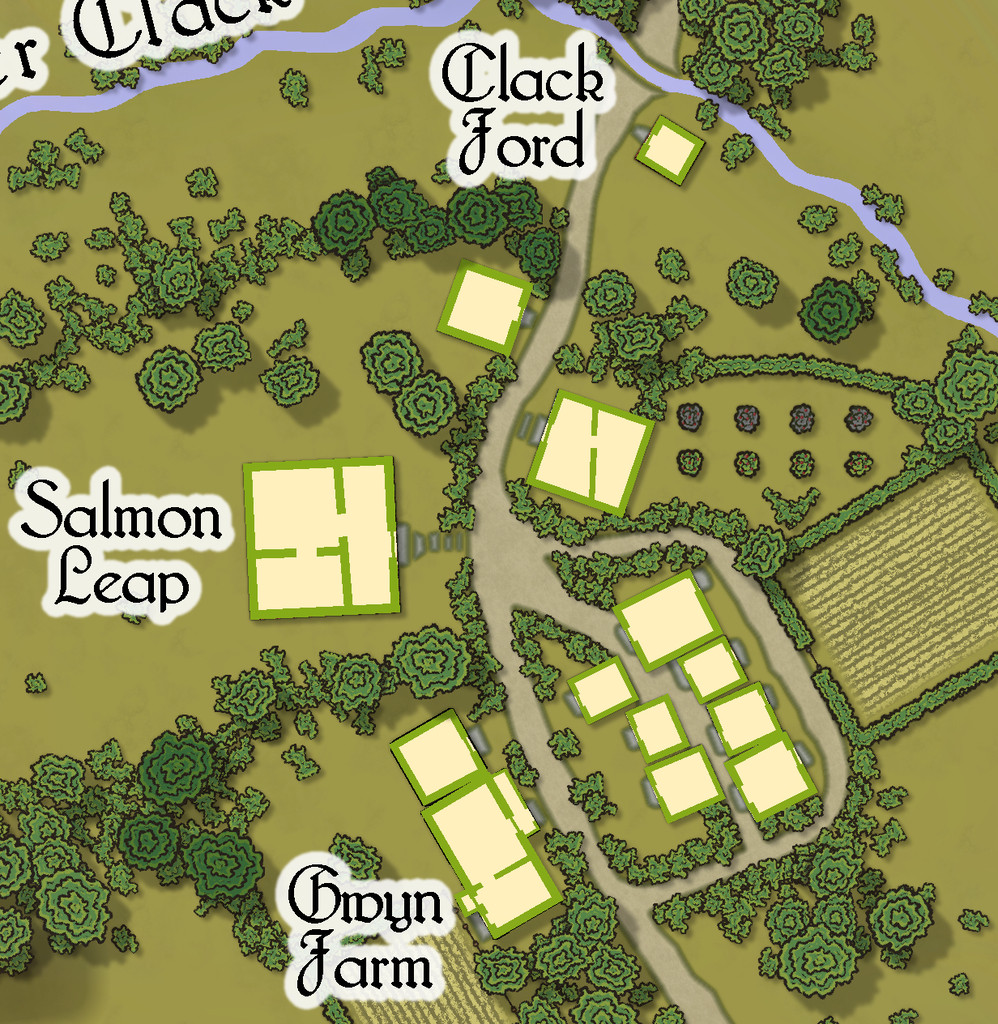
Community Atlas: Embra - Villages
The eastern village is Embra - Mornside, a name partly influenced by the real-world district of Morningside in Edinburgh, although naturally, it also fits neatly into the general naming conventions here (none of which is merely coincidental!).
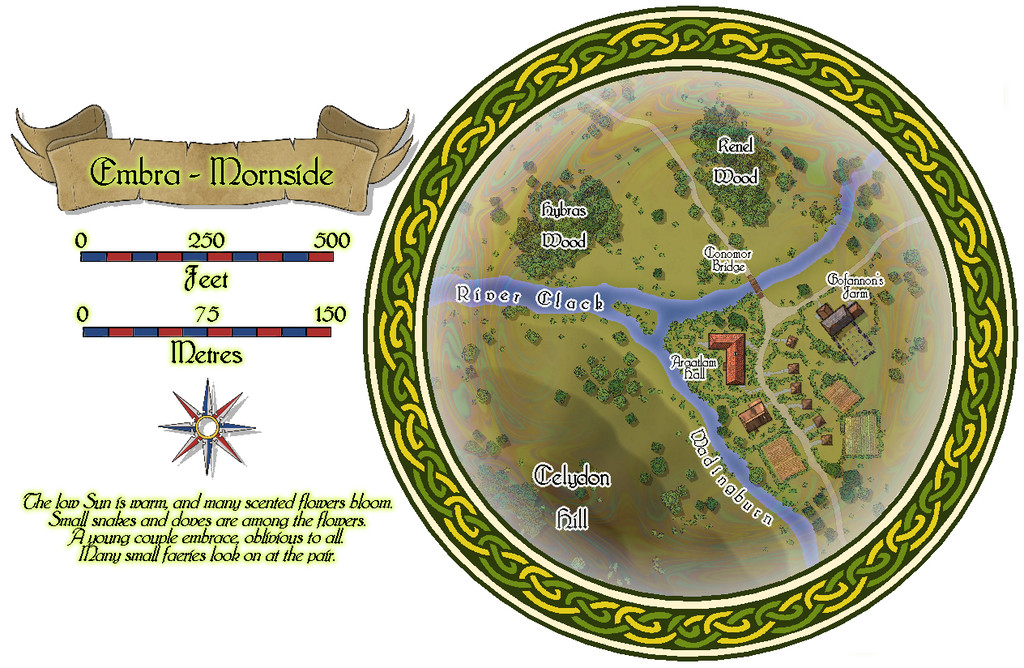
Now the broader Clack has a small island in it, and one of the tributaries from the Clack Valley map features as well, the Wadingburn, in an especially prominent form.
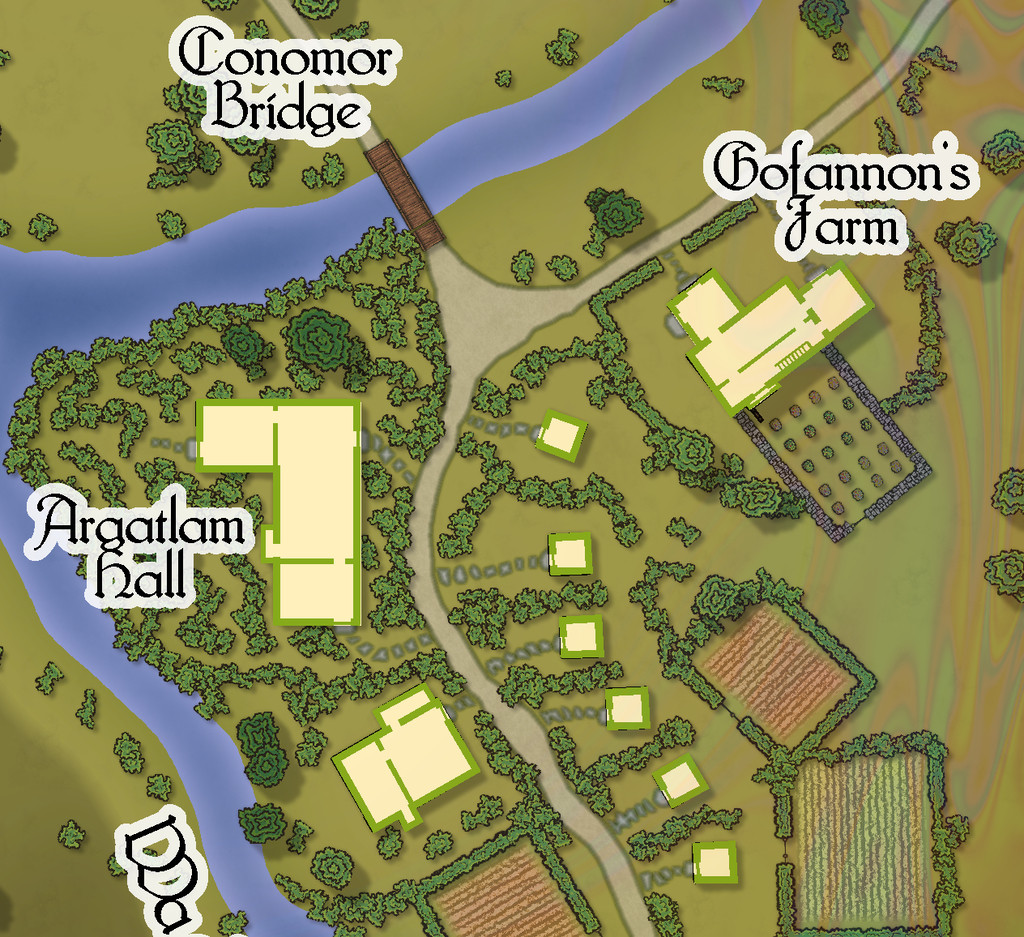
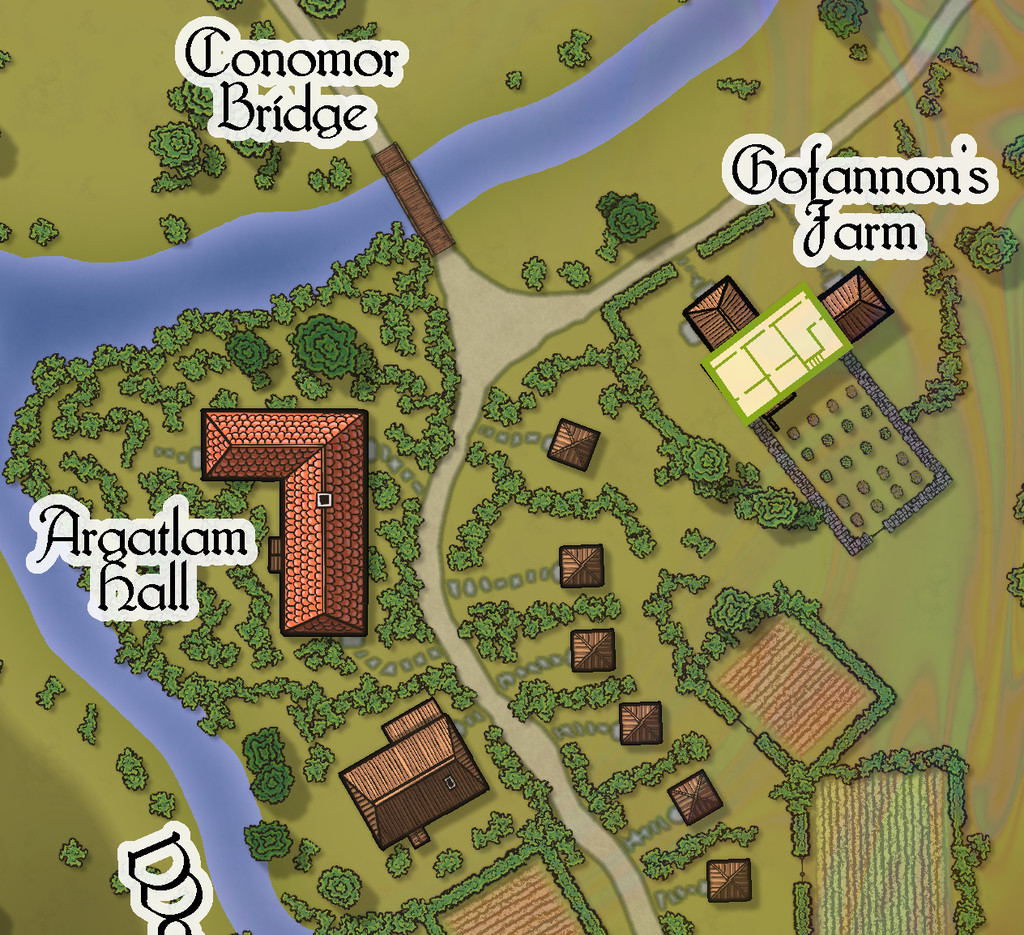
There are more buildings too, a mix of larger and smaller properties, one of which, Gofannon's Farm, has an upper storey:

-
Community Atlas: Embra - Villages
The southernmost village, Embra - Noonday, has a particularly narrow Clack stream, yet one that both the main near-Embra tributaries from the Clack Valley map, the Silverburn and Wadingburn, join by the east edge of this map:
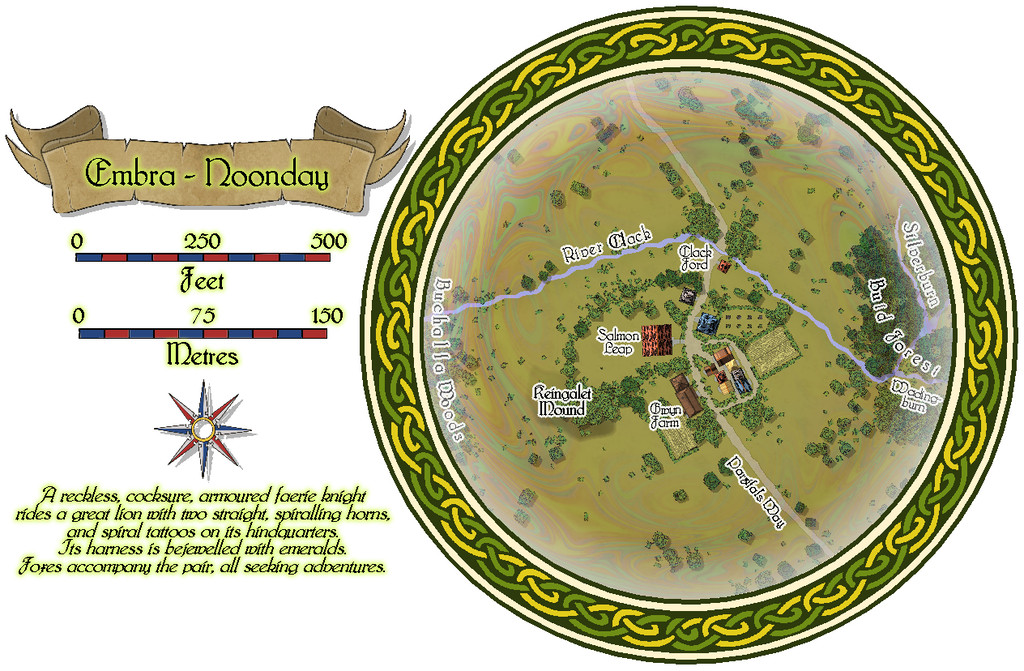
Although there are more buildings this time, each is still only a ground-level property:
-
Community Atlas: Errynor - Aunty MacKassa's Home & Vehicles
Resuming the presentation of the final maps linked to Errynor Map 01 from previously, all concerning the deep-sea hag Aunty MacKassa, we must now zoom right in to Aunty's deep-sea-bed home:
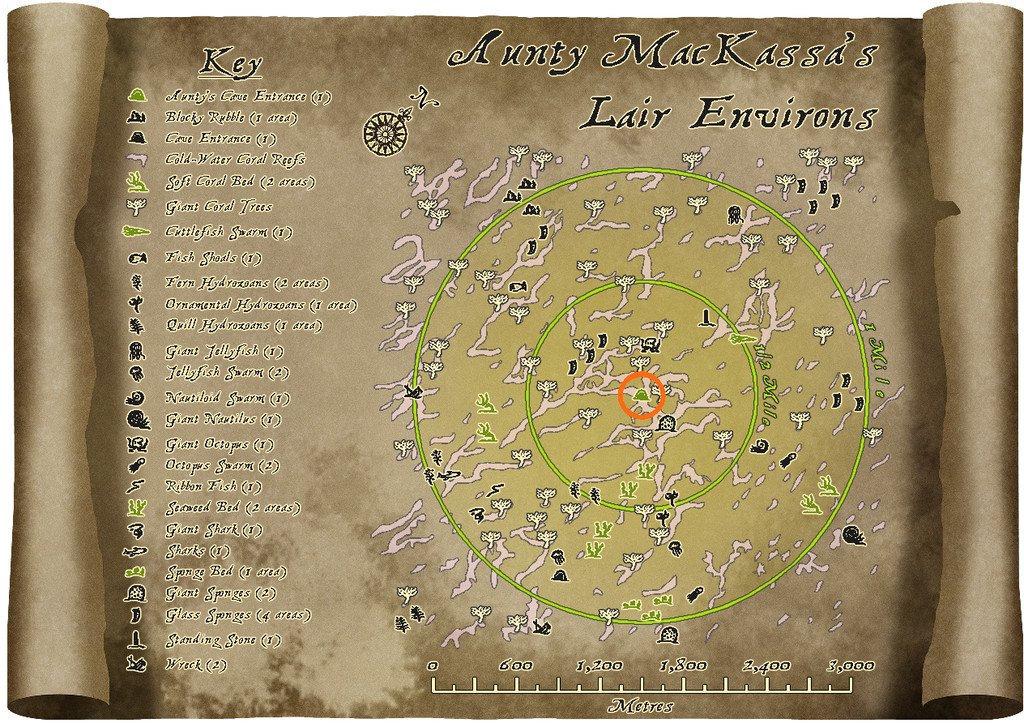
From early in the process of constructing Aunty's lair, I wanted both a fixed-spot home cave, and at least one unusual vehicle, to let her get out and about in "her" 50-mile zone, as established earlier, more readily. This is what some hags have in real-world folklore after all, such as Baba Yaga's chicken-legged hut and flying mortar and pestle. I settled on two smaller "spare" random cave designs from what I'd downloaded from the Curufea's Random Cave Map Generator website earlier as suitable for her coral cavern lair, providing a pair of subterranean levels. These were chosen mostly because each had one cave of a form roughly like the stern of a ship, and a shipwrecked vessel seemed the most obvious choice for a deep-sea hag's vehicle. My idea was, being a faerie creature, and thus seemingly able to circumvent physical "laws" most folks take for granted as "normal", that Aunty would be able to shift her lair effortlessly between cave and vehicle whenever she chose, so a similar shape and size for at least part of both seemed reasonable. Then an idea for a second vehicle, suitable for amphibious sea to land transport, came about too, from which the clearest option was a hut made from another shipwreck, with - what else? - gigantic crab legs.
As I knew elements would need to be copied between all three of these maps, I decided to use the standard DD3 mapping package, except for the fonts. The Coral Cave map was done first (using the East Anglia font from the 2012 Cartographer's Annual):
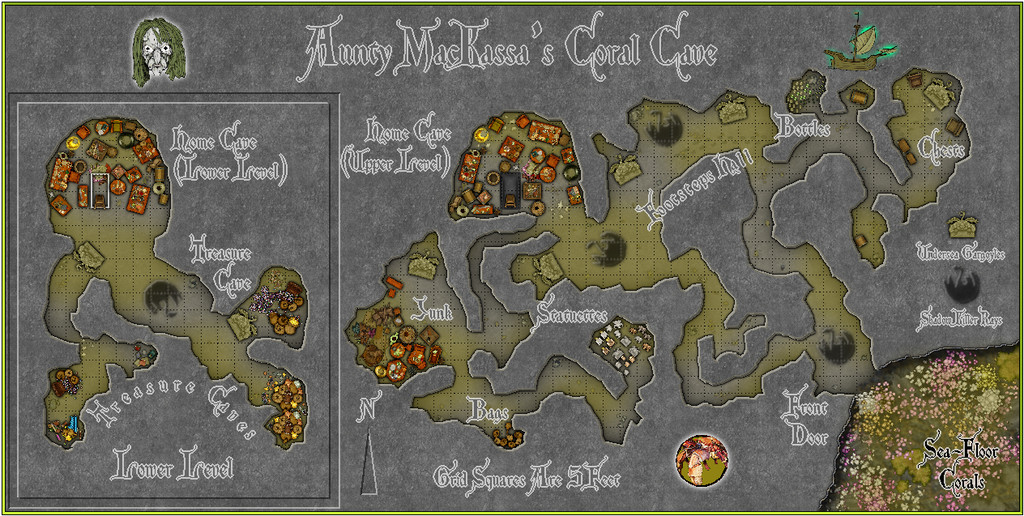
The hatch and ladder between the levels of the Home Cave were chosen to fit with the ship's-cabin concept, of course, while the scatter of clutter and treasure (if it is) was distributed as a compromise between the classic D&D very cluttered hag's lair, and a map that could be read still. Although the deep-sea hag creature is largely an idea of my own of old, it has always been heavily influenced by D&D, and as the 5th edition allows powerful hags to have an assortment of servants, I came up with the illustrated variants of Undersea Gargoyles and Shadow Killer Rays here (the latter drawing partly on a 1953 short story by Joseph Payne Brennan, "Slime", which made a lasting impact on me when I first read it as a youngster). The illustrations for the latter, the north pointer, and the "sunken" border around the Lower Level map segment, were enhanced thanks to the chance publication of Remy Monsen's blog posting on the use of Bevel Effects to create sunken "carvings" on floors while I was preparing this map.
Then I thought it would be interesting to see just what Aunty MacKassa looked like. So I constructed this image of her, using CA3:

As usual, there'll be a PDF and series of text-file notes available in the Atlas to explain the game-relevant map details, from which you can discover why she has a long, bone hairpin in her grasp, and a pair of gold-tinted spectacles in her other hand, should you wish! Plus of course, I added her face to the Coral Cave map to serve as the Atlas link-point to this portrait.

-
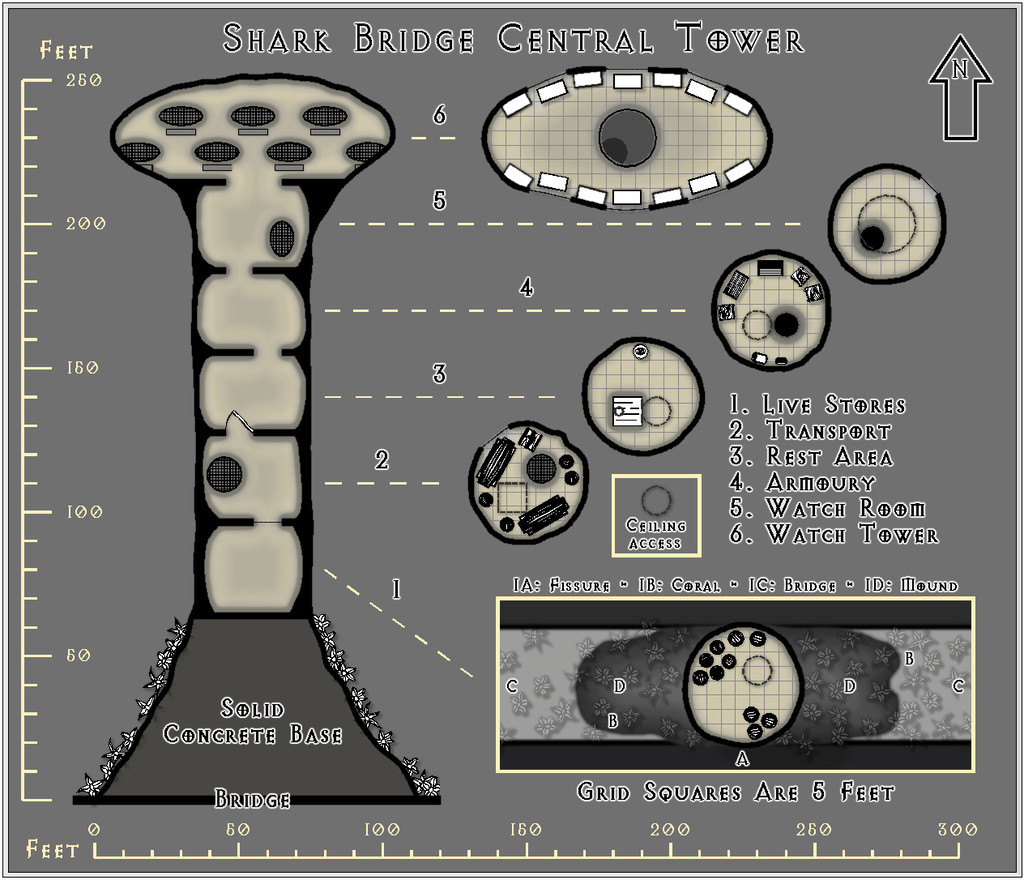
Community Atlas: Errynor - Shark Bridge
Continuing with the sea-floor mapping begun with the Aak and the Aak Hills maps from "my" corner of Alarius, this time I swapped to the opposite corner of Errynor Map 01, to map the Kachayan stronghold marked by the mysterious sea-bed bridge structure crossing the Clawmark fissure line labelled "10" there:

I'd decided already there should be watchtowers on the bridge, and cave strongholds below it, one on each side of the fissure's cliffs. While it might have been nice to visualise the bridge as like the Map 01 symbol, a classic hump-backed arch rising high over the fissure itself, given the fissure was to be around 3,000 feet (over 900 metres) wide at the nominal "crossing point", that seemed impractical - and maybe a bit too "goldfish bowl ornament". So I opted for an arch set in the fissure, with a level bridge top resting on it instead. A vast arch by medieval standards, regardless.
Then I hand-sketched some to-scale ideas from these parameters, and quickly realised I needed a series of drawings to better visualise the general area around the bridge, give an impression of its size and nature, and show where the various Kachayan settlements were on and around it. This led to the Shark Bridge map, albeit it was actually the last map prepared in CC3+, because I needed a clear impression of the appearance of the towers and caverns first to be able to add them correctly to it.

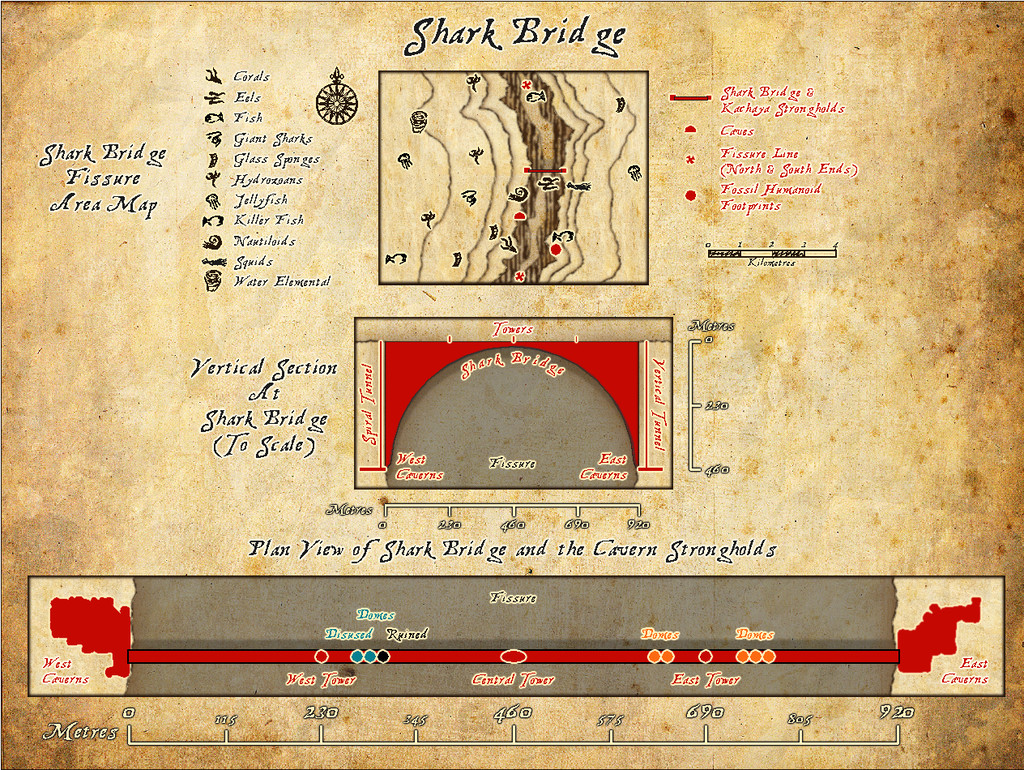
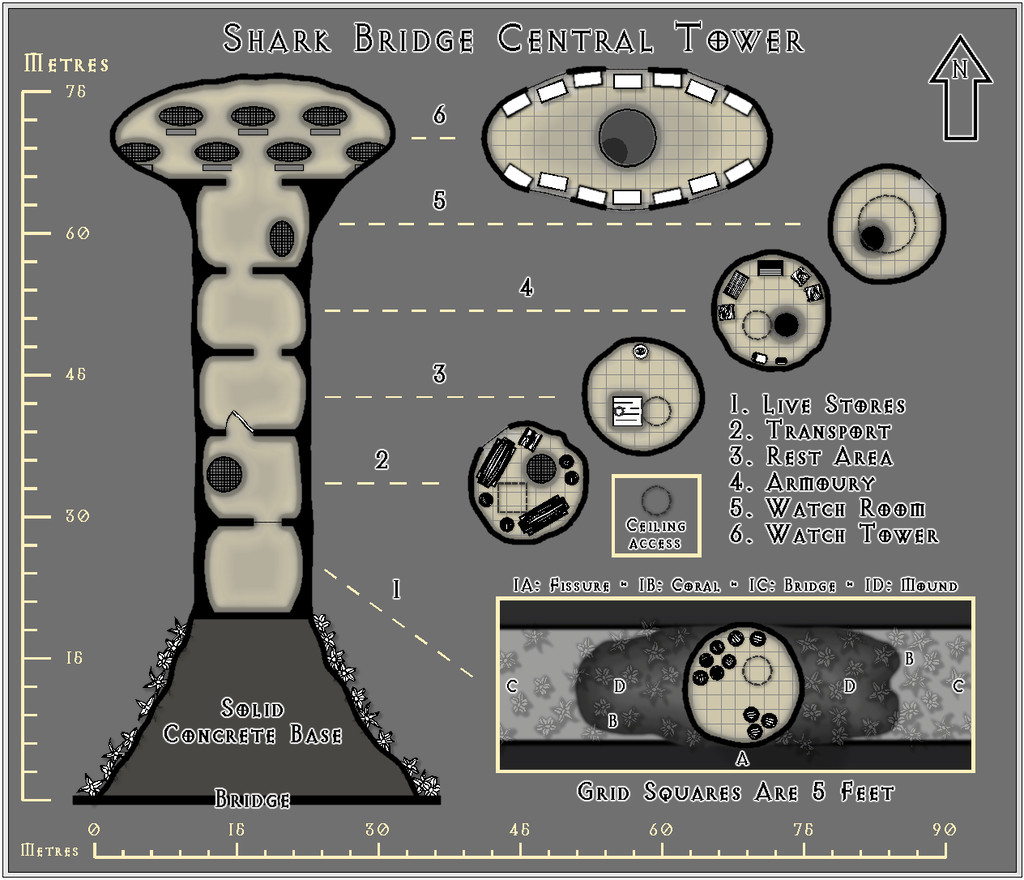
The two versions allow switching between Imperial and Metric scales (via a toggle in the Atlas version, if all goes to plan).
Partly because I'd been mapping extensively in another style for quite some time to reach this point, partly for contrast, and as an opportunity to explore a - to me - new mapping style, I chose the Treasure Maps style from the October 2011 Cartographer's Annual, including its Treasure Map Deadhand font. I rather like this parchment-look texture, where you can't be quite certain it isn't really the surface of an old driftwood plank, with the map lightly cut into its surface in gentle relief.
It has the added advantage of coming with vector symbols drawn in a style that's quite easy to copy, so I drew-up my own not-symbols (they're just drawn shapes in CC3+, not "true" symbols) for the near-sea floor features I'd randomly added from an amended version of my deep-sea encounters & features lists prepared for the original Errynor mapping. As usual, there's more detail in the accompanying PDF and text-file notes.
For the detailed mapping, like Aak, I chose another black-and-white style - monochrome vision only in the lightless deep oceans! This time, I went with the Black & White Dungeons style from the December 2010 CA, labelled using the Avalon Quest font from the 2012 CA. Three maps for the towers along the bridge top, each with a vertical section and individual floor plans, plus a toggle option to show Metric or Imperial scale lines (though the grid is standardised at five-feet-squares only):

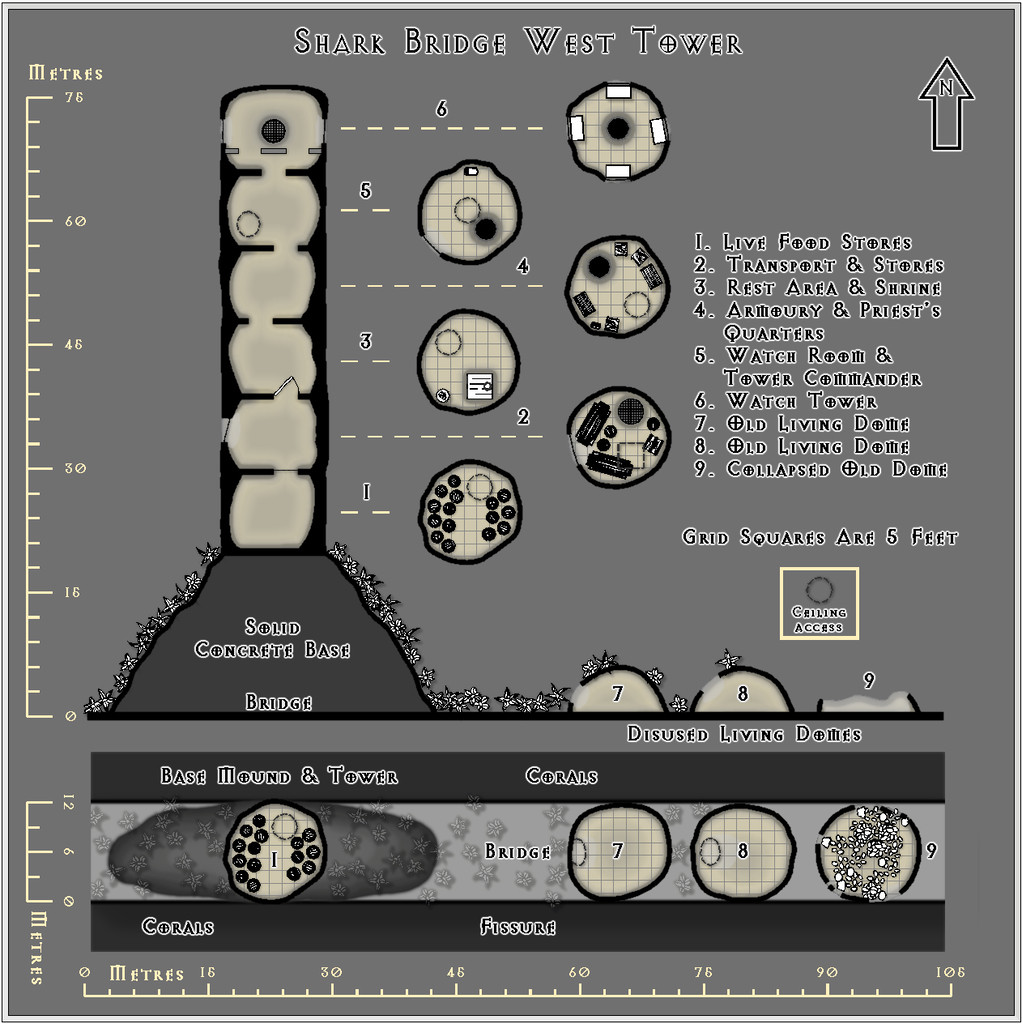

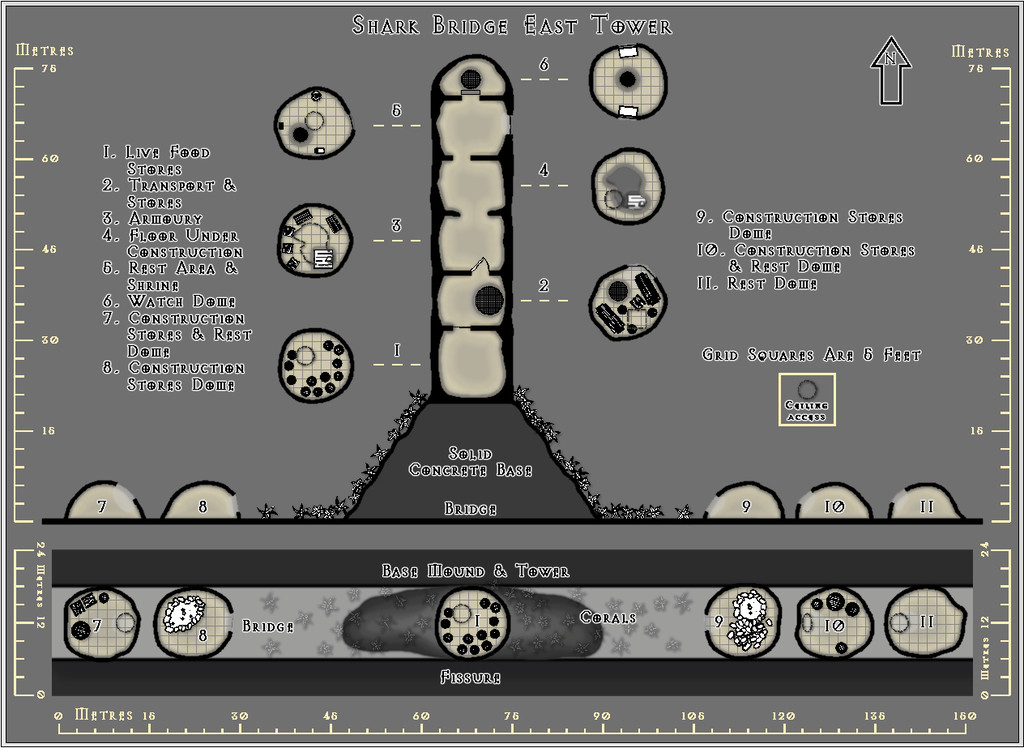
Then one more each for the West and East caverns respectively (floor plans only), again with the option of alternating scalebars:

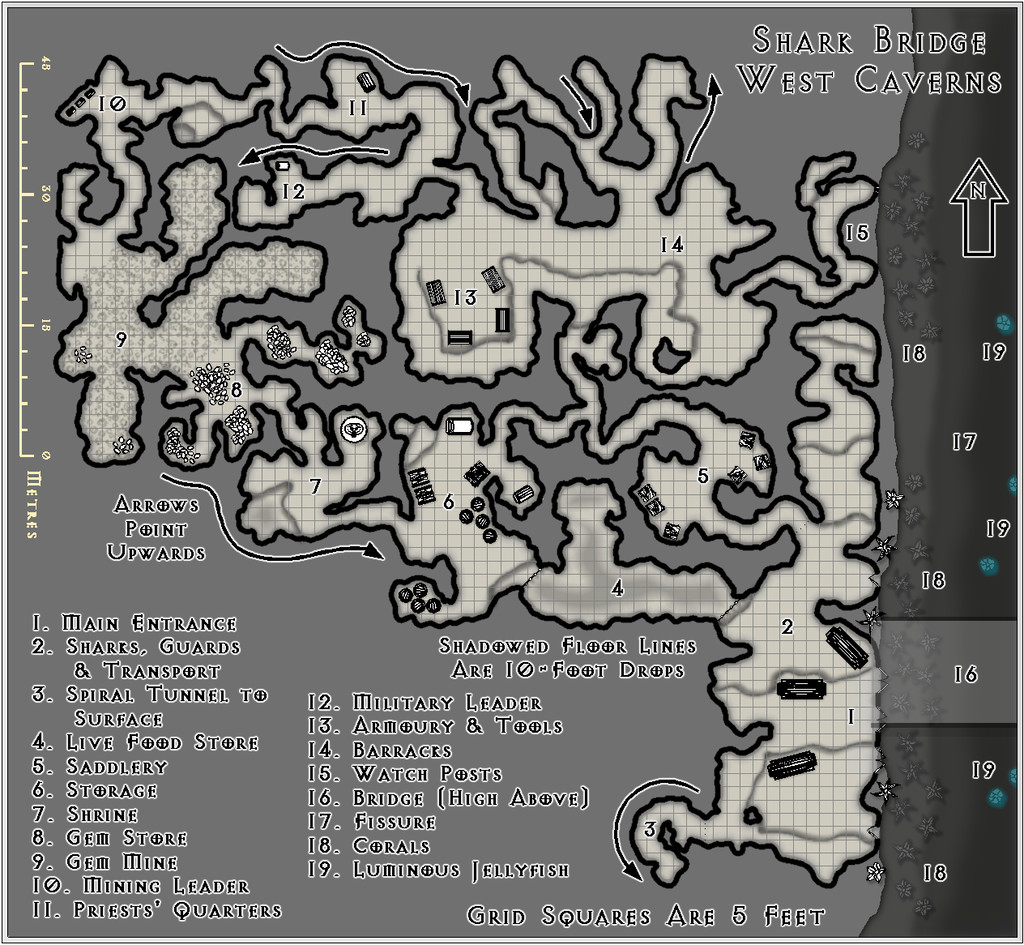
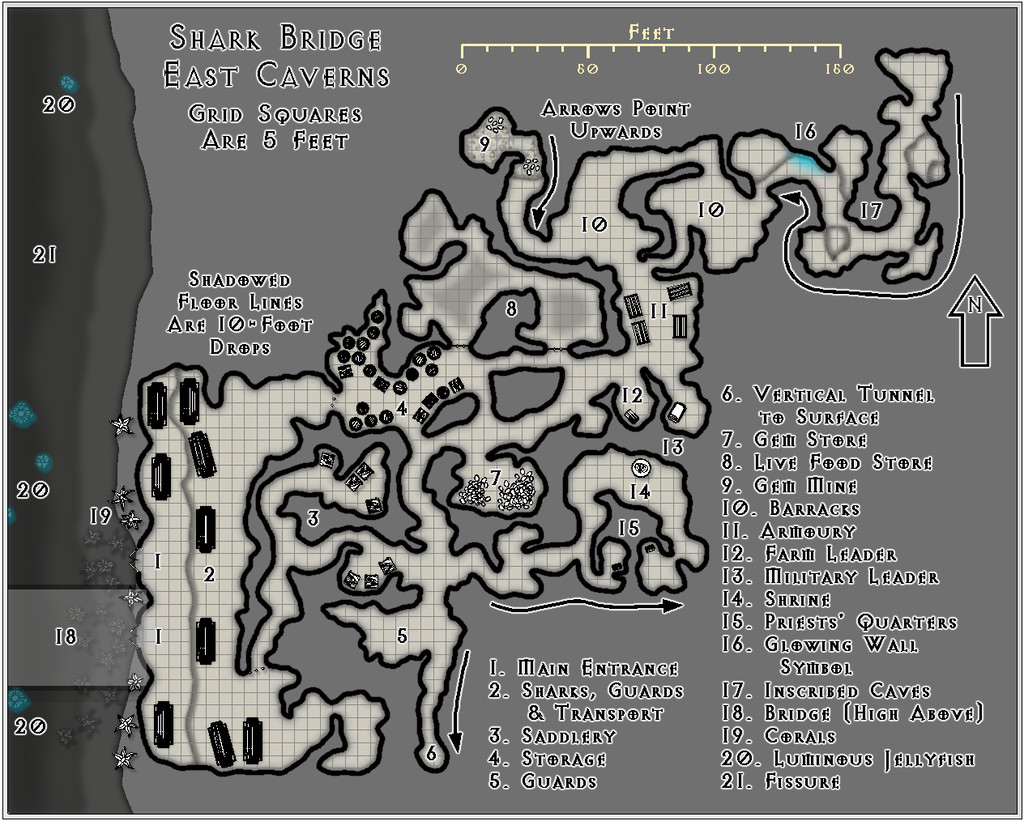

Each separate map comes with its own PDF and text-file notes.
The tower designs were based on my own previous notes regarding Kachayan sea-bed surface architecture, while the Caverns used mildly reworked versions of more random layouts created by the Curufea's Random Cave Map Generator website, like that for Aak village.
-
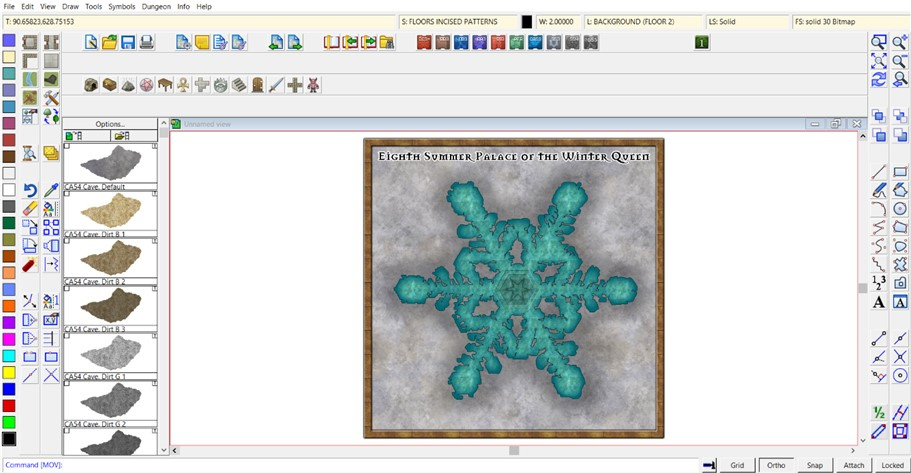
Community Atlas competition entry: The Summer Palace of the Winter Queen
Bit of an excursus today. I've never really done full "works-in-progress" reports on the Forum here, chiefly because when I'm working on a map, I'm not thinking about anything else - such as how I've got to the point I have - which means taking screenshots or jotting down notes along the way so others might be able to follow the process is quite alien to me. However, a contest is nothing if not a chance to stretch beyond the expected bounds, so here are some thoughts on how I constructed the basis of Palace 8 in this series.
Partly, this came about because with working on such a series of similar yet different maps, each using an imported bitmap image as the template, I've established a pattern for doing so, drawing on previous experience, as a lot of my earlier mapping has involved copying layouts from images into CC3+.
Before even starting any of the maps, I'd picked the ten photo-micrographs of snowflakes I intended to use as the individual Palace shapes, and given them a number each, so I knew what order I'd be working on them. Then I printed-off copies of the ten. I like hard copies of such things to-hand, as it means I can jot notes on them in between mapping sessions, and can think more on the map design without having to be sitting at the computer. Additionally, they can be very handy while I'm tracing the image in CC3+, and find I've suddenly hidden some key item with a polygon that I now need to see!
These maps were always going to be a bit unusual, because what I'm doing is taking tiny, microscopically-imaged objects and expanding them to Palaces which are several hundred feet across. So there was a scaling issue from the start in that. However, looking over the images and deciding how the final Palaces were to be drawn, it was clear the key trait was going to be the minimum passage width, to allow access to all parts of the final structure. I fixed upon a general minimum width of 10 feet, from which I could then physically measure features on the hard-copy images, that in turn gave me the approximate maximum dimensions for the area each Palace would need to fit within, and hence roughly what the size of each map would need to be to allow for titling, labels and overall layout.
Palace 8's measured image meant the Palace itself was going to be around 515 feet by 460 feet, so I guessed that a map around 600 feet square might be OK. Firing-up CC3+, and having recently worked on three black-and-white style maps in succession, I opted for the Jon Roberts Dungeon style for Palace 8, from CA54, as a complete change. Aside from setting the size in the New Drawing Wizard, I wanted a paler background than the default to represent snow or grey-white ice, and went with the Stone Light Grey option from what the style offered.
Once the new map had opened, it was clear the fills for the map's frame and background needed adjusting to avoid the dreaded tiling effect, so I greatly increased both fill sizes using Tools - Set Properties - Fill Styles from the drop-down menus, after a bit of experimentation (and locating the correct fill style after picking the wrong one for the background first of all, and wondering why nothing happened when I adjusted it...).
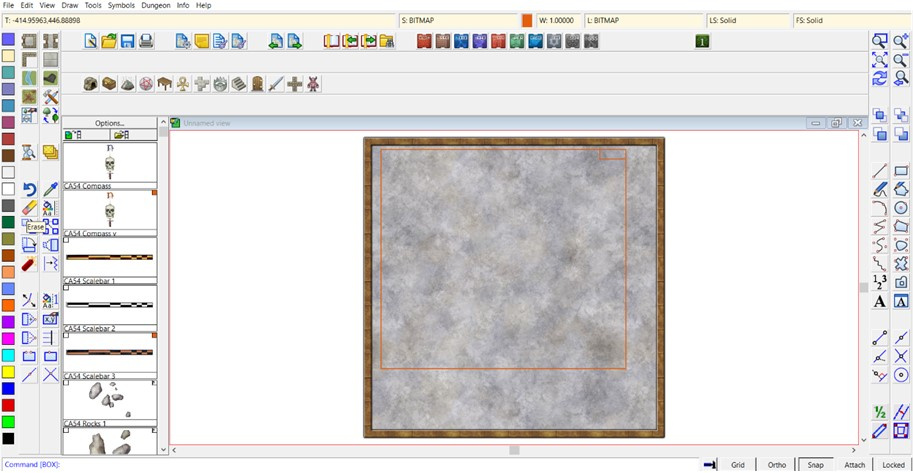
After that, I created a new Sheet, BITMAP, and Layer, also imaginatively called BITMAP, into which I could import the map image. Now, placing and correctly rescaling such imported images is something I've long struggled with in CC3+, because of its restricted redraw standards, where most of the time, you can't see what it is you're trying to resize, or where its edges (which almost never coincide with the image edges) are going to land. So my trick now is to create a rectangular polygon with only a thin outer line in a bright colour, place that in the right spot on the map, and only then bring in the bitmap image. It isn't a perfect solution, but it's the one I've grown used to.
Of course, actually drawing the linear "box" is a bit of a nightmare in itself, because you can't just draw an open rectangle like this and tell CC3+ what size you want it to be as you might in a graphics program, or something even more basic, like Word. Instead it means counting dots on an appropriate-sized grid. For large areas like the Palaces, it's appallingly easy to lose track, so what I do is draw a single line with a kink in it, using the Line tool (not the Path one). For anyone unfamiliar it's:
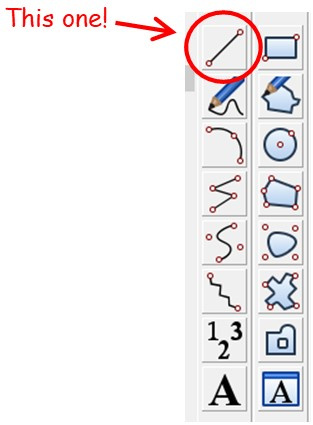
That actually creates three separate lines, not just one. On the next image, the grid dots shown are those for the 10' Grid, 2 Snap (so the snap runs at five-feet intervals, with the dots every ten feet), and the lines are in orange:
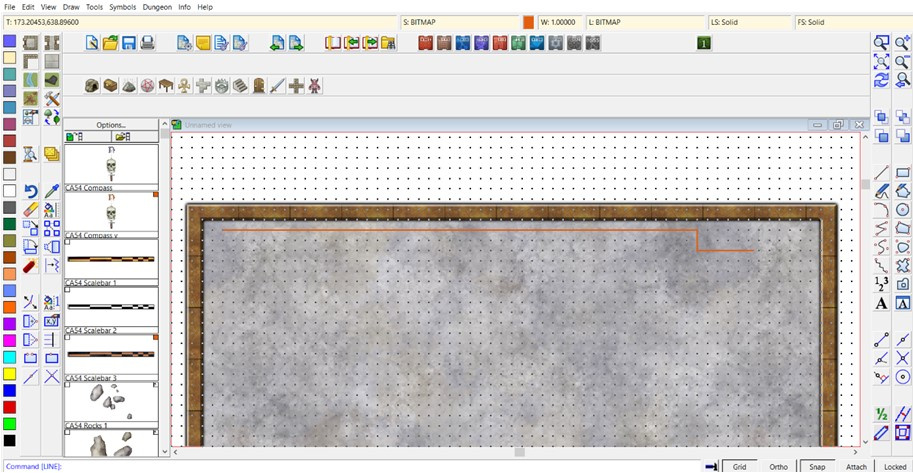
Then I rotate the longer line (that at the left side here) through -90° from its left-most point. (This is because CC3+ insists on doing angles backwards, not logically clockwise! We've discussed this on the Forum before. There are good mathematical-programming reasons for CC3+ doing so, which if nothing else will convince you that mathematics has very little to do with reality after all ?). And then draw a new linear box of the right size, using that left-most point as its top left corner, and the construction lines as templates to give the right size overall:
Then the construction lines can be deleted, and the new box moved to a more central position, again using the snap grid dots as a guide (not shown here, as the image size meant you could scarcely see where the box was any more with the grid left on):
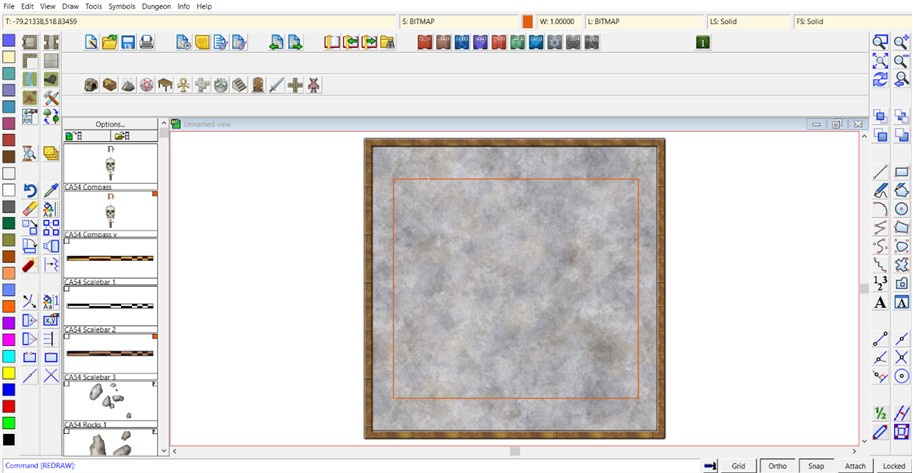
After which, using the Draw - Insert File command from the drop-down menus, the correct snowflake bitmap image can be brought in, resized and correctly positioned, using the construction line box (and a fair amount of adjusting and tweaking):
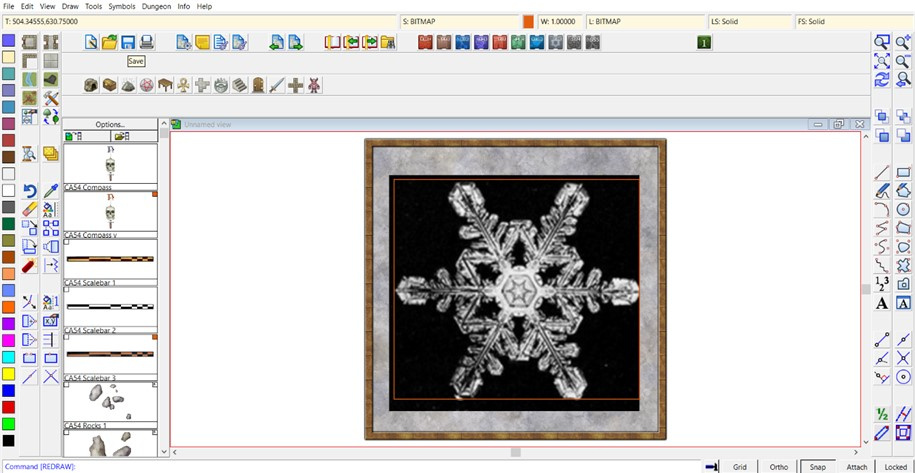
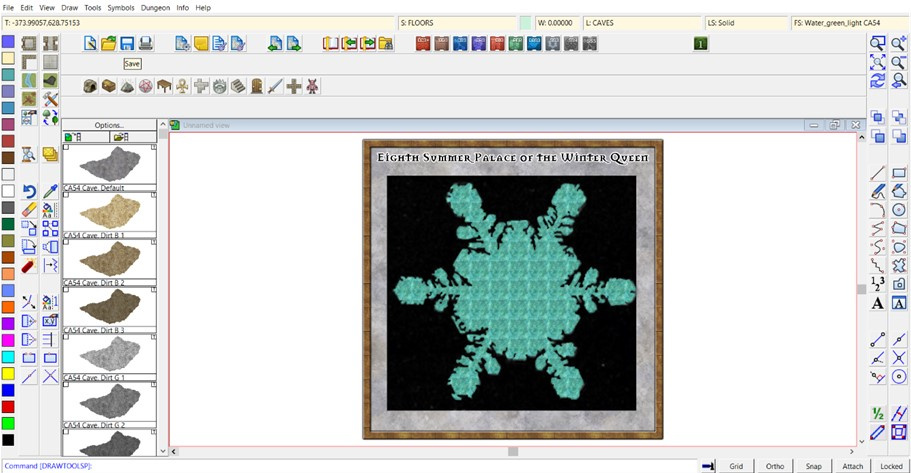
The box can also then be deleted. Sometimes, I draw in one or two crossed centre-lines like this as well, as they're useful for adding items such as the title, if it's meant to be centred somewhere near the map's periphery. Which means at this point I also often add the map's title, so I can remove all the construction lines together. (If they might be needed again later, I usually set them up on their own Sheet in the first place, so they can be hidden or called back at any stage.) In this case though, the title is long enough it's not hard to centre it without needing that:

Next up is to start the mapping proper, by drawing the floor. Looking at the image, it's clear there are several areas where the floor should be missing in the final version, within the outermost line of the flake, so I'd already decided with this mapping style, that would be best accomplished using a Multipoly command on the completed outer floor. This is easier by drawing the areas of floor that will eventually be omitted first, and although it's not so useful for seeing all the pieces you've drawn just before going to the Multipoly action, I like to use the same fill style as the final floor will be, mainly so I don't forget later... Thus:
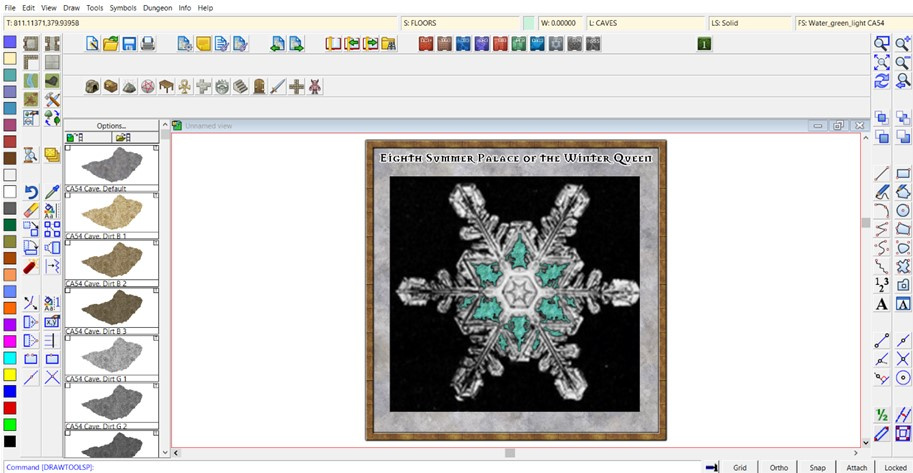
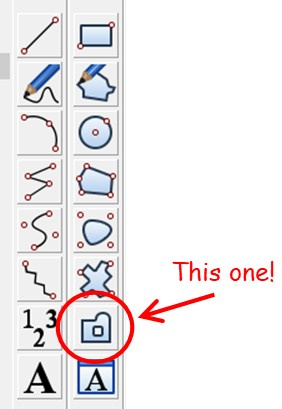
I really liked that Water Green Light fill in the Jon Roberts style, as representing here ice instead. Just has the right colouring and texture to me to give a magical "zing" to the whole. It is a magical ice Palace, after all. You get a better impression of it once the whole outer floor's drawn:
And yes, the tiling's very obvious here. While that could be changed, it'll be much less obvious on the finished drawing, so I left it alone, and just carried out the Multipoly command at this stage:
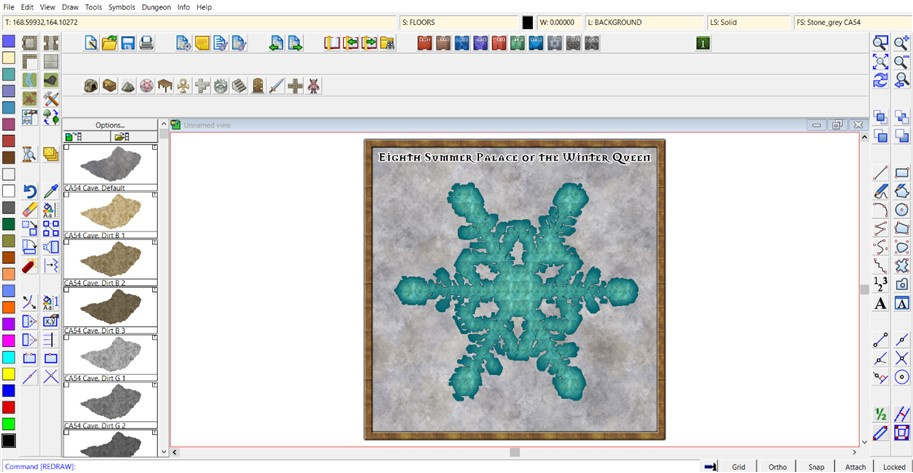
After which it was time to consider adjusting the Effects on the Floors Sheet:
and adding the central floor design based on what the imported image showed, using the Solid 10 to 30 fills, which have the perfect level of transparency to still let the underlying "ice" floor show through, even after adding a suitable Bevel Effect to make them look sunken into said floor, after one of Remy Monsen's recent blog posts about using such Effects:
Beyond which, it should be just a matter of adding other smaller details, labels and a grid. While I'd love to show you what the final map looks like, that will have to wait for another time, as the amount of time and effort involved in putting these notes together meant I didn't manage to get the map itself finished in time to post it today as well!
Starting to remember why I don't do "proper" WIP threads here now... ?

-
Community Atlas competition entry: The Summer Palace of the Winter Queen
As is fairly obvious, I quickly settled on a standard set of seven areas for each Palace map. It is essentially the same Palace each time of course, just with a different design and layout to keep things interesting. Thus I thought some further notes extracted from the forthcoming PDF texts might be an appropriate additional level of explanation here, following on from the general notes last time.
The air throughout the Palace is always fresh and calm regardless of conditions immediately outside the Entrance. While cool, it is of an equitable temperature for whoever physically enters it (something which can feel different for every entrant). The atmosphere is ordinarily solemn and slightly saddening, as if coloured by the ephemeral nature of summer, coupled with the presence of the many passing souls. Ceiling heights, while variable as befits an apparently natural crystalline ice form, are rarely less than 15 to 20 ft (4.5 to 6 m), typically of angular, sometimes spectacular, vaulted nature.
Regardless of its form, there are always seven major areas within the Palace: A guarded Surface Entrance and Reception Area, through which all must first pass, whether physical, immaterial, living or dead; A Ballroom for parties and entertainments; A Banqueting Hall for feasting and its adjoining Kitchen; A Crystal Garden rich with more summer ice-flowers; A Hall of Mirrors of ice; A range of Servant & Guest Quarters; and A Throne Room with the Queen's Chambers nearby.
Surface Entrance: Surrounded by a small garden of summery ice-flowers and foliage, the entrance is always a low, point-topped, open archway around 5 ft tall by 3 ft wide (1.5 by 0.9 m) set in a back-sloping wall of ice. The ice-plants are placed on both this wall and the more level surface just in front of it, always with a cleared path leading a little indirectly to the Entrance, a little wider than the archway. This platform, wall and arch are present even when the Palace is set in the clouds, as they are parts of the Palace itself. The Palace cannot be entered by any means in any other way. Pushing physically into the surrounding clouds, or digging into the ice beyond wall or platform finds no trace of the Palace, for instance, while magical transportation devices and spells will not function into or out from the Palace. Someone who has died in the right environment or circumstances will have their soul pass through here at some stage, although the timing is always uncertain, and usually inconsistent with that in the physical world. Equally, the dead have no control over when or for how long they may be here. Once through the archway, the Palace opens-up immediately as mapped, and the entrant finds themselves at the start of the Reception Area.
Reception Area: This commonly has several awkward, narrow places in it, sometimes with separate ice-walled chambers as well. There are physical guards of various kinds, many to most of magically-animated ice construction, often armed and armoured with ice that has the properties of magically-empowered metal. More typical arctic-environment intelligent creatures may be encountered here at times as well. The numbers involved are always more than a physical group could overcome, and fresh ice-constructs will simply manifest from the ice whenever required. Such constructs are rather like antibodies inside a living creature, whose numbers increase to match the level of the invading threat. This means such constructs may appear from any ice surfaces elsewhere in the Palace in response to threats too. A few guards may be incorporeal spirits, souls temporarily on the Palace's staff, and if so, they may be known to whoever has just entered. This latter is always intentional.
Ballroom: A large, open area for entertainments. When in use, temporary low ice platforms may grow from the floor for performers or an orchestra, say (often made up of passing souls), along with features such as tables and seats with refreshments. Glittering lighting effects, enhanced beyond the Palace norms, can be employed here too. Most guests are normally disembodied spirits, thus the events can have a sombre tone, rather more wake than party, for instance. A literally haunted ballroom.
Banqueting Hall: A substantial ice-table, commonly of angular "C" or "U" shape, is the dominant fixed feature, with fixed ice seats - usually benches - alongside it, and a larger throne-like chair for the Queen at the table's head. Despite most guests at the feasts here being spirits, any physical guests will find the food and drink of excellent quality, albeit the food is exclusively bread and the drink fresh water. However, the bread has an array of forms that include many typical loaf types, and more made to look like meats and fruits. Each has a hint of the taste its appearance would suggest. The bread provides better sustenance than meals of greater variety found elsewhere, and has mildly healing properties for those in need of it, in addition. Similarly, the water comes in an array of different temperatures, colours and tastes, again with beneficial effects that complement the healing powers of the bread. All the tableware is of exquisitely-fashioned ice, while still possessed of a strength and durability closer to metal and pottery than ice. Even the spirits can partake of the food and drink, using the utensils as normal, though only so long as they are seated at this table.
A Kitchen area either adjoins or is close-by the Banqueting Hall. This contains a physical, if seemingly much too small, bread oven, materials and workspaces suitable for preparing bread. The Queen may be here at times, physically making the bread. She prepares all of it daily.
More to follow (if nobody complains this isn't sufficiently map related, at least)!
The bread concept came about largely because of a paper in the latest issue of the journal Folklore, "Winter Crones and Bread-Givers: The Northern Iberian Vieya" by Cristobo de Milio Carrín (can't provide a link, sorry; the journal's subscription-only currently, though you can find a free-access version of the paper's abstract on Semantic Scholar here), which caught my attention recently. It seemed appropriate, particularly as I wanted to keep things minimalist overall, hence the bread & water theme.


