


Wyvern
Wyvern
About
- Username
- Wyvern
- Joined
- Visits
- 3,240
- Last Active
- Roles
- Member
- Points
- 5,519
- Rank
- Cartographer
- Badges
- 24
Latest Images


-
No Flowers Petals with Flowers using Japanese Temples
OK, so after an hour of checking, downloading and reinstalling, I have the complete 2018 Annual installed (again...), and an identical problem to Julian's still. No varicolor bushes unless I load from the PNG files, as described already above.
Before I reinstalled, all four of the Japanese Temples FSC files had dates of 31/08/2018, and they all still do, so I can only assume they were never updated in the final (i.e. the one huge, ~2 GB, Annual download file for 2018).
Hopefully these can be easily redone to correct the problem, though I imagine everyone who owns that Annual except Sue (!) will then need to reinstall the updated version.


-
The Creepy Crypt project
And obviously shocked there's no wyvern statue 😉🐲
Yet 😁

-
WIP Commission, Ancient Tombs
Not sure it will work well enough, but for the pit, you might try drawing a thin line around the top edge of it on a Sheet above the rest of the pit, and apply the same Wall Shadow Effect to it as the rest of the level's walls already have. That should shade the pit the same way as the walls, and hopefully make it not so flat.

-
Live Mapping: Frontier Town
I seem to remember one old west town painted mostly red... [Clint Eastwood movie reference 😉🤠🏜️]
-
I'm getting hit by the 'no post in 60 seconds' spam block.
Careful, Jim:

??
![[Deleted User]](https://secure.gravatar.com/avatar/c75d9a245b74d9c59be0999ea81ca541/?default=https%3A%2F%2Fvanillicon.com%2F92add7f8c954488718110edc4896ad39_200.png&rating=g&size=200)
-
Live Mapping: Hex Maps
There are certainly some tricks to getting the best from this style, and a few oddities about it. I explored some of these last year. I do like the overall look of the style though - so straightforward and clear (though that may be the hex-board wargamer in me, as much as the role-player).

-
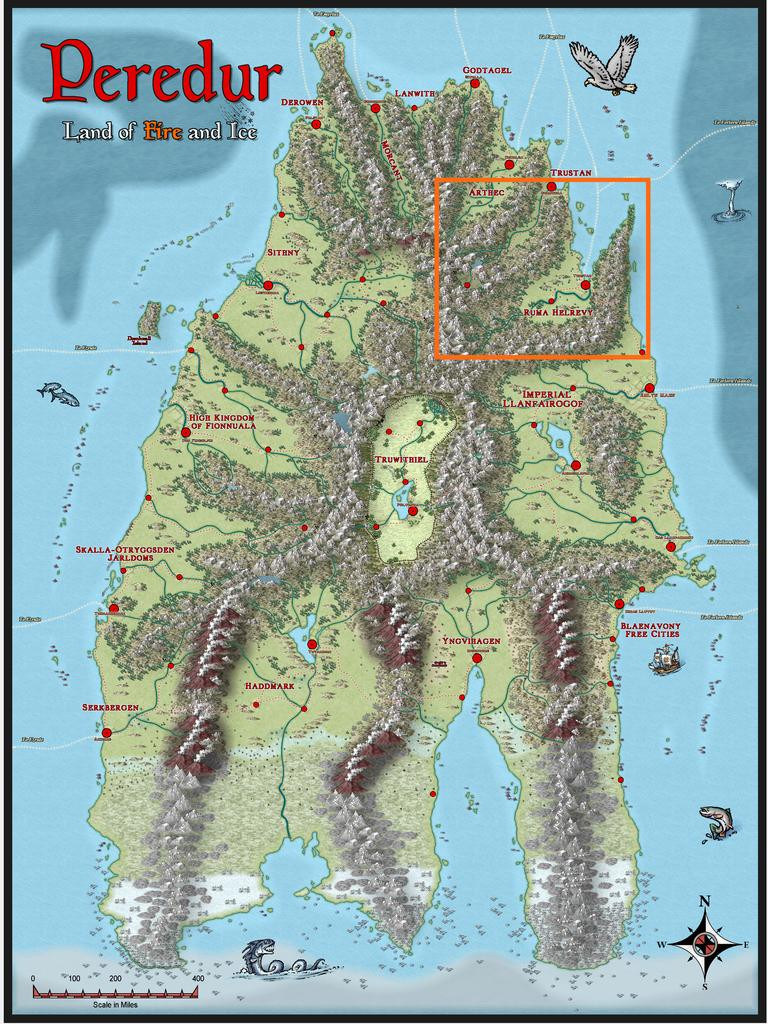
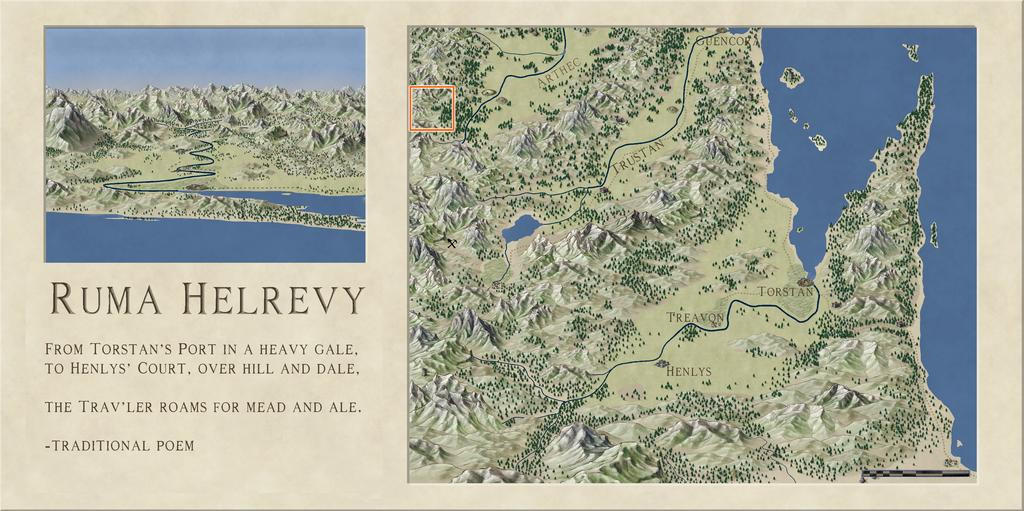
[WIP] Community Atlas: Oracle Mountains Area, Ruma Helrevy, Peredur
Having concluded my recent diversion to The Dying Earth of Jack Vance, it's now time to resume mapping for the Community Atlas. The next maps were intended for somewhere in the substantial Ruma Helrevy region of Peredur, as noted previously in the final post here:
This also brought a switch to a new Inkwell Ideas Dungeonmorph Dice set, as the next four dungeony maps were to be from designs in the Lairs pack. These are quite a contrast to the recent Trailblazer set's layouts, because most of the Lairs ones are caverns, or otherwise irregular spaces. As luck had it though, one of the dice designs randomly selected here was something transitional, with a square entrance room leading into a large series of caves. These dice also have an accompanying Inkwell Ideas book of suggestions for every design, "Dungeonmorph: Delves and Descriptions - Crypts, Lairs & Sewers Edition".
As usual, I checked through the book notes, with random rolls, to spark off some initial concepts, in conjunction with examining the existing Atlas maps for the region, and any notes with those, to find a suitable spot to locate this map. Almost nothing has been mapped in the Ruma Helrevy area, except the main settlement of Torstan, and most of the map's notes revolved around that more southerly broad valley as well. Meanwhile, what I'd determined/adapted from the Inkwell book were some Ogre-sized Badgerfolk who'd broken into the cellar (the square entrance room), which was a former summoning chamber in the base of a ruined wizard's tower. This led, by a now shattered secret door, to the cavern complex. In the caves were a Naga in a pool cavern, a whole group of Spidermages, one of whom was a strange, oracular creature, all of which mages had originally inhabited a far deeper world, led to by a great chasm, come nearer the surface to collect ambient magic in their special web-nets, and a second entrance, via a narrow, open-sky cleft, where a group of Wyverns (yay! 😁) were nesting.
The whole magic-from-the-air concept led me to think of a stone windmill-like wizard's tower, with four fixed, stone-framed sails, now partly ruined, designed to draw magic from the sky in a remote mountain valley (because of the Wyvern-cleft). And suddenly one map became three, because aside from the dungeon one, this needed an area map, and some sort of design for the surface tower too.
There are plenty of mountains in Ruma Helrevy, and I quickly narrowed the options down to a zone in that map's northwest, away from the more civilised parts. Ordinarily, I'd have gone with a 20-mile square area for this, which has become fairly, if not exclusively, typical during this project. That looked ridiculously tiny here though, so I doubled-up, and went with a 40-mile square instead, right on the extant map's northwestern edge:
Following what's become my normal practice, I set-up a, here, 2-mile square grid across that area, and randomly-rolled for locations of interest among those. I also randomly rolled up some name-options for the leading creatures from Mythmere Games' "Nomicon", and a whole series of mostly single-word idea-prompts for more names from the random tables in the "Knave: Second Edition" RPG rules (Jacob Hurst & Swordfish Islands LLC). However, for the location details, I decided to try out another, much newer, Inkwell Ideas product, the "Hexploration Kit". This comes with a large group of pre-drawn, coaster-sized, hexagonal terrain maps printed on card, and five separate card decks with an evocative illustration on one side (by The Forge Studios), and random tables of text ideas on the reverse. Several cards per deck have ideas and random tables on both sides, to further expand the options. I used cards here from three of these decks, "Stranger Places", "Into the Wilderness" and "Settled Lands", with suitable random rolls and further adaptations.
With all this decided, finally, I could start mapping! I opted to stay with Ralf's Hand-Drawn Fantasy style again for the area map (and the dungeon one too), and set-to.
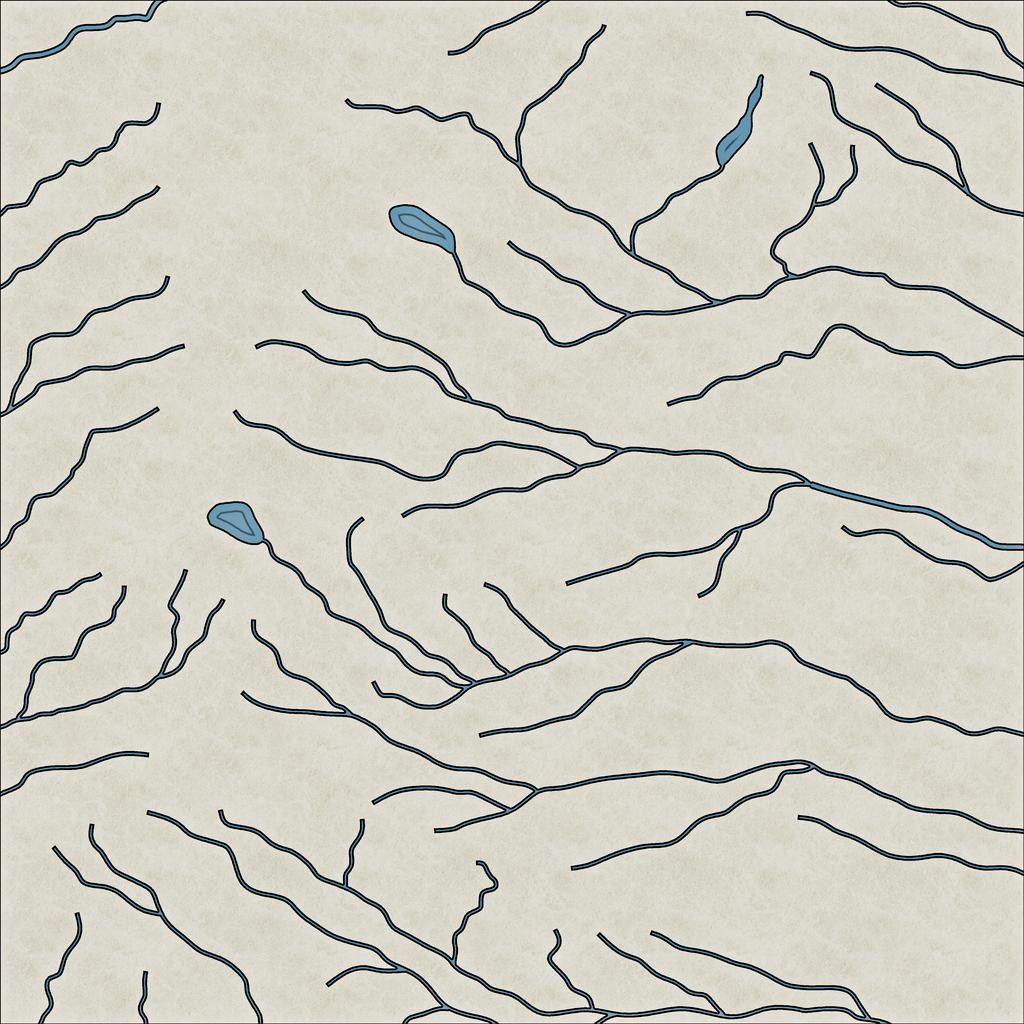
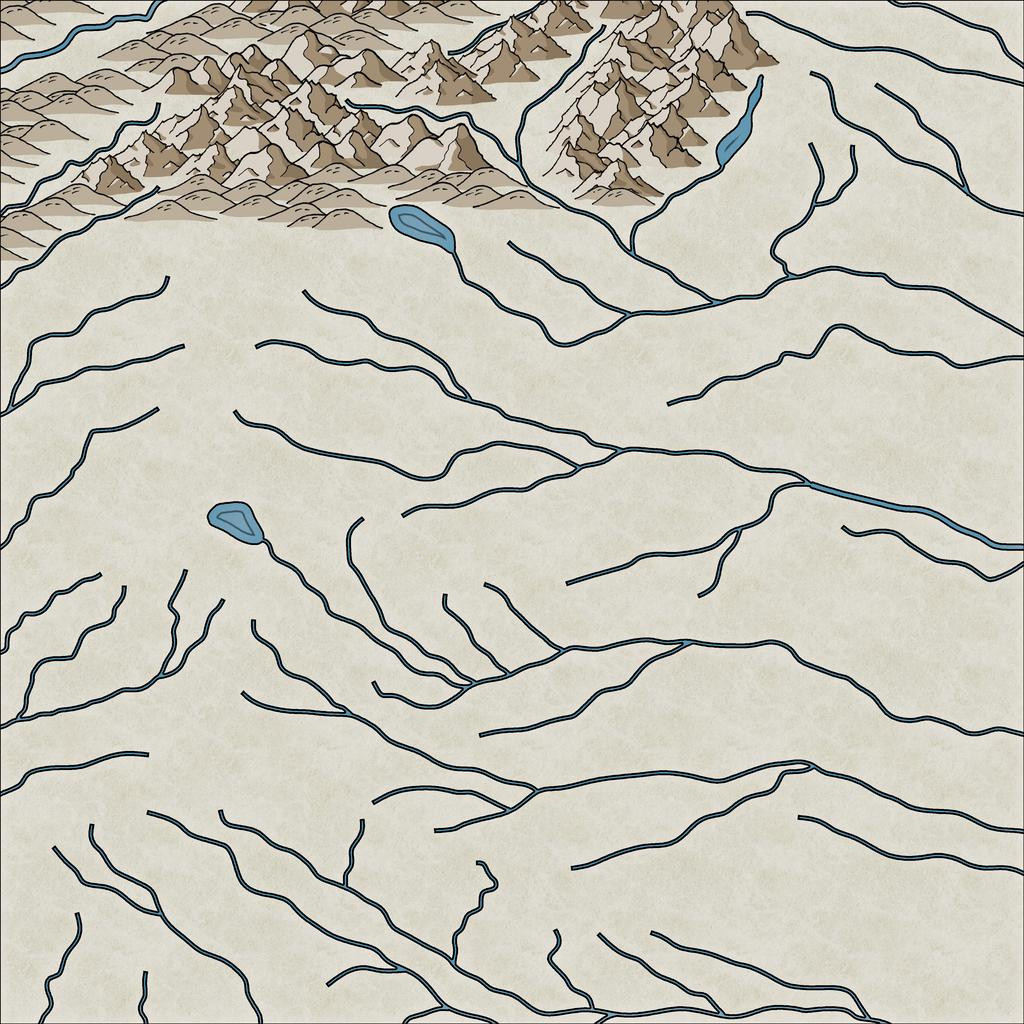
While using the gridded map to place locations, I'd been struck by the flowing lines of the Jon Roberts' style mountains, and thought those lines could be readily adapted to show rivers. This first image illustrates how I drew those, still with the imported, semi-transparent, gridded base bitmap showing:
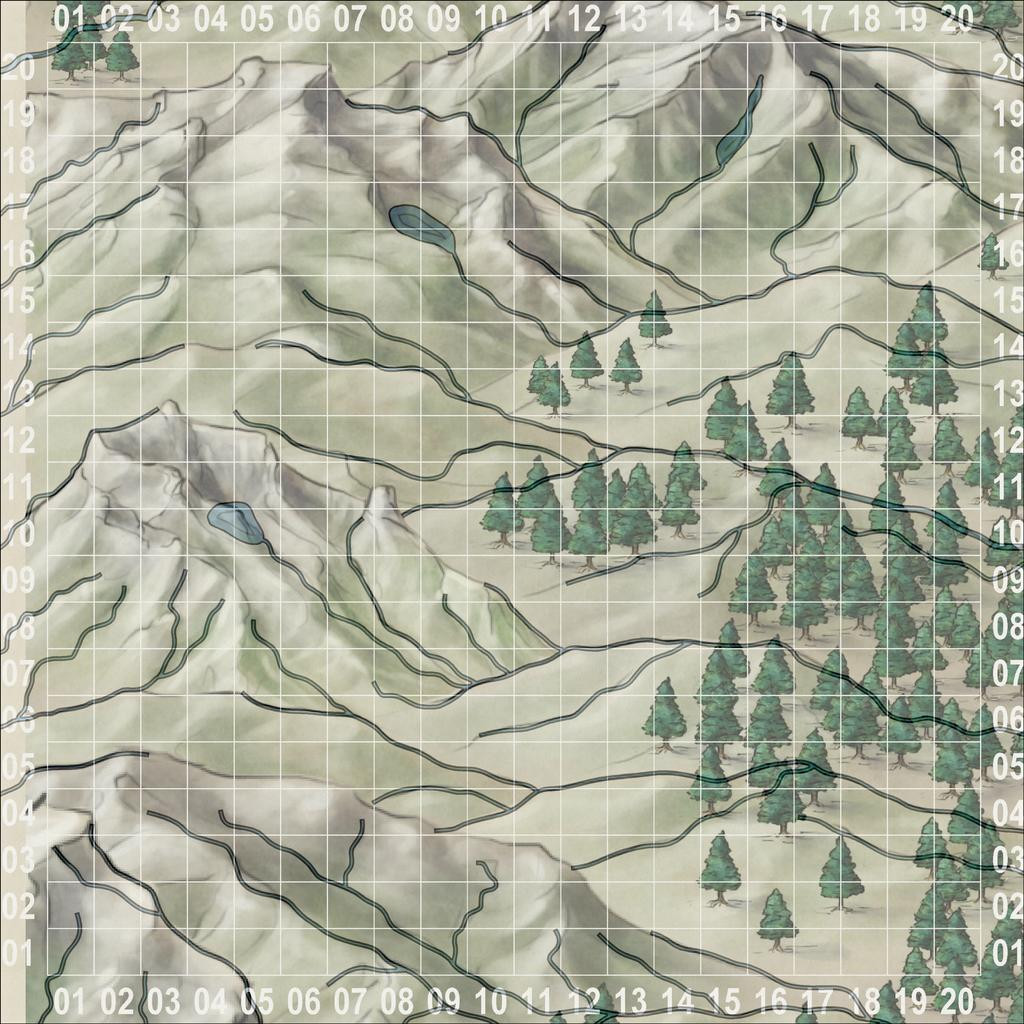
I also added a few small lakes, partly because I'd developed a mental image of how I wanted the ruined tower to look (aimed for the lake-head around square 0411, facing southeast down the valley), and it seemed likely such glaciated mountains (this is around 53°S latitude) would have small lakes of this kind. As you can see too, I've not simply gone with the valleys from the Jon Roberts symbols, but have used some of the crest lines too, essentially because that looked more interesting!
This shot gives a better idea of the final riverine layout:
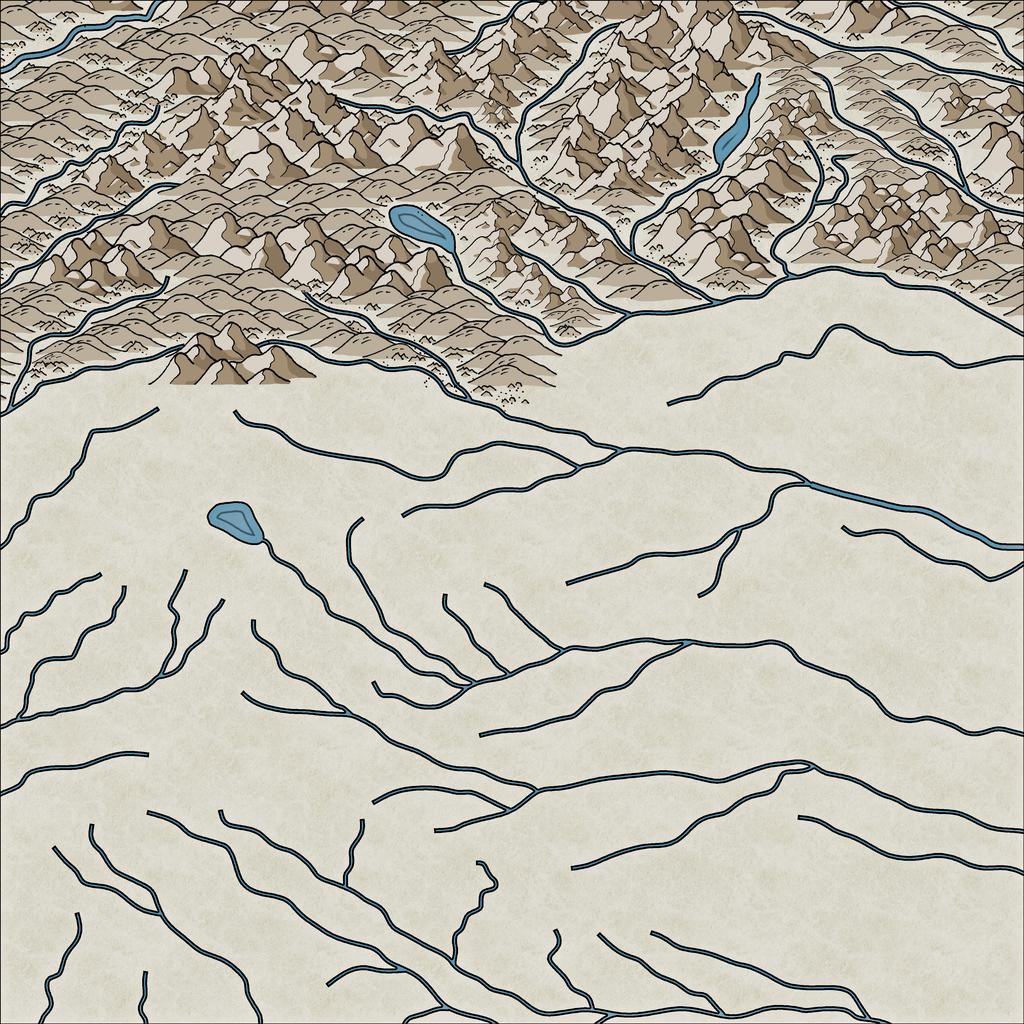
With that completed, I started sketching-in the physical terrain:
This still needs a lot of tweaking - hiding the ends of the river lines, filling-in the blank valley bottoms, and so forth. Here's a shot partway through that "cleaning-up" process, and a bit further along more generally:
I tend to do this in segments of the map, to try to avoid too many problems with the ordering of which symbol overlies which ("Sort Symbols in Map" can create as many problems as it solves with styles of this sort that involve fade-out lower symbol edges, unfortunately). Thus all this took a couple of mapping sessions, and another couple more to complete the whole terrain layout:
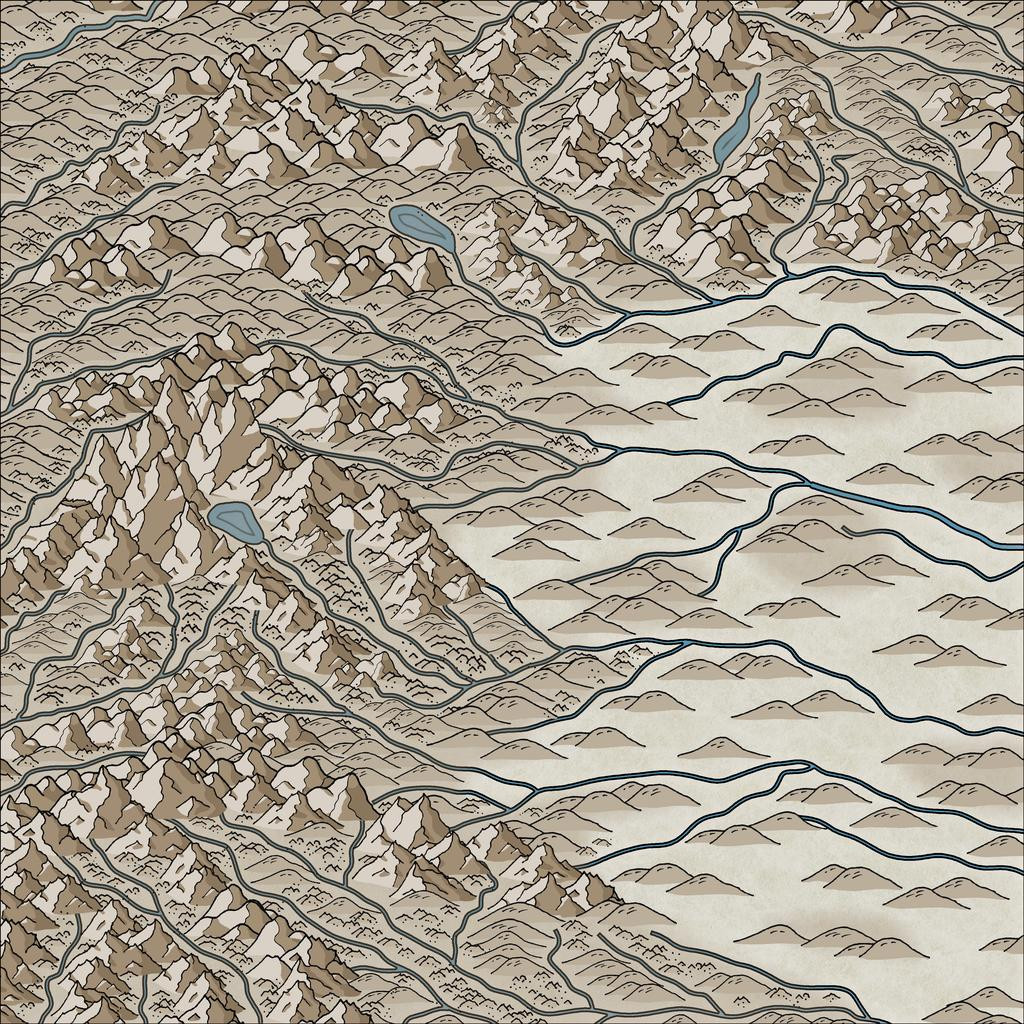
By this point, I've also added the background mountain-shading polygons as well. The absence of smaller terrain features in the lower-lying areas is because there are going to be woodlands here, which would make many such smaller symbols redundant, as largely hidden away.
Still quite a lot more to do, but that's definitely long enough for today's round-up, I think!
-
Heraldry Resources for Campaign Cartographer
Might be worth saying that this is a free-to-access resource as well (perhaps add it to the Free Symbols & Artwork topic @Monsen?).
It would be interesting to know how it complements the existing Heraldic Symbols pack from the March 2008 Cartographer's Annual too.
-
Yet Another Wargame Map set in ...
I suspect my (ongoing) connection to miniatures (and scenery, and everything else that goes with it) is because I started out as a model-maker, and only got involved in wargaming proper a few years after that, at the end of the '60s and early 1970s. Many tabletop rule systems are, and always were slow, but most of what I've done has been for my own interest and solo, so that was never a great issue for me. And a lot of the larger-area battles are fought using the miniatures as little more than markers, so I quite understand your "scale" problems.
I never understood why so many wargames have to be "balanced", when reality very rarely is (unless somebody's really screwed-up their reconnaissance and planning), which I think is why I never took to needing a group to game with. That was just too much like chess to me, whereas I wanted to try to better understand real, or potentially real, situations.

-
CA style development - "Darklands City" (issues for September and December 2021)
"A" looks more natural to me too, Sue.
The cross-hatched decoration (don't know what the proper term for it is, sorry!) seems undamaged despite the roof holes beneath it. As this seems to be of fairly flimsy outer surface material (compared with the depth of roof thatching), it seems unlikely it would have survived intact when the entire thatch below it has rotted away - even if it had just broken and raggedly partly fallen-in, say. I'd guess in some cases it might partly survive sort-of intact, but not always.
It does also look a little odd that none of the holes are where the greenery is; the extra weight and implication that that's where water's collecting, so mulching the thatch down into a growing medium plants can root into, might suggest that kind of area would be ripe for collapse as well.
