

[WIP] - Doriant - Gold Coast - Eknapata Desert - Sakherma Ruins
 Royal Scribe
🖼️ 388 images Mapmaker
Royal Scribe
🖼️ 388 images Mapmaker
Hi Monsen,
At your convenience, I have a pair of maps to submit. This is for the Sakherma Ruins, which is located in Doriant - Gold Coast - Eknapata Desert in the area boxed here:
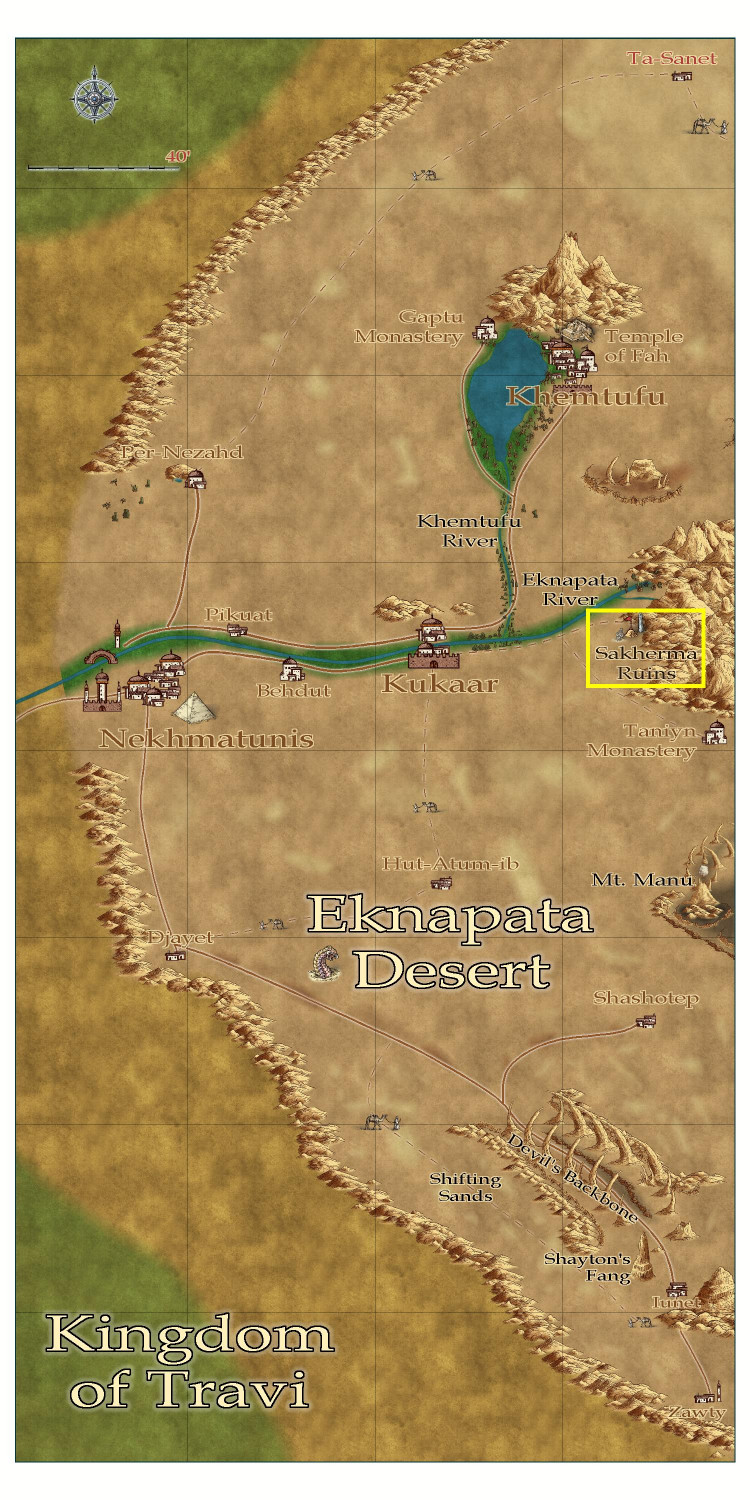
I will post the FCW files as follow-ups in this thread.
Also, fellow mappers: I have plans to map the big city of Khemtufu and the Temple of Fah, but feel free to dive in anywhere else in the Eknapata Desert if you wish.

Comments
This is the top level map.
Toggles: "Roof" layer to show or hide the mountain covering the interior part of the map.
Description
Sakherma Ruins
At the base of the mountains that is the source of the mighty Eknapa River, an ancient people made their home alongside a creek that fed into the river. What they called themselves is no longer known, but their ruined temple has become known to modern people as the Sakherma Ruins.
These ruins are said to be haunted, and often fatal to those foolish to camp near it. Many groups of travelers have vanished utterly overnight, leaving puddles of blood, occasionally, but no bones nor gear nor even a single copper coin.
Game Masters: Unbeknownst to travelers, a great blue dragon has created a lair beneath the ruins.
1. Sakherma Creek: The water from the creek that ultimately feeds into the Eknapata River is clear, cold, and refreshing.
2. Ruins of the Sakherma Temple: The ruined temple includes an outer courtyard where encroaching sand dunes have toppled many of the temple’s pillars. It also includes an interior temple half submerged in the mountainside. The walls of the interior temple are also crumbling and if it ever had a constructed roof, it’s long gone. A once-hidden secret door behind a pedestal where a statue once stood now plainly reveals the passageway behind it. A second passageway just south of the hidden door has opened in the crumbling walls, as has a much larger one in the northeast corner.
3. Great Obelisk: The obelisk rises forty feet above the desert sands, perhaps the only part of the temple that seems untouched from the day it was created.
4. Sandy Dunes: A crescent-shaped hollow in the mountain on its northeastern side provides a comfortable camping area sheltered from the wind. Game Masters: This is the blue dragon’s main entrance; it is capable of burrowing through from the caverns below to devoir travelers as they sleep, or back down through the sands when it returns home.
5. Hidden Cave Entrance: In the southeastern edge of the mountain, a small cave leads to a tunnel into the mountain.
6. Temple Interior: A great statue is all that remains of a once-ornate hidden shrine.
7. Hidden Tomb: The lid has been removed from the sarcophagus by scavenging thieves, but the shrouded body within remains untouched and seemingly well preserved. Game Masters: If the body or its sarcophagus is touched, the body will rise as a mummy to attack the intruders. The following turn, six animated skeletons will claw their way out of the sand to attack.
8. Glass Wall: A glass wall blocks access from the cavern to the tunnels beyond. Game Masters: The wall was crafted by the dragon using its electrical energy, and because it created the glass, it can magically pass through it without damaging it.
9. Sakherma Pond: The pond that feeds into the Sakherma Creek extends beneath the mountain, creating a pool of fresh water accessible within the caverns.
10. Human Camp: The remains of a human encampment are found in a chamber too small for a large creature to enter. The bodily remains suggest that the occupant was old when he died and did not die violently. Game Masters: It’s unclear if the resident here was hiding from the dragon or friends with it. At any rate, it’s clear the occupant wasn’t eaten by the dragon.
11. Stairs Down: The stairs on the northern side are clogged with sand and are unpassable. The southern staircase is open.
12. Tunnels Down: A great, wide tunnel winds down from the upper caverns to the lower caverns.
Below
No toggles for this level.
Description
Sakherma Ruins
Below
1. Temple Stairs Entrance: Here, the stairs from the temple ruins above descend to human-created chambers. The northern staircase is blocked by sand, but a glass wall keeps the sand from filling the chamber below. The southern staircase is relatively unobstructed.
2. Monks’ Cells: These three chambers appear to once have been home to the monks who maintained the original temple. Game Masters: At the Game Master’s discretion, one or more of these rooms may be occupied by the dragon’s humanoid allies – kobolds, dragonborn, or perhaps sorcerers with a draconic bloodline.
3. Treasure Display: This room is practically cluttered with statues and tapestries. Game Masters: Here the dragon has created a veritable museum showing off its favorite treasures, including a display of magical armaments.
4. Pond Entrance: At the base of the pond, a mighty glass wall keeps the pond’s water from flooding into the tunnels. Game Masters: The dragon can magically pass through the glass without harming it to bathe in the pond, or for another escape route to the outside surface.
5. Dunes Entrance: A great glass wall keeps the sand dunes from pouring into the caverns. Game Masters: The dragon can pass through the glass without harming it in order to reach the surface of the desert, or to devoir travelers camping there.
6. Tunnel Entrance: This tunnel connects the upper and lower caverns.
7. Main Lair: It is readily apparent, if visitors haven’t already figured it out, that this is a dragon’s lair. Piles of coins, particularly copper ones, form its bed.
8. Egg Nest: A blue dragon’s egg lies on top of a pile of coins infused with the dragon’s magic to keep the egg warm when the dragon is away.
9. Ritual Chamber & Treasures: Here the dragon keeps most of its magical treasures. The dragon may also shift into human form to conduct arcane rituals from time to time.
10. Wyrmling Lair: The bedroom for the dragon’s “teenage” child.
You've got some visual artifacting on the dunes due to how the lighted bevel effects work. One's easy to fix, but the other is much harder to fix and may require manual intervention that may not be practical.
First, the lighted bevel on the dunes sheet needs to be bigger. There are a couple of dunes (e.g. the one next to the ruined temple in the lower left) that are clipped at the top, which means that the bevel size isn't at least as large as half of the maximum distance from the edge to the centerline. There shouldn't be any cost in making the bevel size larger because it's processed from a distance field that completely covers the surface.
Second, the dunes that intersect the edge of the export area look pretty unnatural (upper right and lower right are examples, but there are some on all of the edges). Because there's no information for the distance field to use when data intersects the edge of the rendering surface, it immediately gives a smooth surface perpendicular to the edge that the entity intersects. The EXPORT command has a slight workaround by adding an extra 10% buffer zone around the map to reduce this result. To take advantage of that workaround, though, you need to extend the dune entities beyond the map border extents out underneath the symbol screen. Having the crinkly geometry for the backside of the dune out there lets the distance field calculation be crinkly instead of smooth.
If your geometry is big enough that it still intersects the rendering surface edge during EXPORT and you're seeing noticeable artifacts, one way is to increase the export map border percent by using the EXPORTSETBPCT command. Be careful with that setting, however, because it affects how many total pixels are calculated during the export and it's possible to calculate so many pixels that you would reduce the total allowable image size (especially important if you like to use high AA settings).
Ohhhhhh, thank you! I will try to play with it tomorrow.
Amazing and awesome technical advice. Thanks so much for taking the time to write that out and share.
I have a few questions about the Sakherma ruins map. Is the darkened section supposed to be the dungeon under?
How about try put that more transparent?
All the sandy desert map looks awesome, but the dark sections distract attection from that great work. Just my opinion.
Just a bit confused.
The dark brown is a mountain hillside that the caverns are cut into. That hill can be hidden or revealed with a layer. I forgot to post an image showing the mountain revealed but I will do that tomorrow.
The darker gray is meant to show elevation changes going down but they are more pronounced than I was expecting. They are Solid 10 transparencies but when I added a transparency effect, they turned almost black. Maybe I will try as solid black and then add a transparency effect where I will have more control over it darkening.
I removed Remy's tag and changed the header to "WIP," as this isn't quite ready for submission. I will start a new thread when it is.
@Don Anderson Jr., I'm not 100% sure I was following what you were referring to with the "darkened section." If you meant the brown walls, then yes, that was meant to be the caves beneath the mountain. Here's what it looks like with the mountain in place. Everything on this map is meant to be roughly at the same level, with those caves going vertically into the mountain.
But if by "darker" you meant the shaded areas like the spots circled on the map, that was meant to reflect elevation changes descending into lower areas. I may have to do something to make that more subtle.
Working on the dunes, too. I wanted sharpish ridge lines like the dunes of the Sahara Desert, rather than more slopy hills like dunes at a beach, but I still need to extend it a bit so there aren't flat parts on top, and maybe soften the ridge lines a little if a can.
Yes that makes way more sense to me as a viewer.
I will also label it to make it clearer when the mountain is cut away.
Trying two different approaches with the sand dunes.
Approach 1 - Adjust Bevel
This version increases the bevel size, reduces the intensity and lightness base, increases the lightness range and smoothing, and slightly reduces the already <1 slope curve. (The dunes are on the HILL and HILL 2 sheets.)
Approach 2 - Symbols
On a different map, I tried using Mike Schley's overland dune symbols with a top-down SS4 map. It didn't work mixing the isometric and and top-down symbols. I looked for other top-down overland or dungeon maps that might have dune symbols, but couldn't find any. 13th Age Overland (including revisited) has mountain symbols but no sand dunes that I could see, and the mountain symbols didn't look right. I thought maybe the Birds Eye Continental beveled hill symbols would work, but they were dark gray.
(Does anyone have recommendations for top-down overland symbols I can check out?)
In the meantime, here is a version using isometric overland dune symbols that might be a little "softer" than the Mike Schley ones were. This mostly uses Jon Roberts symbols mostly (set to varicolor with the creamy #29 color to blend a little better than the non-varicolor). But to the southeast of the hills, I tried some from 2025 Regional Fantasy. Thoughts?
With the bevel you can present the illusion of more gentle lower slopes by adding an Edge Fade, Inner, or increasing the width of one if it's already there.
Good suggestion about the Edge Fade. There was one on it already, but I increased the width from 10 to 30, and it looks better. (I also tried 50 but it was a little too washed out.)
Made the elevation changes in the caves more subtle by replacing the SOLID 10 fills with multiple sheets of the semi-transparent sand fills.
Thank you, everyone, for your very helpful feedback. This community is the best! Please let me know if you have any other thoughts or suggestions before I submit this.
Sakherma Ruins
Sakherma Ruins - Beneath the Mountain
Sakherma Ruins - Below the Ruins
I know I get some hate on the forums here from some individuals. All I want though is for people to have really good maps.
I'm not the best with CC3+ but I try impart my limited skills and/or artistic views.
Some people are really humble and take suggestions garciously, even if they don't use them.
Look at Sue, she is amazing with how she helps everyone. Even today she gave paragraphs on how to do equator lines in Fractal Terrain 3. 5. She could have just as easily suggested the pages in the manual. Yet she will also always listen to input on the overland styles she works on.
Same deal with Remy. He does a great job of helping with technical stuff. He also could just cite reference to the PDF's but he takes the time to explain stuff.
That's why I like to hang out here and learn from even small posts. You just never know where you will find a great tidbit of advice.
What I have learned is two things, which I apply through life.
No hate from me! I'm getting better with the mechanics of CC3+ but I'm constantly learning new things. And there are lots and lots of people with a better artistic eye than I have who give me great feedback. Even newbies who may not know how to do a particular thing in CC3 can point out things that just don't look right, or might be confusing. Just like with writing, an outside eye is always helpful because the writer or artist may be too close to the work to notice what might be unclear or confusing to the audience.
Well, I'm at the stage now where I'll probably just get to be usefully familiar with about 25% of CC3+, and then they'll move us all to CC4 😎!
I wouldn't even put myself at 10% lol. I am currently going through the CC3 pdf. There are some commands I'm struggling with.