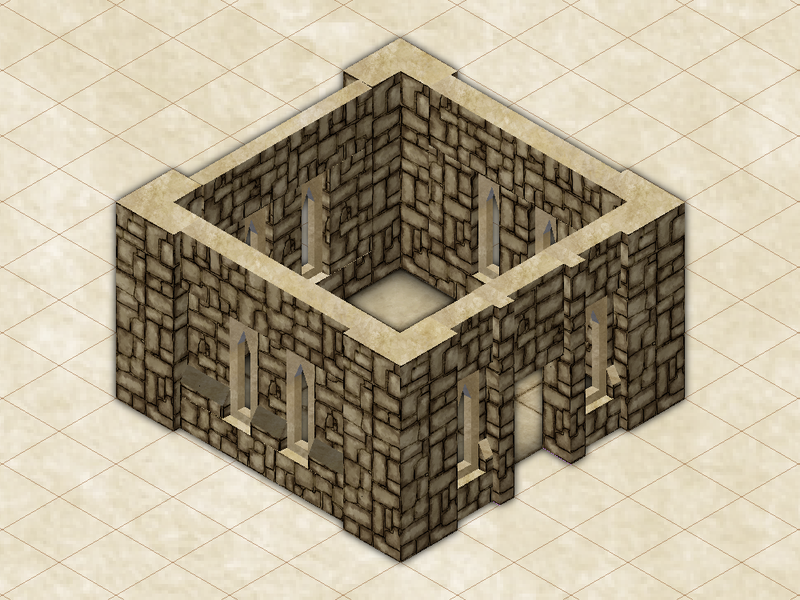
First building in PER3
So after a crap ton of trial and error, I am starting to get some fun results with PER3. This is the ground floor of a tower. The hardest bit was figuring out how to make a "window" in the wall that actually reveals what's behind it, WITHOUT using a symbol. At the end of the day, they are actually fairly easy to draw with polygons.
Not sure where I am going to take this.
Not sure where I am going to take this.


Comments
Better than I know how to do
Better than I know how to do ;)</blockquote>
Bah! Fake News! ;)
The irony is that while I may be making a whole lot of Perspective symbols right now - I still can't draw anything in Perspectives. I haven't had time to learn it properly
Wonderful work!
I am not a DM, so these are more for my own personal enjoyment :) I often get as far as I need to go in order to figure out how things work, and then move on to a new project.
Its brilliant
Ralf, if you're seeing this, we need you to get Max to do a tutorial for the blog on how to do some of this, even if it is just bits and pieces....the windows and the spiral stairs especially.
The stairs are just three instances of the spiral stair symbol from the Wielink symbol set stacked. . .
The windows are a little harder to describe, but not too bad.
1) In perspectives view, make a rectangle for the frame and an arch shape.
2) Combine with multipoly.
3) Now we need to give it some depth. Copy the resulting 2-dimensional window.
4) Move one of the copies "orthogonally" behind the other one. (IE, if the window opens to the north, place one copy a bit further to the north/"behind" the other one.)
5) Change the fill texture so that one of the panes is lighter than the other, but uses the same basic texture. In this example, the windows on the north wall use the brown stone, dark fill for the "front" face. The "back" face uses the medium brown stone texture.
6) Draw in the horizontal faces using the polygon tool.
7) Fill the horizontal faces with the brown stone light texture.
8) Sort everything using the move to back / move to front commands.
In the top story, the columns between the windows are easily made using the 3d polygon tool.
I could not figure out how to give the frames any type of texture that has discrete bricks, blocks, cobbles, or boards in it because the multipoly command does not work on distorted texture elements.
For east or west wall windows, the process is identical, but it's important to swap the stone-brown and stone-brown, dark textures to keep the shading consistent.
Show's how much I know about the symbol sets
That's a lovely symbol isn't it - and thank you very much for the window method
Nothing new technique-wise, but a lot [Insanely] of move-to-front commands! ;)
I love the balcony floor especially
Welcome to the Per3 enthusiasts.
Finishing off the turret was tough. . . it's hard to get a roof that is dimensionally "correct" without looking wonky. To get the two-tiered effect, I just stacked two roofs (using the building command) on top of each other.
That is just amazing
Rooftops are quite difficult, but you seem to have done that one really well.
What will you be moving on to?
I'm not an expert on isometric symbol availability, but maybe someone here can help. I know that some of the third party symbol sets contain a smattering of isometric symbols but its a very long time since I knew anything about them.
Alternatively, do you know that you can import any set of png images to CC3 and make your own symbol set - draw your own as well if you like
I agree with your comment on the difficulty with making roofs. I really struggled with it when I made the Forrestal Chapel map and feel that I never did get it quite right. It always looks wrong even when the angles are correct. Yours turned out just fine though.