non-rectangular stairs in dungeons
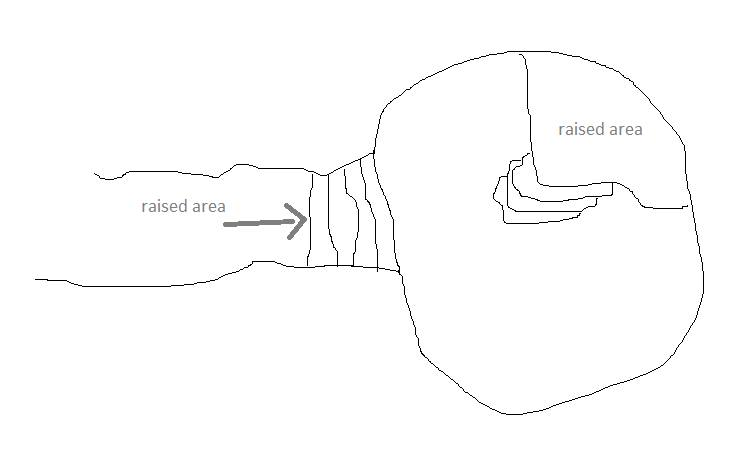
I want to make a dungeon map that consists of dug out tunnels and small caves, where not all caves and tunnels are on the same level. For example, there could be a short flight of stairs in the middle of a tunnel that leads to a dungeon part, which lies 1 or 2 meters below the rest of the dungeon. Or in some caves there might be some kind of irregularly formed raised area.
Those stairs should look a if they were hewn out of the stone and they shouldn't be all that regular/symetric.
How would I paint this in Dungeon Designer? So far I have only found typical dungeon stairs that are made of single bricks/stones and they have the typical square shape.
It sould look something like this sketch.


Comments
As already shown in the FB page, here is my version, and the FCW for you to look at. I have also allowed for different height of steps, using separate sheets for each level of steps. It isn't perfect, by all means, but it will inspire me to do a dungeon like this in the near (ie less than a decade) future.
Hi Mika :)
There is no right or wrong way to do a thing in CC3. Only variations on a theme.
For my suggestion I have started with a standard DD3 template for this map (using one of the dirt bitmaps as the background), and prepared it by adding 10 new sheets. 9 of those sheets are STEP sheets, and one is a SCREEN sheet. This last sheet is designed to hide things that fall outside the area of the map. Some styles have it, but some don't. My copy of the DD3 template doesn't.
I didn't use the FLOORS sheet at all, but drew the mass of the rock directly onto the FLOORS MASK sheet using the freehand drawing tool. I modified the sheet effects to make the edge more prominent by adding a Bevel, Lighted, and strengthening the glow that was already there.
Each of the 9 steps is a simple white polygon drawn with the freehand drawing tool, such that it covers the entire extent of the level it represents and extends under the edge of the FLOORS MASK. Here is one of the step shapes with effects adjusted to show it's extent.
The freehand drawing tool doesn't create a polygon all by itself. You have to draw the outline a bit like you would on a piece of paper with a pencil, and then use Path to polygon from the right click menu of the Fractalize tool to convert it.
As you can see from the screen shot above, I have used 2 different techniques on the 2 sets of steps. Rather than carry on describing these effects and adding loads more to this description, I have attached the FCW file below, so that you can see how the Blend modes are set up. There is one important trick that is very useful to know, however, and that is if you set a Blend mode to 'Multiply' all the white is taken out of the fill. If the fill is solid white (as it is with these steps), then all you are left with is the line and the shadow showing on the top set.
I used Multiply as the Blend Mode on that top set of steps because the highlight effect on the other steps became extra concentrated where the edges were closer together.
Here is the FCW file for you to have a look at. If there is anything you don't understand just shout. Or you may decide to do it a different way.
I really like this Sue. Though I still have difficulty in having steps going up to a higher region on BOTH sides of the central floor. I am very glad this topic has been raised, since I can glean some extra handles on the technique.
Well, I interpreted it as a raised room with a raised platform on the other side, though I see that was wrong from the description now ;)
If I had read it properly in the first place I would have drawn the first 5 steps as patches of white covering the left end of the dungeon, rather than the right end of it. That would turn them the other way around.
And you're welcome. It pays to have a whole arsenal of possible solutions to a problem so that you can chose the best for the job, and the best one is not always the same one each time.
Thank you all. Now I just need some free time to try out the solutions.