

Command of the Week - Scale (Week 47)
 Monsen
Administrator 🖼️ 46 images Cartographer
Monsen
Administrator 🖼️ 46 images Cartographer
Index
- List (Basic)
- Symbols Along (Intermediate)
- Fractalise (Intermediate)
- Edit Text (Basic)
- Link with Map/File (Intermediate)
- Offset (Intermediate)
- Measuring Tools (Basic)
- Change like draw tool (Basic)
- Modifiers (Intermediate)
- File Paths (Intermediate)
- Complex Shapes [Combine Path] (Intermediate)
- Complex Shapes [Multipoly] (Intermediate)
- Break (Intermediate)
- Map Notes (Basic)
- Coordinates (Intermediate)
- Macros (Advanced)
- Search Files for Text (Basic)
- Text Justification (Basic)
- Mirrored Polygons (Intermediate)
- Managing Drawing Tools (Intermediate)
- Named Views (Basic)
- Symbol Lookup Sheets (Intermediate)
- Symbol Catalog Settings (Advanced)
- Symbol Catalog Filters (Advanced)
- Symbol Control Points (Advanced)
- Define Symbol (Intermediate)
- Curves (Basic)
- Selections (Intermediate)
- Sort Symbols in Map (Basic)
- Extract Properties (Basic)
- Convert File (Basic)
- Get Extents (Advanced)
- Quick Move (Basic)
- Menu Editing (Advanced)
- Trace (Basic)
- Array Copy (Intermediate)
- Explode (Basic)
- Clipboard Copy (Basic)
- Rename & Reorder (Intermediate)
- Drawtools Edit (Basic)
- Trims (Basic)
- Symbol Attributes (Intermediate)
- Fill Style Selection Mask (Basic)
- Browse Files (Basic)
- Node Editing (Intermediate)
- Automatic Sheet Selection (Basic)
- Scale (Basic)
- Text along a Curve (Basic)
- Shaded Polygons (Intermediate)
- Fill with Symbols (Intermediate)
- Global Sun (Basic)
- Symbols in Area (Intermediate)
This series is called the command of the week, but it could also explain a feature. The explanations will tend to explain the technical parts of the command, and is intended to highlight the basics (and complexities) of the command, and information about how to use it, but won't be a detailed tutorial. It is up to you to use it creatively in your maps.
Week 47 - Scale
Sometimes you just need to change the size of an entity. Perhaps that symbol needs to be a bit bigger or the image you have imported into the background to trace over doesn't match the scale of your map. For these occasions, you wish to use the scale command.Where to find it?
Toolbar: [Image_9741], right click [Image_9741] -> Scale, Non-Visual Scale, Non-Visual ScaleXYMenu: Edit -> Reshape -> Scale
Command Line: SCA, SCALE, SCALEXY
[Image_9742]
How to use it?
The scale command comes in a visual and a non-visual variant. When using the visual variant, you get a visual preview as you move the mouse cursor, and can size up the result visually before committing to it. This helps you scale the entity to a desired size without having to know the exact scale factor. Non-visual scale doesn't show you a preview, and is excellent when you know how much you want to scale the entity by, and when precision is a factor.Scale Origin
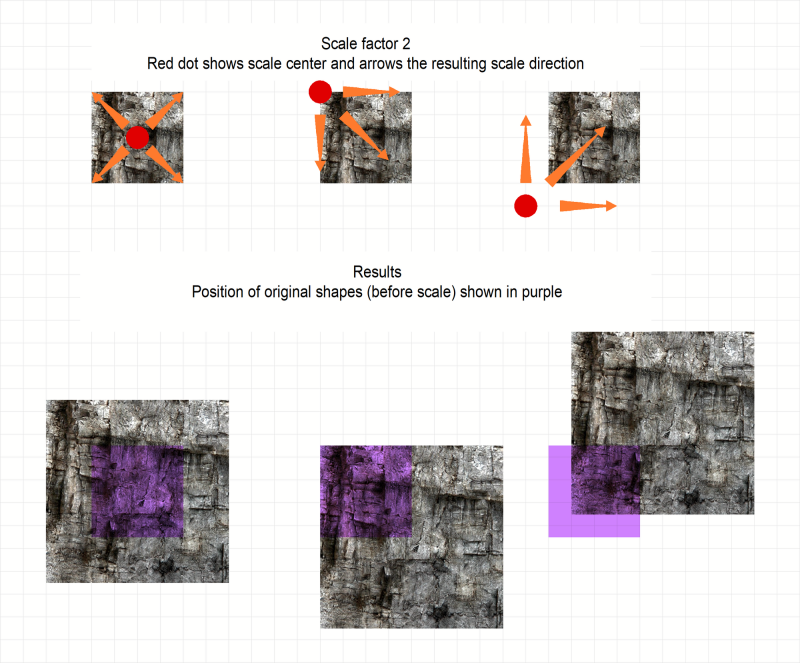
No matter which of the methods below you use, CC3+ will always ask for the scale origin. The scale origin is the point from which the entity grows and shrinks. If you increase the size of an entity, it will always extend away from this point, and if you reduce the size of an entity, it will shrink towards this point. For example, if you set the scale origin in the exact center of the entity to scale and then increase the size, it will extend in all directions equally. But if you instead set the scale origin in the corner of the entity, it will extend outward away from that point.Note that the scale origin can even be placed far away from the entity to be scaled, but note that this will result in the entity being moved, because the distance between the entity and the scale center will grow or shrink as you scale the entity.
(Visual) Scale
The default operation if you just click the button is the visual scale. When you use this mode, you use your mouse to visually indicate the size of the scaled entity. Upon starting the command and finishing the selection of entities to scale, CC3+ will ask you for the scale origin. Once you pick this, you can move your mouse toward the top of the screen and the preview outline of the entity will grow, and if you move the mouse toward the bottom of the screen, it will shrink. The exact size will depend on the distance between the mouse pointer and the scale origin, so it is a good idea to have the entities you wish to scale positioned on the screen sao that you have enough room to move the mouse to scale it by a large enough amount.Once you are happy with the size, simply click the left mouse button to finish the procedure and scale the entity, or hit Esc to cancel the scaling.
While scaling, you can hold down shift to move the reference point. This doesn't move the scale origin, but it moves the point used by CC3+ to compare with the position of the mouse pointer to determine how much to scale the entity. You can also hold down control to scale with independent X and Y, when you do this, sideways (horizontal) motion with the mouse will scale the entity in the X-direction (width) and vertical movement will control the Y-direction (height).
Non-Visual Scale
If you have the correct scale factor lined up, non-visual scale provides you with the precision you need. This command works much like visual scale, but instead of moving the mouse to determine the size, CC3+ will prompt for this on the command line. The default value is 2.0, which means to double the size, but CC3+ will remember the last value used in the current session. Values above 1 will increase the size, values below 1 will decrease it. Basically, the size of the entity is multiplied by the scale factor.There is a separate command for independent X/Y-scaling, when this is used, CC3+ will ask for both the X and Y scale on the command line, otherwise it will just ask for the scale which is used for both axes.
Quick Tips
Here are a few quick tips when using this command.Scale an imported bitmap for tracing
Say you already have a map as an image (scanned from a paper map, or a map in a different format that CC3+ can't use, or just any old image), and you want to insert this into CC3+ and use it as a template for tracing to recreate this map in CC3+. You would start by creating a new map in CC3+ in the appropriate size to fit the map, and then you would use Draw -> Insert file to insert the image into your map. But, it probably won't be scaled correctly since this information isn't contained in the image data. So, what you need to do is to identify two points in your image you know the distance between. If it has a scale bar, that is great, if not, use any two points where you know the supposed distance. Now, use the distance tool in CC3+ to measure this distance on the imported map. For this example, let us say that this distance is supposed to be 100 miles, but when you measure it in CC3+, it comes out as 70.To find the scale factor, simply divide the actual distance (100) by the one measured in CC3+ (70). This gives us 100/70 = 1.4286.
Now, to make things easy for ourselves, when you first insert the map into CC3+, you should insert it so that the bottom left corner of the inserted files fits exactly in the bottom left corner of your new CC3+ map. You can use the endpoint modifier when inserting the map to make this perfectly precise if desired. Now, with the image in the correct starting position, and our scale factor calculated, simply use non-visual scale on the image, provide it with the scale factor of 1.4286 when asked, and when asked for the scale origin, use the bottom left corner of the map/image. This will cause it to stay snug into that corner, but expand as required to fit the correct scale.
After scaling the image, if you now use the distance tool to measure it again, the measured distance should match the actual distance in the imported map.
Letting CC3+ do the calculation
In the example above, we took the numbers, and manually calculated the scale factor (100/70 = 1.4286), but this isn't required. Instead, when CC3+ asks for the scale factor, simply enter 100/70 on the command line, and CC3+ will calculate the value itself and use it. This is both easier, and it ensures that rounding errors are less of a problem, since CC3+ will use a far grater precision than we bothered to type when we calculated it manually.Scaling multiple entities
Beware that when scaling multiple entities, the spacing between them will be scaled as well. Sometimes you want this, sometimes you don't. For example, if you wish to make all the symbols in the map a bit bigger, just selecting them all and doing a single scale operation will scale the distance between them as well as the symbols themselves, which means that the symbols will basically be moved to a new position on the map, with movement being larger the further they were from the scale origin point. This is probably NOT what you want, so in this case, the symbols need to be scaled one by one (The symbol manager have tools for mass scaling symbols though).On the other hand, if you scale a composite shape (like a house with an extension, a garden, and some furniture), you would want to increase spacing as you scale the elements, otherwise they would loose their proper arrangement in relation to each other, so in this case you would definitively want to scale all the entities in the shape as one operation.
Keep this in mind when scaling entities, and consider what can be scaled as a group, and what need to be handled individually.

Comments