

Command of the Week - Trims (Week 41)
 Monsen
Administrator 🖼️ 46 images Cartographer
Monsen
Administrator 🖼️ 46 images Cartographer
Index
- List (Basic)
- Symbols Along (Intermediate)
- Fractalise (Intermediate)
- Edit Text (Basic)
- Link with Map/File (Intermediate)
- Offset (Intermediate)
- Measuring Tools (Basic)
- Change like draw tool (Basic)
- Modifiers (Intermediate)
- File Paths (Intermediate)
- Complex Shapes [Combine Path] (Intermediate)
- Complex Shapes [Multipoly] (Intermediate)
- Break (Intermediate)
- Map Notes (Basic)
- Coordinates (Intermediate)
- Macros (Advanced)
- Search Files for Text (Basic)
- Text Justification (Basic)
- Mirrored Polygons (Intermediate)
- Managing Drawing Tools (Intermediate)
- Named Views (Basic)
- Symbol Lookup Sheets (Intermediate)
- Symbol Catalog Settings (Advanced)
- Symbol Catalog Filters (Advanced)
- Symbol Control Points (Advanced)
- Define Symbol (Intermediate)
- Curves (Basic)
- Selections (Intermediate)
- Sort Symbols in Map (Basic)
- Extract Properties (Basic)
- Convert File (Basic)
- Get Extents (Advanced)
- Quick Move (Basic)
- Menu Editing (Advanced)
- Trace (Basic)
- Array Copy (Intermediate)
- Explode (Basic)
- Clipboard Copy (Basic)
- Rename & Reorder (Intermediate)
- Drawtools Edit (Basic)
- Trims (Basic)
- Symbol Attributes (Intermediate)
- Fill Style Selection Mask (Basic)
- Browse Files (Basic)
- Node Editing (Intermediate)
- Automatic Sheet Selection (Basic)
- Scale (Basic)
- Text along a Curve (Basic)
- Shaded Polygons (Intermediate)
- Fill with Symbols (Intermediate)
- Global Sun (Basic)
- Symbols in Area (Intermediate)
This series is called the command of the week, but it could also explain a feature. The explanations will tend to explain the technical parts of the command, and is intended to highlight the basics (and complexities) of the command, and information about how to use it, but won't be a detailed tutorial. It is up to you to use it creatively in your maps.
Week 41 - Trims
The various Trim command in CC3+ are used to trim lines, for example to ensure that a river ends at the shore. Note that this command only operates on lines and paths. If you need to trim a polygon, use Cut or Break on it first to reduce it to a path, then trim it as required, and finally use Path to Poly to turn the result back into a polygon. When operating on basic lines, CC3+ can also lengthen the lines with the Trim commands, but for paths, they can only be shortened.Where to find them?
Toolbar: [Image_9465], [Image_9466], [Image_9467], Right Click [Image_9465]Menu: Edit -> Trims -> Trim, Trim to Intersection, Trim to Entity, Trim to Length, Trim Inside, Trim Outside
Command Line: TRIM, TRIMINT, TRIMTO, TRIML, TRIMIE, TRIMOE
How to use them
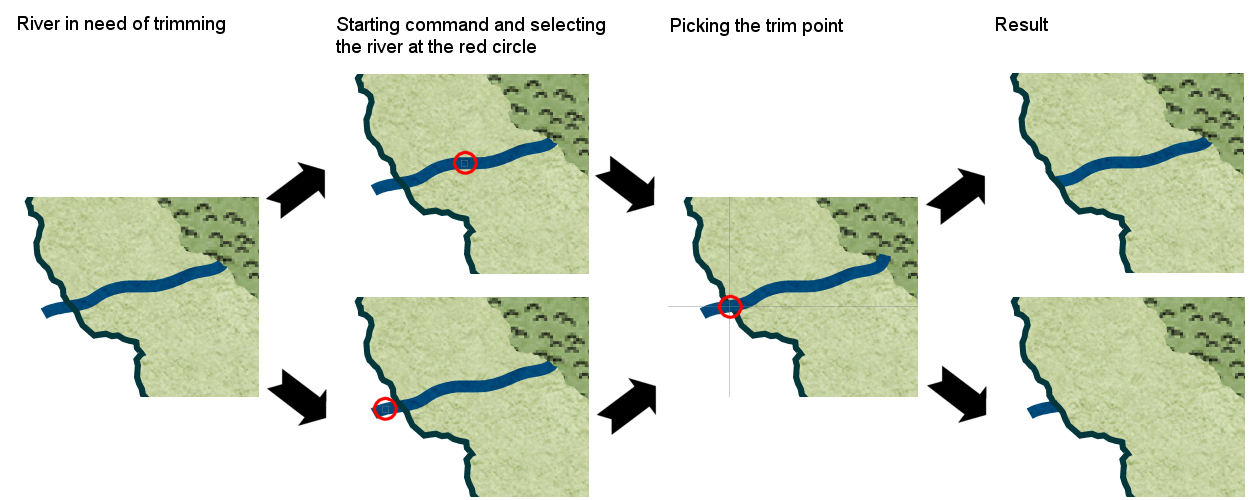
The basic thing to remember for most of the trim commands is that the selection point of the entity you trim is important, because it will define what part of the entity you keep. If you select it in the wrong location, you'll end up with just the part you wanted to remove left behind. Here are two examples, with the selection point highlighted by a red circle. The top example shows correct use, while the bottom example shows what happens if you use the wrong selection point.[Image_9468]
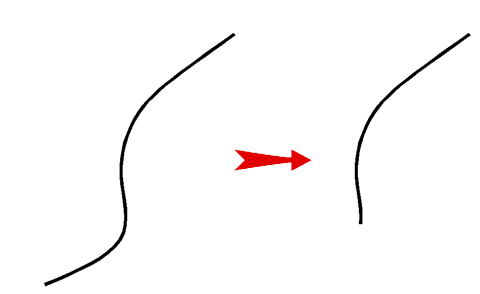
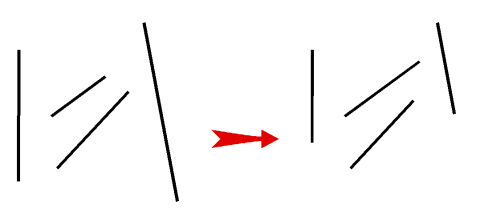
| Trim Trim is the basic command. It has you pick an entity, and then click a point along that entity to tell CC3+ where to trim it. The part containing the point you used to select the entity is kept, the other half is discarded. The Trim command was used for the example above. It is worth nothing that you can click anywhere in your drawing when CC3+ asks for the trim point, CC3+ will simply use the point on the entity that is nearest to wherever you clicked, but to have reasonable control, I recommend clicking on the entity itself at the appropriate point. | [Image_9469] |
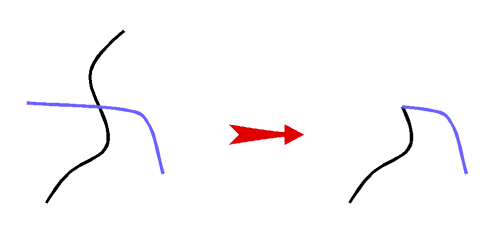
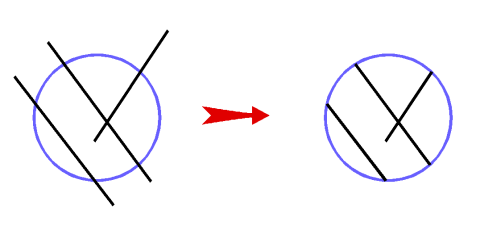
| Trim to Intersection Trim to intersection has you select two entities, and then trims both of them to the point where they intersect. Remember that the selection point matters for both entities, and is used to determine which parts you wish to keep from each line. | [Image_9470] |
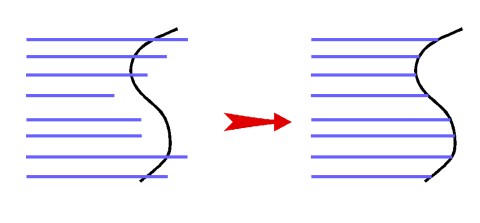
| Trim to Entity With trim to entity, CC3+ will ask you to select an entity to trim to, then click on any number of lines. As you click on the lines, they are trimmed to the entity selected in the beginning. Examples for using this is to use a straight line as the entity to trim other lines to the same relative position, or a more interesting shape to trim them into that shape. It can also be used to lengthen nav lines to stretch all the way to the map border. | [Image_9471] |
| Trim to Length Trim to length will ask you for the desired length, and you can then click multiple lines (one by one) to trim them to that length. This is used to make multiple lines the same length, regardless of their position and orientation. | [Image_9472] |
| Trim Inside Trim Inside will trim an entity to only keep the part that is inside one or two bounding entities. Use one entity if you have a closed shape (like a polygon), otherwise use two (if you are using lines for example). | [Image_9473] |
| Trim Outside Trim Outside will trim an entity to only keep the part that is outside one or two bounding entities. Use one entity if you have a closed shape (like a polygon), otherwise use two (if you are using lines for example). | [Image_9474] |


Comments