

Command of the Week - Selections (Week 28)
 Monsen
Administrator 🖼️ 46 images Cartographer
Monsen
Administrator 🖼️ 46 images Cartographer
Index
- List
- Symbols Along
- Fractalise
- Edit Text
- Link with Map/File
- Offset
- Measuring Tools
- Change like draw tool
- Modifiers
- File Paths
- Complex Shapes [Combine Path]
- Complex Shapes [Multipoly]
- Break
- Map Notes
- Coordinates
- Macros
- Search Files for Text
- Text Justification
- Mirrored Polygons
- Managing Drawing Tools
- Named Views
- Symbol Lookup Sheets
- Symbol Catalog Settings
- Symbol Catalog Filters
- Symbol Control Points
- Define Symbol
- Curves
- Selections
- Sort Symbols in Map
- Extract Properties
- Convert File
- Get Extents
- Quick Move
- Menu Editing
- Trace
- Array Copy
- Explode
- Clipboard Copy
- Rename & Reorder
- Drawtools Edit
- Trims
- Symbol Attributes
- Fill Style Selection Mask
- Browse Files
- Node Editing
- Automatic Sheet Selection
- Scale
- Text along a Curve
- Shaded Polygons
- Fill with Symbols
- Global Sun
- Symbols in Area
Week 28 - Selections
A lot of the commands in CC3+ require you to select one or more entities. CC3+ is equipped with a very powerful selection system, but it is important to familiarize yourself with it to be able to utilize it properly. In this installment of Command of the Week we will take an in-depth look at these.Selection Procedure
You're hopefully already very familiar with this, but just to keep everyone on the same page, remember that when executing commands (be it erase, move, scale, change properties or so on), the procedure in CC3+ is to first start the command (by clicking on the button, selecting it from the menu, or typing it on the command line), then, when the CC3+ command line says Select entities (0 picked) you to your selection (which is what we will talk about below), and finally, you right click inside the drawing window and select Do It to execute the selected command on the selected entities. Note that instead of right clicking and selecting Do It from the menu, you can simply hit the D key on your keyboard.Note that when selecting, you can never select entities on frozen layers, nor can you select entities that are on hidden layers or hidden sheets. This is a quick way to prevent certain entities from being selected. Do note that you can still select entities that are completely obscured by other entities though, they react the same way to the selection no matter if they are obscured or visible.
Selection Visibility
The original way Campaign Cartographer represented selections was to temporarily change the displayed color of the entity to the selection color (pink by default). However, when CC3 introduced raster symbols and fill, color cannot be changed as easily (Which you may have noticed if you have tried to use change properties on a raster symbol and picked a new color). Thus, to be able to show selected raster symbols, CC3 introduced a thin border around the symbol in the selection color instead. Note that varicolor raster symbols, which have parts that can change colors, DO take on the selection color on those parts when selected. Raster fills are the most tricky, and currently does not show that they are selected in any clear way.Note that when selecting an entity, it is temporarily moved to the front, instead of occupying it's normal place in the sheet order (just like when first placing a new entity). As with new entities, this is just a visual issue, because the entity needs to be redrawn, and CC3+ just redraws the selected entity, and not everything else that would have (partially) covered it. This can make it difficult to select entities now covered by this selected entity, but you can always hit Redraw (ctrl+R) in the middle of a selection to redraw the current view, which will draw everything in their appropriate order, including selections. This won't affect your selection in any way. Also, sometimes the selection color stick behind after deselecting an entity, redraw fixes that too.
If the selection color doesn't work for you, you can change it with the MCOLOR command.
Selection Methods
There are different methods of doing the selection itself, as discussed below. Note that these can only be used when CC3+ expects you to select something, i.e. after you have started a command as discussed above. Note that if selections doesn't behave as you expect, your selection method may be set to the wrong option. You can always change this from Tools -> Options -> Select Method. The default method (and the one you usually want) is 'Dialog or Popup', and provides access to the edge select and selection window options below. To use the other selection methods, you must set them in this dialog. Note that the dialog have a checkbox for making the change valid for one operation only before it reverts to the previous option.Direct Selection / Edge Select and Selection Window
The most common way of selecting entities in CC3+ is by clicking on the edge of the entity. You may have noticed that your cursor have a small square attached to the end of it when selecting. This is the pick aperture, and the edge to select must be within this box to select it. Also note that if there are edges from multiple entities in the aperture box, they will all be selected.You can change the size of the pick cursor aperture from Tools -> Options.
Note that when selecting text, it must be selected by clicking on the baseline, and not just any edge.
If you click anywhere that is not on the edge of an entity while selecting, CC3+ will start a selection window instead. After placing the first point, just move your mouse, and you will see a selection rectangle/window following it, and click again to end selection. Any entities with at least part of their edge inside this selection window will be selected. If you get a selection window when you were sure you clicked on the edge of an entity and would have expected to select it directly, or if entities that are inside the selection window didn't get selected, make sure they are not located on a frozen layer. Entities that are on frozen layers cannot be selected.
During this selection method, you can also hold down the Control key on your keyboard while clicking or using the selection window to deselect entities.
This is the default selection method in CC3+.
Multiple Each
When this selection method is active, CC3+ lets you select entities like normal, but once you right click, the selection finishes and the command is executed. This allows for a bit faster procedure with less clicks, but it also prevents access to all the various selection modifiers which one of the main reasons why selections in CC3+ are so powerful.To enable this selection method, you need to go to Tools -> Options -> Select Method.
1 each pick
This select method lets you do a single pick with the pick cursor (no selection window). Immediately upon picking something, the command executes on that entity. Note that if multiple entities had their edges inside the pick cursor aperture, they would all be selected, even if CC3+ tells you to select 1 entity. If you click somewhere that does not result in a selected entity, the command just terminates.To enable this selection method, you need to go to Tools -> Options -> Select Method.
Window
This select method lets you use a single selection window. Once you have defined the selection window, all entities within it are selected as usual, and the command immediately executes without the option of selecting additional entities. This is another method that provides faster selections, but less power and flexibility.To enable this selection method, you need to go to Tools -> Options -> Select Method.
Prior
The prior entity/entities are either the last group of entities selected, OR the last new entity placed. When this selection method is active, whenever you start a command, it will automatically use the prior entity as it's selection and execute the command on that one, without asking the user for any input to the selection at all.To enable this selection method, you need to go to Tools -> Options -> Select Method.
Layer
When using select by Layer, instead of being prompted to select entities, you are being prompted for the name of a layer. Either type the name, or right click to bring up the list of layer and pick one (Click on the name of the layer to select it, NOT the checkbox in front, that is used to make the layer active). This procedure will select all the entities on the selected layer, and immediately execute the selected command on them. This selection method is mostly used by macros.To enable this selection method, type SELBYL on the command line.
Color
Similar to Layer selection, this method is also mostly used by macros, and selects all entities of a given color. Provide the color on the command line, or right click to bring up the color picker. Once a color have been selected, the command is immediately execute on all entities of that color.Note that color is a property of all entities. For vector entities, this color would be clearly visible in the entity, but for raster entities, the color is usually not shown at all, because the raster image is shown instead, and the color of the raster image doesn't need to be anything like the color property. You can always check the color property of an entity using the list command.
To enable this selection method, type SELBYC on the command line.
All
Again, primarily a macro command. This selection method simply selects all entities in your map and executes the command on them, with no user input. Once you start the command, it will simply operate on all entities and finish (or show the appropriate dialog if the command was something like change properties).To enable this selection method, type SELBYA on the command line.
Selection Modifiers
Above, I presented all the different selection methods, and you may have seen some interesting options there. However, most of the selection methods are very inflexible, they do just one thing. Much more powerful selections can be had by using the default selection method and using the various selection modifiers. There are modifiers that duplicate most of the features from the various selection methods above, and they can be used in combination. For certain scenarios, you may need the slighter faster selections by using one of the optional selection methods above, but for everyday work, I strongly recommend having the default one enabled (Tools -> Options -> Select Method -> Dialog or Popup) and use the selection modifiers below to accomplish your needs.To try out the various selection modifiers, I've attached an example map to this post. For each example, I expect this map to be in a pristine state, so I recommend undoing (Edit -> Undo, Ctrl+Z) your changes after each try. I also expect you to start a new selection each time, so make sure to finish the command after each, and don't just continue with the current selection. Also, I'm not going to tell you what command to use most of the time, experiment with whatever command you like (Just use something that requires a selection)
Note that all these selection modifiers are available by right clicking inside the drawing window when you are in a selection process, I am not going to mention this in each example. You can also simply press the listed shortcut key instead, doing that has the same effects as picking it from the menu.
Note that every time you need to right click (either to bring up the selection menu shown here, or to bring up various dialogs mentioned below) it is very important that you right click inside the actual drawing window, as right clicking on other parts of the CC3+ UI will have other effects.

All
Shortcut Key: ASelecting by all simply selects every entity on the map (except entities on frozen layers, entities on hidden layers, and entities on hidden sheets). This modifier requires no additional user input.

Prior
Shortcut Key: PThe prior entity is either the last set of selected entities, or most recent entity placed in the map. This selection option is very useful when you want to use several different commands over the same set of entities, or you wish to use a command on the entity you just placed.
Try it 1: Place any symbol from the symbol catalog into the drawing. Now, click the Erase button, select Prior. The symbol should now be selected, and when you hit Do It, it should be erased.
Try It 2: Start by using the list command on the blue circle and red square (both in one operation, and it is important to actually complete the command and bring up the list window, don't just abort it after doing the selection). Now, start any other other command that requires a selection and do Prior. The circle and square should now be selected again.
Window
Shortcut Key: WThis modifier allows you to pick entities by using a selection window. This is useful to force a window selection when the entity density is so high that it is difficult to click anywhere to start a window selection, because it just ends up picking entities instead. It behaves just as the regular selection window.

Color
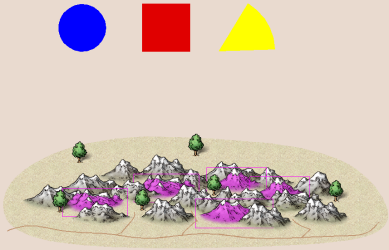
Shortcut Key: CThis modifier allows you to pick entities by their color. Do note that this is the color property of an entity, NOT any color seen in the entity. The color of an entity is the color that was selected on the color bar when you placed it (unless changed later, typically by change properties). However, this color may not be visible in the entity at all. For example, a raster symbol will just show the raster image associated with the symbol. The color property of the symbol may be pink, but if the image was a gray mountain, it will still look grey on the screen. The same applies to raster fills, they show the raster image as a fill instead of the defined color. This knowledge is very important when selecting by color, since the actual color property of the entity might be nothing like the colors displayed on screen. Varicolor symbols are a bit of an exception to this, since these symbols take on the chosen color on part of the symbol (all dependent on how the varicolor mask is set for that particular symbol). In my example drawing, you will see both grey and blue mountains. The blue mountains are varicolor mountains, and take on the blue color I have defined for them, while the rest of the mountains are defined with several different colors, something completely impossible to see (but can be revealed by using List on them)
When you use this modifer, the command line will prompt you to select a color. You can either type in the color number (this is a number from 0-255. You can find this in CC3+'s color picker dialog. It is NOT a color hex code or similar, it is the index number of the color in the CC3+ palette) followed by enter, or you can right click (inside the drawing window) to bring up the color dialog where you can pick a color and hit OK.
Try it: Activate the Color option during selection. Right click to bring up the color dialog and pick the blue in the top left before hitting OK. This will cause all the blue mountains as well as the blue circle to be selected. (Note that the blue mountains were selected because they are varicolor symbols with a blue color property, not simply because they were bitmaps containing the color blue)

Layer
Shortcut Key: LSelecting by layer allows you to select all the entities on a given layer. This makes it easy to select for example all the vegetation in the map, or any other related group of entities if you use layers to organize your entities (Remember, layers are good for organizing amd grouping entities, while sheets control arrangement of entities, as well as effects). When using this modifier, the command line will prompt you for a layer. You can either type in the name of the layer (case insensitive, followed by enter), or right click to bring up the layer selector. Note that when you select a layer, click on it to select it. The background color of that layer in the list changes to indicate it is selected. You do not need to use the checkboxes in front of the layer name when you are just selecting it, those check boxes are for setting the layer as the active layer for future drawing operations, not for selecting it (there are also boxes for hiding and freezing the layer).
Try It:Activate the Layer modifier and select the VEGETATION layer (type it or right click to select it from the list). All the trees in the map should be selected.

Entity Type
Shortcut Key: TSelecting by entity type allows you to base the selection on what type of entity this is, for example a symbol, a circle, and arc, a polygon or more. This is great for selecting all map elements of a given type. When using this selection modifier, you can select many types at once, but be aware that the dialog remember the choices from the last selection, so you may need to turn these back off if you need different types.
Try It:Activate the Entity Type option. In the dialog that appears, place a checkmark in 2D Circle and Symbol Reference, then hit ok. This will result in both the circle and all the symbols being selected.

Line Style
Shortcut Key: SSelecting by line style allows you to pick entities with a given line style. Note that all entities have a line style, but not all entities have a visual representation of it. In CC3+ maps, line styles are most prominently used to make things like dashed roads, dashed road markings, and sometimes dotted lines for grids. When using this selection modifier, CC3+ asks for a line style, and just as with the layer option, you can either type in the name of a line style, or right click to select it from the dialog.
Try It:Use the line style modifier, and select the Road Long Dash option from the dialog (Note, list is not alphabetized). This result in the small roads going up into the mountains being selected, but not the main road below the mountains. (The dash on the small roads may be difficult to see, I recommend zooming in close on them to see the line style visually)

Fill Style
Shortcut Key: FJust as with line style, all entities have a fill style, even if it is not visible. By using this selection modifier, you can select all entities with a given fill style. When you activate this modifier the command line will ask you to select a fill style, and as usual, you can either type in the name of it, or right click to bring up the selection dialog.
Try It: Activate the Fill Style selection modifier, then right click to bring up the fill style dialog. Go tot he Bitmap Files tab of that dialog, and pick Hills, Background_MS from the list before clicking OK. This should cause the background polygon behind the mountains to be selected. (Note that as mentioned earlier, it is difficult to see when a raster filled polygon is selected, but go ahead and execute the command on it, and you'll see that it is affected).

Entity Tag #
Shortcut Key: #Sometimes you have a bunch of (almost) identical entities and you need to select only one of them. Selecting by color doesn't work if they have all the same color, same with the other properties. End if they exist in the same location too, they get difficult to pick. This is where the entity tag comes in. This is a unique id number for each entity in your drawing. You can find the entity number of any given entity by using List on it. Note that when using this modifier, you must input the entity number on the command line, there is no list available to pick from.
Try It:Activate the Entity Tag # selection modifier, and when the command line prompts you for the tag number, type in 16179 followed by enter. The center mountain should be selected.

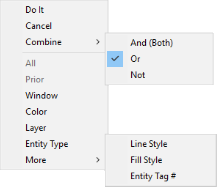
Combining Selections
When working with the various selection modifiers discussed above, you can combine them as you please. The default option is to just add to the selection each time, so if you first click on a few entities, then select by color, then finally select by fill style, you will end up with a selection that contains all the entities selected by each of these methods. But there are other ways of combining them. You can select between the different way of combining selections by using the options in the Combine submenu of the selection menu.To use this combination operators, you first select a group of entities, using any of the methods above. Then, select the appropriate option under Combine, and make a second selection using any of the options above. You can then optionally change the Combine option again and make a third selection. But do NOT select a combine option before the first selection, the combine option is used to tell CC3+ how to combine the second (and subsequent) selection with what is already selected, not as a one-time choice for the entire procedure.
It is important to note that for the examples I mention below, there are other ways to go around getting the same end result, and that basically holds true for any selection examples. Maybe you feel another way is better for the specific example I provide here, but keep in mind that these examples are only used to teach you the different options, it is up to you to decide when each of them makes most sens in your work.
Also note that for the examples below, I do the selection in parts. You are NOT supposed to end the selection (Through Do It) after each part, that is done only at the very end, everything in my description is about building a selection for a single invocation of the command.

Or
This is the default option. The Or options means that all entities selected are being combined into one large selection. Basically, they are included in the final selection if they are selected either in your first selection Or your second selection. This option means that anything selected will be added to the current selection, increasing the total amount of entities selected. So, you can for example first do a selection by color, and then a selection by layer, and end up with all the entities from those two individual selections to be combined into one big selection.Try It:First, use a selection window to select the geometric figures (circle, square and wedge). Then, right click and verify that the combine option is set to Or. Now activate the Entity type selection modifier, and select the Symbol Reference type. This will result in all the symbols in the map being selected, as well as the geometric figures. Everything is included in the final selection, because they belonged to EITHER your selection window OR the symbol type modifier.
And (Both)
The And (Both) option is used to only select entities that match BOTH condition you specify. This is very helpful when a single criteria may select more entities than you want. To use this option, first select something, then enable the And (Both) combine option, and finally do a second selection. Only entities that matches BOTH selections will be included in the final selection.Try It:First, use select by color to select everything blue (color #3). This will cause the blue mountains as well as the circle to be selected. Now, activate Combine -> And (Both) followed by selection by Entity type, where you pick Symbol Reference. The end result is that only the blue mountains remain selected, because they match both criteria (BOTH color Blue AND a symbol reference) (You may need to do Redraw, Ctrl+R, to update the view to get rid of lingering display of selection rectangles from deselected entities)

Not
Not is a great option to exclude certain entities from your selection. Since you can simply deselect by holding down control, Not is primarily used to excluded entities based on given criteria. To use it, first make a regular selection, then activate the Not option and make another selection. The final selection will only contain the entities from the first selection that is NOT also in the second selection.Try It: Use Entity Type to select only the Symbol References. Select Combine -> Not, followed by Layer and pick the Vegetation layer. That leaves us with just the mountains selected. Finally, check that Combine is still set to not, then do a selection by color and use Blue (#3). This matches the blue symbols, and since we are using Not, they will be removed from the selection. The end result is that only the regular mountains remain selected (You may need to do Redraw, Ctrl+R, to update the view to get rid of lingering display of selection rectangles from deselected entities)
If you are unfamiliar with logical operators, you may be a bit confused why Both (And) doesn't combine the selection. Both means both of the right? So why don't you get the entities from both selections? The trick here is to look a the individual selections as criteria. Let us use two selections to be combined as an example. The first selection, S1, is a selection by color, while the second selection, S2, is a selection by entity type. The exact color and entity types are not important. These two selections, S1 and S2, are our criteria.
- If we use the default Or option, it means that an entity remain in the final selection if it is in S1 OR S2. Since all entities selected do indeed match (at least) one of those criteria, they are all included in the final selection.
- For And (Both), we require that BOTH criteria are true, a entity must be in BOTH S1 AND S2. So, this will only end up selecting entities that were in BOTH selection groups
- For Not we take all entities from S1 that are NOT in S2. So the final selection will include everything from S1 unless excluded by S2. Nothing from S2 will be part of the final selection.

Comments