

Community Atlas: Errynor - Selass Town
 Wyvern
🖼️ 201 images Mapmaker
Wyvern
🖼️ 201 images Mapmaker
While working on the Ellenge Town map for the Kachaya, I'd also prepared some random tables for designating shops and facilities suitable for Merfolk settlements, given that all undersea civilisations will have a degree of similar requirements for places to live. As I wanted to provide some ideas to the Community Atlas more generally too on developing undersea settlements for all the main races I'd situated in Errynor's oceans, from what had been decided for the Map 01 area, the logical next map was a Merfolk settlement. Of the two still-inhabited ones on Map 01, the Shaldun castle stronghold set in the line of The Cliff itself seemed too similar a location to what I'd already explored for the Shark Bridge area, so I opted instead for the town of Selass out in The Deeps:

I'd already established that Selass was going to be a kind-of independent frontier town, towards the edge of the abyssal plain of Nibirum's greatest ocean, and that the abyssal plain itself would be an area likely to attract adventurers and prospectors. Selass would then have grown to serve their needs in this area. Not wanting to simply drop the settlement onto the routine, flattish, deep ocean floor (the sea's about 3,600 m, nearly 12,000 ft, deep here), and having already worked with some undersea uplands (the Aak Hills), I thought a hollow would be more interesting here. This had the added advantage I could try out @Loopysue's City Cliffs set from the 2020 Cartographer's Annual (CA 165).
Using my random tables, I worked out the size of Selass, and rolled-up what its main features were going to be. The population involved needed two modest villages of agricultural workers and hunters to support it, and them, and dicing for their locations placed one very near Selass, like a "suburb" perhaps, the other a couple of kilometres/a mile or so to the southwest. This meant Selass took on a somewhat elongated look overall, and doodling shapes around this layout brought me to the realisation both Selass + "suburb", and its neighbouring village, could be set into rounded areas where the sea-bed had partly collapsed - when a small magma tube had fallen-in, say, or an especially gassy magma emplacement had led to the sea-floor fracturing in a similar way - places that could have plenty of cliff-opening caves afterwards, suitable for occupation and expansion. Two such places relatively near one another would thus have been ideal for the Merfolk's uses, and included an explanation for why one village had ended up so close to the town, yet could be thought of still as loosely separate from it.
One minor drawback was that the City Cliffs set is intended to work best with the CD3 Bitmap A symbol sets, which are not black-and-white, the overall colour scheme I'd been trying to use for all my undersea settlement maps, due to deciding that while the deep-sea humanoids can all see normally despite the eternal darkness of the deep oceans, their vision without a light source is purely monochromatic. That though was easily overcome by simply applying an RGB Matrix Process Effect set to "Gray" to the entire map. I did have to keep turning it on and off along the way to ensure whatever was being added in colour still worked in greyscale, of course.
Merfolk architecture as I'd envisioned it is pretty eclectic on the whole, so aside from cave-dwellings, a mixture of sea-floor-surface building styles - even some that look remarkably like their land counterparts - would be perfectly reasonable. What seems to be a chimney might be really a vent of some kind, though it could be equally a rooftop accessway, for example. So I drew on all the CD3 Bitmap A symbol sets available, including @ScottA's Celtic houses and @Loopysue's City Domes, to provide an appropriate mix. The switch to greyscale became helpful in another respect, because I needed three shipwrecks, reused as buildings, and the Bitmap A symbols have no ships at all. Luckily the original CD3 vector symbols do have some - not perfect for use as wrecks, but clearly boat-shaped - a difference the use of greyscale helped conceal!
The settlement outlines were to be traced from my hand sketch, once scanned and imported into the CC3+ template, and rescaled to fit the proper area. Using this, I constructed the cliff-lines for both Selass + suburb, and the separate mile-distant village. This took a few tries to get right, as I'd not realised individual segments of the connecting-symbol cliffs couldn't be swapped-out for replacements. After that though, it was easy enough to complete the cliffs.
In order to have the buildings and caves placed randomly - no streets needed on the deep sea-floor, after all - I'd always intended to use the Symbols In Area command to set-up these layouts. So I added basic coloured circles for the relevant Areas within the outer cliff-lines, and populated them with the correct numbers of identifiable symbols of different types for the different surface building shapes chosen, using just the standard Geometry.FSC set from CC3+ at this stage. Once the random patterns were established, it became possible to identify what should go where from the selected properties and places lists randomly determined earlier. The Cave Entrance symbols were moved in places to their nearer cliff-lines, and a few other minor adjustments made, before replacing those except the cave symbols with their final CD3 Bitmap A ones. The most significant change made during this process was to add a cliff stack feature around the southern border of Selass near where it met with that of the adjoining village area, where a particular cluster of symbols had chanced to lie.
Labels and keys were added, along with other surface features in and around the settlements to give them a little more "life", after which an area map was constructed to show the relative locations of the settlements to one another on the sea-bed. For this latter drawing, the cliff-lines from the town and village maps were simply copied and rescaled accordingly. The provided distance scale symbols proved a little too small and unclear when added to the maps, aside from the need to relabel those for the area map, so after adjusting and adding some suitably sized Grid options, fresh scales were produced for these by hand instead.
Hence the final combined map looks like this:
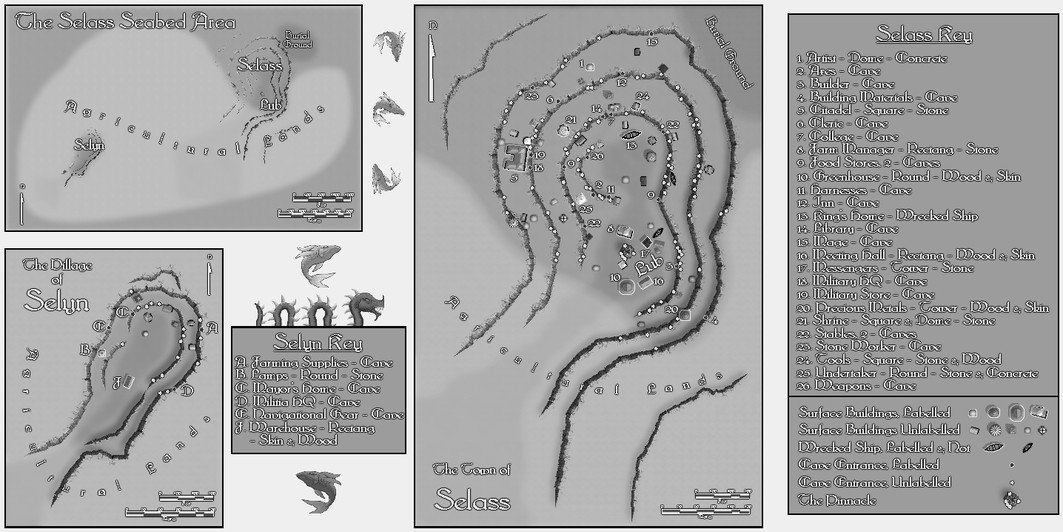
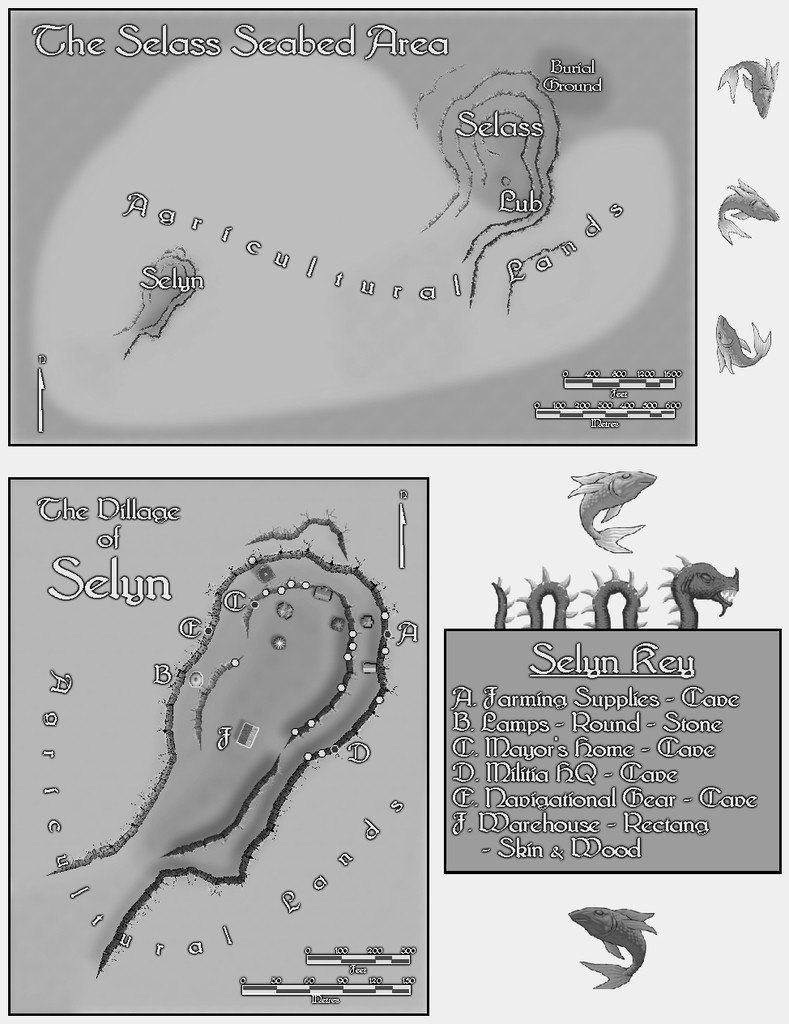
This isn't very clear at the usual Forum resolution, so this is a closer view of just the left half:
And this is the right half:

As usual, a detailed set of text-file and PDF notes was drafted to accompany and explain more about the whole mapped set-up here.


![[Deleted User]](https://secure.gravatar.com/avatar/c75d9a245b74d9c59be0999ea81ca541/?default=https%3A%2F%2Fvanillicon.com%2F92add7f8c954488718110edc4896ad39_200.png&rating=g&size=200)


Comments
The map is now in the atlas. Thanks for contributing. I think Wyvern is on a roll this year. He managed to score the official 500th map to the atlas, then he grabbed the 600th too with his last submission, and now also the Master Mapper award.
Definitely!
Look at him go...
Great work, Wyvern :)
Thanks very much folks!
Of course, to be strictly accurate, most of the maps I've submitted for the Atlas this year were actually completed last, though of course there are often things that need tweaking even after they're "finished".
Then you need to surpass me in quantity to the Atlas as well. I'm sure you can handle that.
Yeah, I've seen the quantity of maps on your Crestar website alone, Jim - I'm not sure I stand much chance of achieving this one!
Well, that is why I suggest the Atlas map numbers. The ones on my Crestar site are over 18 or so years.
But it reflects the speed and quantity of your mapping generally Jim!
Yes, but many of those first years, I had no one to talk to. And my maps weren't very good. Seriously not very good. The ones on my Old Crestar site are typically a big improvement. Then I was on Yahoo groups, and was one of those who voted for this forum to come into existence. Hmm... So, maybe I've been doing this for more than 18 years ?!