

Scaling in Perspectives 3

Hi all! First post, be gentle.
Background: I am working in a small team, designing an new RPG and I tried picking up this software since it would speed things up quite a bit for us from doing all the interiours hand painted. I have a fairly good understanding of vector and have been using Illustrator for quite a few years. I can't quite get the hang of Perspectives scale though. Hoping for help from this community before rage quitting and asking for a refund and going toward Hobyte's isometric software instead.
My process so far: I am going to create a tavern in a sort of a viking long house. I'm thinking an interior area of ~25x15 meters.
See attached image.
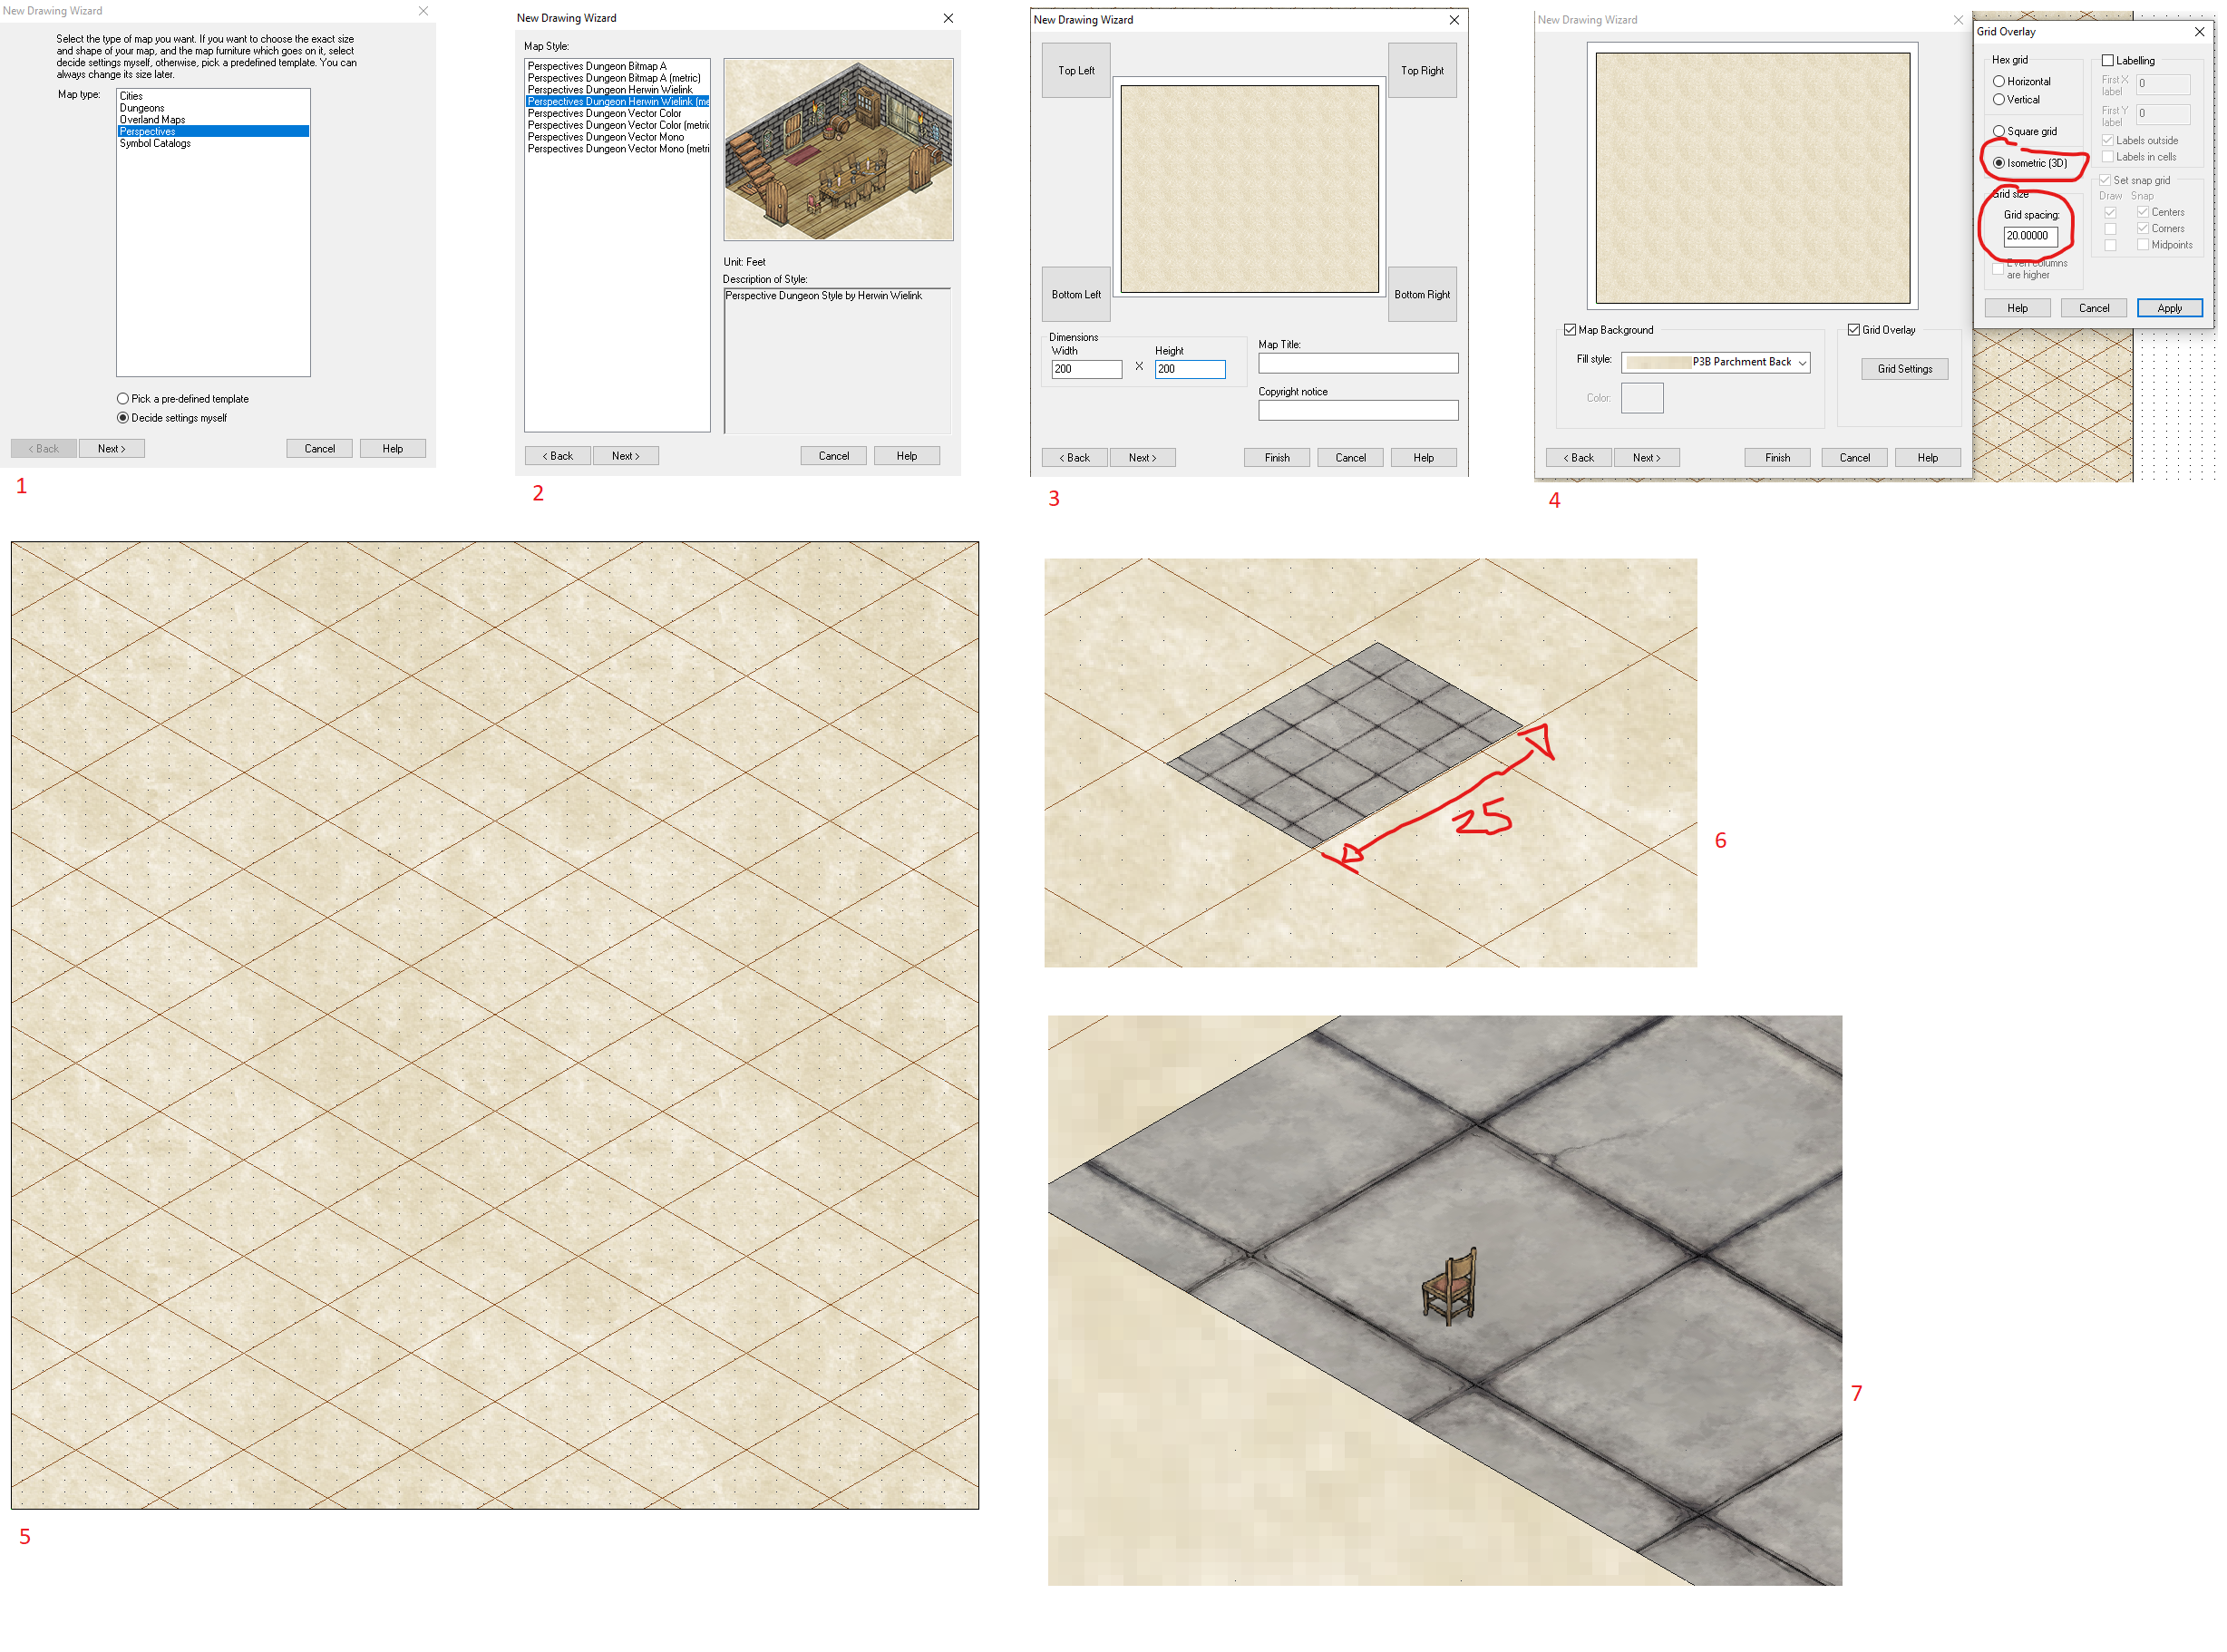
1. I'm starting a new project using Perspectives.
2. I choose a metric theme.
3. To have some margin I set the map size to 200x200 (meters?)
4. I want an isometric grid so I choose "isometric (3D)". What is grid spacing and what does "20" indicate in this area? For this example, I'll go with suggested 20.
5. It generates this work area.
6. I Draw a line and enters "25m". As in 25 meters, right? The long side of the long house.
7. All furniture is small as heck. See image. Where do I mess up the scale?
I would like each square of the isometric guides to be 1x1 meters. Regardless of "grid spacing" the furniture looks small as ants. OR is it the floor pattern that is too big? I can't make heads or tails out of this.
If I choose 200x200 map with grid spacing 1 then the furnitore looks ok IN RELATION TO THE GRID, but then the floorplanks, or flagstones, look huge.
Please, can someone explain? Thank you in advance.
Background: I am working in a small team, designing an new RPG and I tried picking up this software since it would speed things up quite a bit for us from doing all the interiours hand painted. I have a fairly good understanding of vector and have been using Illustrator for quite a few years. I can't quite get the hang of Perspectives scale though. Hoping for help from this community before rage quitting and asking for a refund and going toward Hobyte's isometric software instead.
My process so far: I am going to create a tavern in a sort of a viking long house. I'm thinking an interior area of ~25x15 meters.
See attached image.
1. I'm starting a new project using Perspectives.
2. I choose a metric theme.
3. To have some margin I set the map size to 200x200 (meters?)
4. I want an isometric grid so I choose "isometric (3D)". What is grid spacing and what does "20" indicate in this area? For this example, I'll go with suggested 20.
5. It generates this work area.
6. I Draw a line and enters "25m". As in 25 meters, right? The long side of the long house.
7. All furniture is small as heck. See image. Where do I mess up the scale?
I would like each square of the isometric guides to be 1x1 meters. Regardless of "grid spacing" the furniture looks small as ants. OR is it the floor pattern that is too big? I can't make heads or tails out of this.
If I choose 200x200 map with grid spacing 1 then the furnitore looks ok IN RELATION TO THE GRID, but then the floorplanks, or flagstones, look huge.
Please, can someone explain? Thank you in advance.
Comments
The tutorial PDF never mentions anything about scaling or grid settings it justs "make a room 5 by 6 squares and voila!" and everything is in scale.
Also; how to edit/add an isometric grid overlay AFTER the projects already started? Or change the grid spacings afterwards?
As you mention, the furniture looks ok in relation to the grid spacing here, it is the floor textures that are mis-sized.
Seems the metric template isn't properly configured.
You can change the scale of the fill through the fill style dialog to make it more appropriate.
Adding a grid after creating the map is done through the Draw menu --> Hex or Square Overlay
Is there any way to change this permanently? And what/how would I change that? Because I'm guessing this is putting poltergeists in every setting I try to change because all meassurements are getting fracked up while trying to use this template.
Instead of starting a new map from the template, go to file --> open, browse to @Templates\Perspectives\Wizard, change the file type to CC3+ FCT template, and open up herwin wielink metric template.
Now, from here, open the fill style dialog, and change the scaling of every fill by multiplying it by 0.3048 (feet to meters conversion).
When done, save the template, and any new maps created from it will have the new fill scaling.
The Unit: Feet in your images is just a text string in a description file indicating the intended unit of the map. Changing this doesn't do anything, it is just information to the user. It is found in a text file in the same folder as the template.
I've notified ProFantasy so they can fix the template in the installer.
Is this also possible to change by editing the template somehow?
The simplest option is just to use the Wall, choose thickness for the first wall, and then enter in 0.3048 for the width (to make it 1' wide under the metric template, of course, you are free to use more logical values for metric, like 0.20 to make it 20cm wide). From then on (untill you restart CC3+, change the map, or use a different setting) you can then just use Wall, current thickness, as that will continue to use the thickness you specified last time.
It is also possible to change that menu by adding the following line to @system\perwall.mnc:
Wall, 20cm thick:|IWALL;0.2;
(Note that this menu option WILL replace the current thickness value when you use it, it is really just calling the current thickness command, but also supplying a value directly instead of asking you for it. Also, since it is not unit aware, 0.2 will mean 20 cm under the metric template, but if you ever use an imperial template, that will be 0.2 feet)
One final scaling question regardin Dungeon Designer, though, if I may since you were so quick and helpful with the first ones
Using the annual 2020 inked dungeons I am experimenting with wether I'm to use crosshatch or "dirt" outside my dungeon walls. I think I'm leaning towards the dotted dirt outside BUT I would like to make a copy and adjust the size of the filling so that the dots are much denser close to the walls, and then use the original as a background to make the dots a bit less dense.
This (attached #1) is the standard pattern that I would like to edit in a copy. I find the option for editing the SAMPLE width (as you can see in attached #2), but the final result is the same
As it is now the wall outline differs to little to the "dusty floors" of my grottos :P
Any tips?
The fill in those tools are hatch styles. This kind of fill is defined in separate files.
To check which fill the tool is using, click Advanced, select the tool in the list, click Outline, then Properties int he new dialog. You'll notice that the radio button for use hatch style is selected, and the dropdown shows the currently selected file for this tool.
These files are stored in @Hatch Styles
As always, I don't recommend you edit the original file, so just make a copy of the correct file, then edit it in CC3+. To change the scale, just use Scale
Now, you can make a clone of the orignal drawing tool, and then just chaneg the hatch style to your newly scaled file.
Is it possible to add a wall outline with one style of hatches and then, later, just select all the areas and change drawing tool/style or do I have to redraw everything?