

Mapping scales and creating symbols in cc3+
 LadieStorm
🖼️ 50 images Surveyor
LadieStorm
🖼️ 50 images Surveyor
Hey everyone. I need help, please.
As you all know, I'm working on my latest color wash project, which I posted here yesterday... the Guild World map Yilseudor. I'm getting really close to the end, I only have a few things left to do: finishing my roads, labeling, and map scale.
I have a confession to make. I have NEVER really understood scaling when it comes to map making. Let me amend that. I have never really understood how to determine distance in map scaling. It's probably fairly obvious to some, and if it's not... well, up to this point I must have been faking it really well!
Now I have read, and even followed the Tome on this subject. But I still don't really UNDERSTAND it. More importantly, I don't understand how to set the scale of my Yilseudor map so that it isn't out of proportion with the rest of the guild maps. Which I will have the same issue when I start working on the community atlas here.
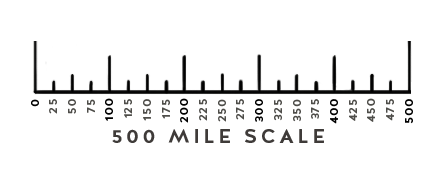
And then there is how to create symbols. There is a particular scale we are supposed to use. I need to turn it into a symbol to use in cc3+, and I have no idea how to do that.
I've posted the image, I just need to know how to turn it into a symbol.
As you all know, I'm working on my latest color wash project, which I posted here yesterday... the Guild World map Yilseudor. I'm getting really close to the end, I only have a few things left to do: finishing my roads, labeling, and map scale.
I have a confession to make. I have NEVER really understood scaling when it comes to map making. Let me amend that. I have never really understood how to determine distance in map scaling. It's probably fairly obvious to some, and if it's not... well, up to this point I must have been faking it really well!
Now I have read, and even followed the Tome on this subject. But I still don't really UNDERSTAND it. More importantly, I don't understand how to set the scale of my Yilseudor map so that it isn't out of proportion with the rest of the guild maps. Which I will have the same issue when I start working on the community atlas here.
And then there is how to create symbols. There is a particular scale we are supposed to use. I need to turn it into a symbol to use in cc3+, and I have no idea how to do that.
I've posted the image, I just need to know how to turn it into a symbol.
Comments
I'm just asking, because it looks like a guide to draw a scale, rather than a finished scale.
That being the case, then it would probably be easier to import this guide into your map as an image, adjust its size until its about right compared to the others, and then use that as a marker to scale and paste one of the considerably more attractive scale bars we have as ready made symbols.
I am a bit surprised that the scale wasn't already shown on the blueprint map you were presumably given to trace for your country.
Are there any indications of dimensions and distances on that original map?
Everything is much easier if you scaled your map correctly in the first place, because then you can use CC3+'s measurement tools like distance and area. However, if you find that your map scale is wrong when you plan to insert the scale bar, you have two options, either rescale the entire map, or scale the scalebar to an equally wrong scale as the rest of the map. The last option is simpler works if you just plan to give people an exported image of your map, but if anyone should use the .fcw, you should scale the actual map instead.
In your case, since that scalebar is just an image in the first place, so it isn't to scale in the first place anyway, so this is the procedure I would recommend.
1. Place the scalebar image in it's permanent home, and not some temporary location. Preferably somewhere inside your CC3+ data directory.
2. Use Symbols -> Import png's and use it on the folder you placed the scalebar. Enable the option to create other resolutions.
3. After importing, click the 'symbols in drawing' button on top of the symbol catalog window, and scroll down, find your scalebar, and place it in your map at scale 1.0
4. Now, you need to measure some values and do some math. First, figure out the scale of your actual map. You can do this by using the Distance tool (from the info menu) and measure something in your drawing. Let us say you measure the width of an island, and CC3+ says it is 75 wide, but you know it is supposed to be 25 miles. Just divide the measured number by the real number, and you find out how "wrong" your map is. In this case, that's 75/25 = 3
5. Then do the same with the scale bar you inserted. You know it is supposed to be 500, but for the example, let us say that you measure it and it is 200. Again, take the real number divided by the measured number, which in this example is 500 / 200 = 2.5
6. Finally, to find the real scale factor, multiply the two numbers: 2.5 * 3 = 7.5
7. Finally, use Non-visual scale (right click the scale button) on the scale bar, and scale it by this last number (7.5). By doing this, we corrected it both for the wrongness of your map (if any) and for the size of the image which had an unknown scale to begin with)
8. Now move the scale bar to wherever you want it, but make sure to not scale it any further.
(Instead of using steps 2 & 3 to turn it into a symbol, you could just have used Draw -> Insert file to insert the image files instead.)
I wonder just how many of them would actually match up properly if all the scales were shown side by side?
What I'm saying is, I don't think anyone will notice if you get it maybe a few mm wrong either way in your individual map, as long as it 'looks about right'
EDIT: The PS and GIMP users have this part of the job really easy, since I presume the scale bar is set to the same resolution as the original plan that you imported to trace from, so all they have to do is just import it and leave it exactly as it is - two layers in one PS file. If you can remember how you scaled the plan when you imported it for tracing, then do the same with the scalebar.
For speed, if you wish, send me the unaltered base map and the unaltered scale bar, and I will combine them both in one image, which you can then substitute for the original trace image you used by saving it over the top of that trace image wherever it is, and the next time you open CC3+ the scale bar will be there ready for you to trace, just like you traced the original plan of the landmass.
I hope that makes sense to you
I will look into all of this when I get ready to place my scale. But that will be the almost last thing I do.
Right now I'm working on my text labels. I thought I would use the red like the cartouche, but I'm not sure I like it, so I'm looking for some feedback on this.