

Command of the Week - Node Editing (Week 45)
 Monsen
Administrator 🖼️ 46 images Cartographer
Monsen
Administrator 🖼️ 46 images Cartographer
Index
- List (Basic)
- Symbols Along (Intermediate)
- Fractalise (Intermediate)
- Edit Text (Basic)
- Link with Map/File (Intermediate)
- Offset (Intermediate)
- Measuring Tools (Basic)
- Change like draw tool (Basic)
- Modifiers (Intermediate)
- File Paths (Intermediate)
- Complex Shapes [Combine Path] (Intermediate)
- Complex Shapes [Multipoly] (Intermediate)
- Break (Intermediate)
- Map Notes (Basic)
- Coordinates (Intermediate)
- Macros (Advanced)
- Search Files for Text (Basic)
- Text Justification (Basic)
- Mirrored Polygons (Intermediate)
- Managing Drawing Tools (Intermediate)
- Named Views (Basic)
- Symbol Lookup Sheets (Intermediate)
- Symbol Catalog Settings (Advanced)
- Symbol Catalog Filters (Advanced)
- Symbol Control Points (Advanced)
- Define Symbol (Intermediate)
- Curves (Basic)
- Selections (Intermediate)
- Sort Symbols in Map (Basic)
- Extract Properties (Basic)
- Convert File (Basic)
- Get Extents (Advanced)
- Quick Move (Basic)
- Menu Editing (Advanced)
- Trace (Basic)
- Array Copy (Intermediate)
- Explode (Basic)
- Clipboard Copy (Basic)
- Rename & Reorder (Intermediate)
- Drawtools Edit (Basic)
- Trims (Basic)
- Symbol Attributes (Intermediate)
- Fill Style Selection Mask (Basic)
- Browse Files (Basic)
- Node Editing (Intermediate)
- Automatic Sheet Selection (Basic)
- Scale (Basic)
- Text along a Curve (Basic)
- Shaded Polygons (Intermediate)
- Fill with Symbols (Intermediate)
- Global Sun (Basic)
- Symbols in Area (Intermediate)
This series is called the command of the week, but it could also explain a feature. The explanations will tend to explain the technical parts of the command, and is intended to highlight the basics (and complexities) of the command, and information about how to use it, but won't be a detailed tutorial. It is up to you to use it creatively in your maps.
Week 45 - Node Editing
For larger edits of of landmasses and other terrain features, we have the ability to edit with drawing tools, but there are situations where you need to manipulating single nodes in your entities. This may be to add more nodes, delete existing ones, or move them around. For this purpose, we have a set of node editing tools in CC3+Where to find them?
Toolbar: [Image_9661], [Image_9660], [Image_9659]Menu: Edit -> Single Entities -> Delete Node, Add Node, Dynamic Edit
Command Line: DELNODE, ADDNODE, DYNEDIT
What is a node?
[Image_9664]
The shape of an entity is defined by one or more nodes. Each node is a single point in the drawing, and the shape of an entity is defined by drawing a line between these nodes, in order, so that any two nodes forms the ends of a line segment from the entity. In most cases, nodes appear where the outline of the shape changes direction, also known as a corner. One of the most simple tpye of entities, a rectangle, contains four nodes, one at each corner, while a fractalized landmass may contain thousands of them.However, a node doesn't have to represent a visible corner, for example, if three or more nodes are arranged along a straight path, they will technically form two line segments, but visually, it will look like a single long line. Look out for things like this when editing nodes.
Another thing to watch out for is smooth entities. Because of the way the smoothing algorithm works, nodes appear a bit outside the visible outline, and not on the outline itself. To be able to see the location of nodes better, enable frames (Ctrl+F, Tools -> Drawing Aids -> Toggle Frames)
How To use them?
None of these commands are particularly complex to use, but be aware that there are no selection procedure when using these tools, they affect the entity you click on immediately. This means that you need to be especially careful when you have multiple entities overlapping in the same spot, you might end up editing the wrong one. Also, if you edit multi-part entities, such as an entity with an outline, you need to edit both individually, or delete the outline, then edit the main entity, and then recreate the outline. This is often a faster approach.Deleting a Node
[Image_9663]
Deleting a node is the simplest of the commands. Simply activate the command, and click anywhere on the outline of the entity, and the nearest node will be deleted. Obviously, for the best control of which node to delete, click as close to the actual node as possible, preferably on the actual node itself. Once the node is deleted, the entity will reshape to fit the remaining nodes.
Adding a Node
[Image_9665]
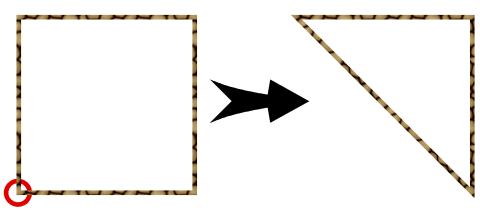
When adding a node, you first need to consider which line segment of the entity you wish to add the node to, and then activate the command and click on that line segment. CC3+ will draw a dynamic preview which updates as you move your mouse, which lets you see how the new shape will look. It is important to realize that the line segment you clicked on will be removed, and will be replaced with the two line segments from the dynamic preview. Once you are happy with the new shape, click to place the node. The new node will then appear in between the two nodes forming the line segment you initially clicked on. Note that since you first select the line segment, and then place the node, it doesn't matter where you click on the line segment in the first step, so just find a convenient spot.One of my most common use of this command is after I have imported part of a landmass (or terrain) to a regional map. Once I am done cropping it and have turned it back into a polygon, it typically doesn't extend out to the corner properly, so it needs another node.
Moving a Node
[Image_9666]
Lastly, we have the command that let us move a node. Simply start the command, and just as with the delete node, click on any edge of the polygon, as close to the node you wish to move as possible. The dynamic cursor will show three lines. The two outermost ones will show the new line segment when you place the moved node, while the third center line goes from the cursor to the current position of the node.The most important thing to realize about this command is that it doesn't end when you click to place the node, it simply carries on, allowing you to move the same node over and over. Usually, you don't need to move any given node more than once, so press ESC to end the command when done.
Note that the dynamic edit command does more than allow you to move nodes, it can also add and delete nodes too. After activating the command and selecting a node, you can hit the INS key on your keyboard to add a node or the DEL key to delete a node. You can also use the left and right arrow keys to navigate around the shape, to indicate the node to edit. By using these features, you can actually do all the node editing you need from a single invocation of the dynamic edit command (Which is why the command doesn't end immediately after moving a node)


Comments