

How to trim a large map down to smaller map

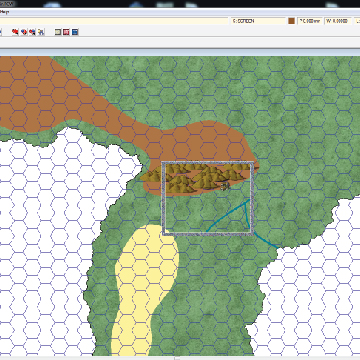
I've searched all over for a tutorial on doing this and tried several ways to do it myself. Attached is an image of what I been trying. The area in the gray square is what should be in the boarder and shown. The rest needs deleted. I manually deleted all other elements and even got trim to work on some of the rivers but the other river is suborn and refuses to trim the correct side of it. I've seen ppl claim there are tutorials but I can't find anyone pointing to where these tutorials are. Sorry if this is all over the place but I can't find anything on it.
Is there any way to do this also without manually deleting all the symbols off the larger map because to get the map to this state it took me about an hour of deleting. I was hoping maybe there is some tool to crop everything outside the boarder. If that isn't possible what is a way to scale a map to a specific area off a larger map that actually works.
Thanks in advance for the help I been trying to do this now for the last 3-4 days and can't figure it out.
Comments
Basically, you save as to a different filename. And edit that down.
Or use my method of a small rectangular bmp of just the area you want, and import, then trace, in a different map.
Though I do have one question when creating a bitmap saving the file how to you save it so that when imported it will keep the same scale in miles so I can get it working right when copying over?
Use the Info Menu -> Distance ability to determine the size of the length and width of the smaller map area.
Label it with the distances inside the hollow square.
Do a 'save as rectangular area' using the hollow square as a guide.
Use the map wizard to create a new map of the same size.
Import the bmp or jpg into the new map onto a bmp layer. You'll have to add the bmp layer to the new map.
Trace over everything.
Delete the inserted bmp.
All done.
I also suggest 'save as' often when making a map. filename01, filename02, filename03, etc. That way if you make am is take further back than undo can handle, you can just load the older map.
I have a tutorial on my site that goes nito greater detail. All my tutorials are free. The link is in the 'large map to small' discussion.
Yes, smoe of my maps have over 100 files due to the above save as.
But I can always go back and take one of them off into another direction for a different area, or a players map.
Not easy to do if you save the map to same filename over and over.
1. If the entity has an outline, delete it first. It is easier to re-apply the outline later than modify it too. To get to the outline, use the erase tool, then click on the polygon. This will select both it and the outline. Then use the And selection modifier to combine it with the color 0 (The outline is almost always black so this should reduce your selection to the outline only).
2. Use the Break
3. Use Path to Poly (right click on the explode button to find this command) on the line. This will revert it back to a polygon.
4. If there was one or more corners between the starting point of the cut and the ending point, the polygon will not fill out the corner. If so, use the insert node
5. Use Outline in Black
While these may initially look like several complicated steps, they are quick and easy to complete.
Note there is also a set of undocumented commands that make this easier. You can enable them by typing CUTMENUON on the CC3 command line, the restarting the program. You should now have an additional menu named Cut which contains a set of features.