

City Walls Macro - can someone get this to work?
![[Deleted User]](https://secure.gravatar.com/avatar/c75d9a245b74d9c59be0999ea81ca541/?default=https%3A%2F%2Fvanillicon.com%2F92add7f8c954488718110edc4896ad39_200.png&rating=g&size=200)
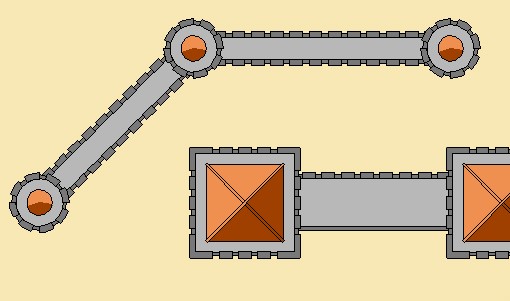
Here is a city macro I found that is supposed to draw really cool city walls that I would love to have in my toolbox for CC3Plus.
Trouble is, I cannot get it to work - can any of our macro experts help here.
INSTRUCTIONS
CITYWALL3
This macro prompts for several items of information, then allows the user to select a series of points. The macro draws a city wall between each point, and inserts a tower on top of each point. The appearance of the wall and towers depends on the provided information (default values in brackets):
1. Wall width. (10)
2. Parapet both sides? (Both)
3. Parapet width. (2)
4. Tower width. (Wall width x 2)
5. Tower style. (square or circle) (circle)
6. Roof style. (flat or peaked) (peaked)
7. Roof walkway width. (5) (Optional: if 'peaked roof' is selected)
All of the macros found in the 'Code' section below are required, but only the macros "CITYWALL3' and 'CITYWALL3TOWER' should be run from the command line. For best results, create a separate macro file for the macros here, and load that file when you need to create city walls.
NOTES:
1. Left clicks draw wall segments, right click to end the wall.
2. Square towers automatically align themselves at an angle midway between the two adjacent walls.
3. Walls will enter and exit a square tower on opposite sides of the tower when the difference in angle between the two walls is less than 55 degrees. Angles greater than this will cause the walls to enter and exit the tower on two adjoining sides of the tower.
4. Parapet widths apply to both the wall and the tower. Towers with peaked roofs will still have a parapet.
5. The minimum size for a tower is equal to the selected wall width, but for best results, select a tower width at least two times that of the wall width.
CITYWALL3TOWER
This macro draws only a tower, located at the point specified. After prompting the user for several items of information, the macro prompts for the tower location point. If a square tower style was selected, the macro also prompts for the tower orientation. The appearance of the tower depends on the provided information (default values in brackets):
1. Tower width. (20)
2. Tower style. (square or circle) (circle)
3. Roof style. (flat or peaked) (peaked)
4. Roof walkway width. (5) (Optional: if 'peaked roof' is selected)
Comments
________________________________________
//Morgan Olden (June 2000)
macro CITYWALL3
ecoff
rdoff
gv ColDS 18
gv ColLS 16
gv ColDR 11
gv ColLR 10
gv WW 10
gv sides 1
gv TWW 5
gv TS 1
gv RS 0
gv WW ^DEnter wall width:
gv sides ^DParapet on both sides? (one side=0, both=1)
gv TW WW*2
gv TW ^DEnter tower width:
ifn TW-20 control1
go control2
:control1
gv TW 20
:control2
gv TS ^DChose tower style (square=0, circle=1):
gv RS ^DChose tower roof style (peaked=0, flat=1):
ifz RS askwalkwaywidth
go skipwalkwaywidth
:askwalkwaywidth
gv TWW ^DTower walkway width (defalt=5, none=0):
:skipwalkwaywidth
gp P1 ^DFirst point:
line P1 ^DNext point:;
gp P2 @0,0
selbyp;erase;
gp wallpoint1 P1;gp wallpoint2 P2
drawwall3
gbrng towerbrng P1 P2
gp towercenter P1
drawtower3
:loop
line P2 ^DNext point:;
gp P3 @0,0
gdist testdist P2 P3
ifz testdist laststep
selbyp;erase;
gp wallpoint1 P2;gp wallpoint2 P3
drawwall3
gbrng B12 P1 P2
gbrng B23 P2 P3
gv towerbrng (B12+B23)/2
gsin offset (B12-B23)
ifp offset control5
gv offset 0-offset
:control5
ifn offset-.8 control6
gv towerbrng towerbrng+45
:control6
gp towercenter P2
drawtower3
gp P1 P2;gp P2 P3
go loop
:laststep
|gp towercenter P2
gbrng towerbrng P1 P2
drawtower3
selbyd
econ
rdon
endm
macro DRAWTOWER3
ifz TS drawsquaretower
:drawcircletower
lwidth 0;color ColLS;fstyle solid;cird TW towercenter;
lwidth 1.5;color ColDS;cird TW towercenter;
color 0;fstyle hollow;cird TW towercenter;
gv OutsideTW TW+.75
gv OutsideCirc OutsideTW*3.1416
gv counter 0
:circcounterloop
gv counter counter+1
gv OutsideCirc OutsideCirc-7.5
ifz OutsideCirc donecirccounterloop
ifn OutsideCirc-7.5 donecirccounterloop
go circcounterloop
:donecirccounterloop
gv OneArcUnit 360/counter/7.5
gv currentangle 0
:circcrenloop
lwidth 2.5;color ColDS;fstyle solid
arcr towercenter OutsideTW/2 currentangle (currentangle+(OneArcUnit*5))
|color 0;fstyle hollow
arcr towercenter OutsideTW/2 currentangle (currentangle+(OneArcUnit*5))
|gv currentangle (currentangle+(OneArcUnit*7.5))
ifp currentangle-360 donecirccrenloop
go circcrenloop
:donecirccrenloop
ifz RS circlepeakroof
:circleflatroof
go done
:circlepeakroof
lwidth 0;fstyle solid
color ColLR;cird TW-(TWW*2) towercenter;
color ColDR
arcw towercenter (TW-(TWW*2))/2 200 350
|color 0;fstyle hollow;cird TW-(TWW*2) towercenter;
go done
:drawsquaretower
gp TP1 ref towercenter <towerbrng+45,TW*.70711
gp TP2 ref towercenter <towerbrng+135,TW*.70711
gp TP3 ref towercenter <towerbrng+225,TW*.70711
gp TP4 ref towercenter <towerbrng+315,TW*.70711
lwidth 0;color ColLS;fstyle solid;poly TP1 TP2 TP3 TP4;
lwidth 1.5;color ColDS;poly TP1 TP2 TP3 TP4;
color 0;fstyle hollow;poly TP1 TP2 TP3 TP4;
gp TP1 ref TP1 <towerbrng+45,.5303301
gp TP2 ref TP2 <towerbrng+135,.5303301
gp TP3 ref TP3 <towerbrng+225,.5303301
gp TP4 ref TP4 <towerbrng+315,.5303301
gdist DTS TP1 TP2
gv DTS DTS-12.5
gv remainder DTS
:remainderloop
ifz remainder doneremainderloop
ifn remainder-7.5 doneremainderloop
gv remainder remainder-7.5
go remainderloop
:doneremainderloop
gv CrenBrng towerbrng-90
gp Cren1 ref TP1 <CrenBrng,(remainder/2)+7.5
gv CrenTDist DTS-remainder
lwidth 2.5;color ColDS;fstyle solid
path ref TP1 <CrenBrng-90,5+(remainder/2) TP1 ref TP1 <CrenBrng,5+(remainder/2);
color 0;fstyle hollow
path ref TP1 <CrenBrng-90,5+(remainder/2) TP1 ref TP1 <CrenBrng,5+(remainder/2);
DRAWCRELLELATION
gv CrenBrng towerbrng
gp Cren1 ref TP2 <CrenBrng,(remainder/2)+7.5
lwidth 2.5;color ColDS;fstyle solid
path ref TP2 <CrenBrng-90,5+(remainder/2) TP2 ref TP2 <CrenBrng,5+(remainder/2);
color 0;fstyle hollow
path ref TP2 <CrenBrng-90,5+(remainder/2) TP2 ref TP2 <CrenBrng,5+(remainder/2);
DRAWCRELLELATION
gv CrenBrng towerbrng+90
gp Cren1 ref TP3 <CrenBrng,(remainder/2)+7.5
lwidth 2.5;color ColDS;fstyle solid
path ref TP3 <CrenBrng-90,5+(remainder/2) TP3 ref TP3 <CrenBrng,5+(remainder/2);
color 0;fstyle hollow
path ref TP3 <CrenBrng-90,5+(remainder/2) TP3 ref TP3 <CrenBrng,5+(remainder/2);
DRAWCRELLELATION
gv CrenBrng towerbrng+180
gp Cren1 ref TP4 <CrenBrng,(remainder/2)+7.5
lwidth 2.5;color ColDS;fstyle solid
path ref TP4 <CrenBrng-90,5+(remainder/2) TP4 ref TP4 <CrenBrng,5+(remainder/2);
color 0;fstyle hollow
path ref TP4 <CrenBrng-90,5+(remainder/2) TP4 ref TP4 <CrenBrng,5+(remainder/2);
DRAWCRELLELATION
ifz RS squarepeakroof
:squareflatroof
go done
:squarepeakroof
gp TP1 ref towercenter <towerbrng+45,(TW-(TWW*2))*.70711
gp TP2 ref towercenter <towerbrng+135,(TW-(TWW*2))*.70711
gp TP3 ref towercenter <towerbrng+225,(TW-(TWW*2))*.70711
gp TP4 ref towercenter <towerbrng+315,(TW-(TWW*2))*.70711
lwidth 0;color ColLR;fstyle solid;poly TP1 TP2 TP3;
color ColDR;poly TP3 TP4 TP1;
color 0;fstyle hollow;poly TP1 TP2 TP3 TP4;
line TP1 TP3;
line TP2 TP4;
color ColDR;fstyle solid;lwidth 1;line towercenter TP4;
color 0;fstyle hollow;lwidth 1;line towercenter TP4;
color ColLR;fstyle solid;lwidth 1;line towercenter TP2;
color 0;fstyle hollow;lwidth 1;line towercenter TP2;
color ColLR;fstyle solid;lwidth 1;line TP1 TP3;
color 0;fstyle hollow;lwidth 1;line TP1 TP3;
go done
:done
endm
macro DRAWWALL3
color 0;lwidth 0;fstyle solid
gbrng B12 wallpoint1 wallpoint2
gdist Dist12 wallpoint1 wallpoint2
gp L1 ref wallpoint1 <B12+90,WW/2
gp R1 ref wallpoint1 <B12-90,WW/2
color ColLS;lstyle solid;fstyle solid;lwidth WW;line wallpoint1 wallpoint2;
color ColDS;lwidth 1.5;line L1 ref L1 <B12,Dist12;
line R1 ref R1 <B12,Dist12;
color 0;fstyle hollow;line L1 ref L1 <B12,Dist12;
line R1 ref R1 <B12,Dist12;
gp Cren1 ref L1 <B12+90,.5
gv CrenBrng B12
gv CrenTDist Dist12
DRAWCRELLELATION
ifz sides done
gp Cren1 ref R1 <B12-90,.5
gv CrenBrng B12
gv CrenTDist Dist12
DRAWCRELLELATION
:done
endm
macro DRAWCRELLELATION
gp CrenS Cren1
:loop
gp Cren2 ref Cren1 <CrenBrng,5
lstyle solid;color ColDS;lwidth 2.5;fstyle solid;line Cren1 Cren2;
color 0;fstyle hollow;line Cren1 Cren2;
gdist CrenDist CrenS Cren2
ifn CrenTDist-CrenDist-7.5 control1
gp Cren1 ref Cren1 <CrenBrng,7.5
go loop
:control1
endm
macro CITYWALL3TOWER
ecoff
rdoff
gv ColDS 18
gv ColLS 16
gv ColDR 11
gv ColLR 10
gv TWW 5
gv TW 20
gv TS 1
gv RS 0
gv TW ^DEnter tower width:
ifn TW-20 control1
go control2
:control1
gv TW 20
:control2
gv TS ^DChose tower style (square=0, circle=1):
gv RS ^DChose tower roof style (peaked=0, flat=1):
ifz RS askwalkwaywidth
go loop
:askwalkwaywidth
gv TWW ^DTower walkway width (defalt=5, none=0):
:loop
gp towercenter ^DPick tower center:
iferr done
ifz TS-1 control3
line towercenter ^DTower angle:;
gp anglereference @0,0
selbyp;erase;
gbrng towerbrng towercenter anglereference
:control3
drawtower3
go loop
:done
selbyd
econ
endm
EDIT: I spent time looking for it while you were editing your posts. Sorry. There is a apparently a "drawwall3" macro that you haven't defined that does the real work of actually drawing the wall segment.
It is supposed to draw city walls as above
(Note that the code visible in Quenten's post isn't complete, when the forum sees a pair of < > it thinks it is an html tag, and hides it, you need to check the actual source)
If it isn't available, it will be for one of these reasons:
- You've edited the macro file improperly. Your new macros may not be properly terminated with ENDM or have extra ENDM in them, or you've accidentally messed up something else int he file when editing.
- You've unloaded the standard macro file.
Could you recheck that it does work on your system, ie the one in the zip file, please? There are no missing or extra endm.
And the file is exactly as is in the zip file - I have not edited it at all.
Does there need to be a blank line after the last endm? (there is in the macro I have)
You could then edit the main macro in the Profantasy folder, with additional parts.
Load and unload the additional macros with the main bit in them.
That way you have a copy of the main macro unedited. And make backups of your changed ones to. In case an update writes over the copy in the cc3plus folder.
Next mission: How can I get it to put the white part of the walls onto the sheet Walls bottom, and towers onto towers bottom, all the crens on the sheet Walls crens, and the tower roofs onto tower roofs, and all the lines underlying the crens onto crens bottom.
Sorry to be a nuisance, but I have 3 excuses:
1. I am hopeless with programming.
2. I want more than I asked for
3. I am an Aussie, so I have to think while standing on my head and being knocked down by kangaroos onto horrid wet sand. 3:)
you can use the command GOSHEET for that. For example, GOSHEET WALLS will switch to the WALLS sheet (and to avoid errors in the macro, will also create it if it doesn't already exist)